Online exam in kiosk mode on a Chromebook for Medical Schools Applied Knowledge Test

We are planning to run the MS AKT this year on Chromebooks at our Examination Schools, so that we can examine the whole year 6 cohort in one sitting. However, unlike Inspera – the system we use for most internal computer-based exams – the MSCAA Assessment Suite does not come with a lockdown browser for Chromebooks.

To save others some pain, I thought it would be worth noting down how we have tackled this. The first thing to say is DO NOT go down the same dead end that I did – see The Wrong Way at the end of this post. Instead, use this much simpler process for adding a website to a Chrome kiosk. It’s as simple as:

  • Choose the Organizational Unit to which you want the kiosk to be applied
  • Go to Devices > Chrome > Apps & extensions > Kiosks
  • From the add menu (right), choose Add by URL then type in the name of the site you want to launch, then Save

In order to further lock things down:

  • Specify the list of URLs to allow in Devices > Chrome > Settings > Device. Under Kiosk settings:
    • first block all URLs – enter ‘https://*’ and ‘http://*’ in Devices > Blocked URLs
    • then allow the list of URLs required by the MSCAA by entering them (each on its own line) in Devices > Blocked URLs exceptions.
  • By default, users can escape the kiosk launch when the Chromebook is starting up by pressing Ctrl + Alt + S. If you do not want to allow this, disable Enable Splash Screen bailout in the kiosk app settings – accessed via Devices > Chrome > Apps & extensions > Kiosks then clicking on the name of your kiosk URL.

The Wrong Way
Create and deploy Chrome kiosk apps suggested that I needed to build a Chome kiosk app so, I duly: downloaded Chrome App Builder; created a dedicated Gmail account for the project; registered as a Chrome Web Store developer ($5); created a logo and some screenshots; and attempted to upload to the store so I could deploy to our Chromebooks. At that point, I was told “New Chrome apps will no longer be accepted by the Chrome Web Store” 🙁

Computer Marked Maths now available

MSD Learning Technologies is now able to offer computer marked maths.

We are looking for departments with the University to make use of our project – for formative assessment at this stage. We particularly want to gauge enthusiasm and, ideally, to see examples of the questions which you’d find useful.

Highlights of the maths assessment system:

  1. interacts with Maxima which gives it full algebraic evaluation for simple or complex maths.
  2. allows use of random variables in questions
  3. can calculate and show worked answers
  4. can include control flow functions (if, while, etc, to modify or calculate variables)
  5. supports multiple tests on an answer (eg is it simplified? is it algebraically correct?)
  6. supports multi-part questions
  7. supports SI units
  8. supports questions requiring significant figures and decimal places

We have integrated with WebLearn, so you can offer assessments via your existing WebLearn sites. Assessments can also be provided as a standalone service using SSO if that is required.

The sponsorship of this project is through the IT Innovation Fund so we can offer this to any part of the University.

QuestionMark Perception’s GetScheduleListByParticipant method in QMWISe

PLEASE NOTE: I’m looking further into why this may be happening after a very useful chat with Questionmark’s Richard Ham so watch this space…

If you’re using QuestionMark Perception’s GetScheduleListByParticipant method through their QMWISe API and the Questionmark Basic LTI Community Connector (I don’t know about the LTI Connector for Questionmark OnDemand) then this is a quick heads up about a problem that I’ve just encountered in v5.4. We use this method to work out whether students are currently scheduled for a given assessment through a (rather inelegant) check of whether the AssessmentID they are trying to access is the same as the AssessmentID of one of the assessments they are scheduled for and, if that schedule is time-limited, whether it is currently open.

The problem is that, for reasons that are probably die to the way that PHP deals with a SOAP return , GetScheduleListByParticipant returns a different object structure depending on whether the one or more schedules are returned. For one schedule (with print_r()):

stdClass Object
(
    [Schedule] => stdClass Object
        (
            [Schedule_ID] => 111111111
            [Assessment_ID] => 1111111111111111 
            [Participant_ID] => 0 
            [Group_ID] => 111111111 
            [Schedule_Name] => Quiz 1 
            [Restrict_Times] => 1 
            [Restrict_Attempts] => 
            [Max_Attempts] => 0 
            [Monitored] => 0 
            [Schedule_Starts] => 2013-12-03T00:00:00 
            [Schedule_Stops] => 2013-12-04T00:00:00 
        )
)

Whereas with more than one schedule:

stdClass Object
(
    [Schedule] => Array
        (
            [0] => stdClass Object
               (
                   [Schedule_ID] => 1111111
                   [Assessment_ID] => 1111111111111111
                   [Participant_ID] => 0
                   [Group_ID] => 111111111
                   [Schedule_Name] => Quiz 1
                   [Restrict_Times] =>
                   [Restrict_Attempts] =>
                   [Max_Attempts] => 0
                   [Monitored] => 0
                   [Schedule_Starts] => 0001-01-01T00:00:00
                   [Schedule_Stops] => 0001-01-01T00:00:00
               )
            [1] => stdClass Object
               (
                   [Schedule_ID] => 2222222
                   [Assessment_ID] => 2222222222222222
                   [Participant_ID] => 0
                   [Group_ID] => 222222222
                   [Schedule_Name] => Quiz 2
                   [Restrict_Times] => 1
                   [Restrict_Attempts] =>
                   [Max_Attempts] => 0
                   [Monitored] => 0
                   [Schedule_Starts] => 2013-12-03T00:00:00
                   [Schedule_Stops] => 2013-12-04T00:00:00
               )
            [n] => and so on...

The real problem with is when you compare desired AssessmentID with scheduled AssessmentID in a for loop:

$schedules = get_schedule_list_by_participant($participant_id)) //method which calls GetScheduleListByParticipant
foreach($schedules->Schedule){
    ... //check each schedule
    }

It works fine until you come across a student with only one schedule, at which point it breaks as it tries to iterate through the properties of the only schedule returned. Until we can work out something else, the simplest solution is to check the number of schedules returned before deciding how to evaluate them:

if(count($schedules->Schedule)>1){ 
    foreach($schedules->Schedule as $schedule){
        ... //check each schedule
        }
    }
elseif(count($schedules->Schedule)==1){ 
    ... //check this schedule
    }

Haven’t checked whether behaviour is the same with the other QMWISe methods but I wouldn’t be surprised….

MSDLT Update May-Oct 2013

Teaching Excellence Project Award for mobile technology

New user-friendly interface for My Workspace Resources for Biomedical Sciences students in Sakai/WebLearn

Bringing Biochemistry TLTP software up to date

And progress with: online maths assessment; project choosing; clinical sign-off and the History of Medical Sciences website

Get your copy here: ETSGMSDLTNewsMaytoOct2013.

Maths with QTI – Response Processing

From my experience, the responseProcessing section of a QTI XML file is the most complicated. It is the place where you check whether the user has given the correct response, deal with incorrect responses, and display the appropriate feedback. In theory it could be very simple, if you are just checking whether an answer is correct, showing the ‘correct’ feedback if it is and showing ‘incorrect’ feedback if it is not. However, it is possible to give much more tailored feedback than this, pointing users in the right direction if they have made a common mistake.

Another common use of the responseProcessing is to show a hint and/or a solution if the user requests it. For a generic structure for doing this, please see the Solution and Hint post.

responseProcessing Start and End

<responseProcessing>
<!-- Response processing goes here -->
</responseProcessing>

responseConditions

General Structure

This is the general structure for if…else if…else statements for dealing with responses. responseCondition statements can be nested within each other to create complex hierarchies of conditions.

<responseCondition>
   <responseIf>
   </responseIf>
   <responseElseIf>
   </responseElseIf>
   <responseElse>
   </responseElse>
</responseCondition>

Simple Example

In this example, the RESPONSE is tested for being NULL, in which case a score of 0 is given, and no feedback shown, so the user can just have another go. Next, RESPONSE is tested for being equal to ANSWER (i.e. the response is correct), in which case the CORRECT feedback is shown and the score is set to 1. Otherwise, the INCORRECT feedback is shown and the score set to 0.

<responseCondition>
   <!-- Is the response NULL? -->
   <responseIf>
      <isNull>
         <variable identifier="RESPONSE"/>
      </isNull>
      <setOutcomeValue identifier="SCORE">
         <baseValue baseType="float">0.0</baseValue>
      </setOutcomeValue>
   </responseIf>
   <responseElseIf>
      <!-- Is the response Correct? -->
      <equal toleranceMode="exact">
         <variable identifier="iAnswer"/>
         <variable identifier="RESPONSE"/>
      </equal>
      <setOutcomeValue identifier="FEEDBACK">
         <multiple>
            <baseValue baseType="identifier">CORRECT</baseValue>
         </multiple>
      <setOutcomeValue identifier="SCORE">
         <baseValue baseType="float">1.0</baseValue>
      </setOutcomeValue>
   </responseElseIf>
   <responseElse>
      <!-- Otherwise the response must be incorrect -->
      <setOutcomeValue identifier="FEEDBACK">
         <multiple>
            <baseValue baseType="identifier">INCORRECT</baseValue>
         </multiple>
      </setOutcomeValue>
      <setOutcomeValue identifier="SCORE">
         <baseValue baseType="float">0.0</baseValue>
      </setOutcomeValue>
   </responseElse>
</setOutcomeValue>

Feedback

Empty the Feedback Variable

This empties the feedback ‘multiple’ variable, so any previously shown feedback (from previous response) is removed before we process the current response. The EMPTY variable must have been declared in the Variable Declarations.

<setOutcomeValue identifier="FEEDBACK">
   <multiple>
      <variable identifier="EMPTY"/>
   </multiple>
</setOutcomeValue>

Add Feedback to the Feedback Variable

This defines the feedback sections that will be shown to the user. Multiple feedback sections can be shown by adding multiple identifiers.

<setOutcomeValue identifier="FEEDBACK">
   <multiple>
      <baseValue baseType="identifier">INCORRECT</baseValue>
      <baseValue baseType="identifier">NOTSIMP</baseValue>
   </multiple>
</setOutcomeValue>

Append Feedback to the Feedback Variable

If some feedback has already been defined and you want to add further feedback, you can append another feedback identifier as shown.

<setOutcomeValue identifier="FEEDBACK">
   <multiple>
      <variable identifier="FEEDBACK"/>
      <baseValue baseType="identifier">SEEN-HINT</baseValue>
   </multiple>
</setOutcomeValue>

Comparisons

Equal

This simply compares whether two numerical values are equal. If ‘toleranceMode’ is set to exact, the values must be exactly equal. toleranceMode can also be set to absolute or relative, in which case the ‘tolerance’ must be specified. See the specification for more information.

<equal toleranceMode="exact">
   <variable identifier="iAnswer"/>
   <variable identifier="RESPONSE"/>
</equal>

EqualRounded

This compares whether two values are equal, to a specified level of rounding. The roundingMode can either be decimalPlaces or significantFigures.

<equalRounded roundingMode="decimalPlaces" figures="0">
   <variable identifier="RESPONSE"/>
   <variable identifier="iAnswer"/>
</equalRounded>

Substring contains

<substring caseSensitive="false">
   <baseValue baseType="string">+</baseValue>
   <variable identifier="printMath"/>
</substring>

isNull

This tests whether a value is null.

<isNull>
   <variable identifier="RESPONSE"/>
</isNull>

Custom Operator

Custom operators can be used to carry out more complicated tests, e.g. comparing mathematical responses using the MathAssess engine. The ‘action’ can take one of three values:

  • equal: algebraic equivalence (e.g. factorised and expanded forms are equivalent)
  • syntequal: syntactical equality (e.g. factorised and expanded forms are not syntactically equal)
  • code: allows custom comparison code to be provided

As an example of the difference between equal and syntequal, 1/2 and 2/4 are equal, but not syntequal. 2(x+1) and 2x+2 are equal, but not syntequal.

<customOperator class="org.qtitools.mathassess.CasCompare" ma:action="equal" ma:syntax="text/x-maxima">
   <variable identifier="mAnswer"/>
   <variable identifier="RESPONSE"/>
</customOperator>

The following example of a ‘code’ action tests whether the sum of the two response and answer is 0, i.e. the response is correct, but has the wrong sign.

<customOperator class="org.qtitools.mathassess.CasCompare" ma:action="code" ma:code="is(equal($1+$2,0));" ma:syntax="text/x-maxima">
   <variable identifier="RESPONSE"/>
   <variable identifier="mAnswer"/>
</customOperator>

Operators

And Or

As you would expected, placing two comparisons within an ‘and’ operator gives a true result only if both comparisons evaluate to true. Placing two comparisons within an ‘or’ gives a true result if either (or both) of the comparisons evaluate to true. For or, just use the following snippet and change the <and>/</and> tags to <or>/</or>

<and>
   <equal toleranceMode="exact">
      <variable identifier="iAnswer1"/>
      <variable identifier="RESPONSE1"/>
   </equal>
   <equal toleranceMode="exact">
      <variable identifier="iAnswer2"/>
      <variable identifier="RESPONSE2"/>
   </equal>
</and>

Not

The ‘not’ operators gives the ‘logical negative’ (i.e. opposite, e.g. true => false) of the subexpression. The following snippet will return true if the value of RESPONSE is not null.

<not>
   <isNull>
      <variable identifier="RESPONSE"/>
   </isNull>
</not>


Maths with QTI – Solution and Hint

Use the following chunks of code to add “Show Hint” and “Show Solution” buttons to the question, define the hint and solution that are shown and do all the necessary processing

Variable Declarations

Request variables set to true when user asks for Hint or Solution

<responseDeclaration identifier="HINTREQUEST" baseType="boolean" cardinality="single"/>
<responseDeclaration identifier="SOLREQUEST" baseType="boolean" cardinality="single"/>

Outcome variables for tracking whether the user has viewed the Hint or Solution

<outcomeDeclaration identifier="seenHint" baseType="boolean" cardinality="single">
   <defaultValue>
      <value>false</value>
   </defaultValue>
</outcomeDeclaration>
<outcomeDeclaration identifier="seenSolution" baseType="boolean" cardinality="single">
   <defaultValue>
      <value>false</value>
   </defaultValue>
</outcomeDeclaration>

Outcome variables for tracking whether the user has viewed the Hint or Solution

<outcomeDeclaration identifier="ASKHINT" baseType="identifier" cardinality="single">
   <defaultValue>
      <value>askhint</value>
   </defaultValue>
</outcomeDeclaration>
<outcomeDeclaration identifier="ASKSOLUTION" baseType="identifier" cardinality="single">
   <defaultValue>
      <value>asksolution</value>
   </defaultValue>
</outcomeDeclaration>

ItemBody

Hint and Solution feedback blocks

<feedbackBlock identifier="SOLUTION" outcomeIdentifier="FEEDBACK" showHide="show"> Solution goes here </feedbackBlock>
<feedbackBlock identifier="HINT" outcomeIdentifier="FEEDBACK" showHide="show"> Hint goes here </feedbackBlock>

“Show Hint” and “Show Solution” buttons

<div class="">
   <feedbackBlock showHide="show" identifier="askhint" outcomeIdentifier="ASKHINT">
      <p>
         <endAttemptInteraction responseIdentifier="HINTREQUEST" title="Show Hint"/>
      </p>
   </feedbackBlock>
   <feedbackBlock showHide="show" identifier="asksolution" outcomeIdentifier="ASKSOLUTION">
      <p>
         <endAttemptInteraction responseIdentifier="SOLREQUEST" title="Show Solution"/>
      </p>
   </feedbackBlock>
</div>

responseProcessing

The code below can be used as the framework for the responseProcessing section. The responseProcessing expressions that, for example, idenitfy whether the question has been answered correctly should be inserted at the “***Response Processing goes here***” comment.

<responseProcessing>
   <responseCondition>
      <responseIf>
         <!-- If user has asked for the Hint -->
         <variable identifier="HINTREQUEST"/>
         <!-- Show the Hint -->
         <setOutcomeValue identifier="FEEDBACK">
            <multiple>
               <baseValue baseType="identifier">HINT</baseValue>
            </multiple>
         </setOutcomeValue>
         <!-- Set seenHint to true -->
         <setOutcomeValue identifier="seenHint">
            <baseValue baseType="boolean">true</baseValue>
         </setOutcomeValue>
      </responseIf>
      <responseElseIf>
         <!-- If user has asked for the Solution -->
         <variable identifier="SOLREQUEST"/>
         <!-- Show the Solution -->
         <setOutcomeValue identifier="FEEDBACK">
            <multiple>
               <baseValue baseType="identifier">SOLUTION</baseValue>
            </multiple>
         </setOutcomeValue>
         <setOutcomeValue identifier="seenSolution">
            <baseValue baseType="boolean">true</baseValue>
         </setOutcomeValue>
         <setOutcomeValue identifier="completionStatus">
            <baseValue baseType="identifier">completed</baseValue>
         </setOutcomeValue>
         <setOutcomeValue identifier="ASKHINT">
            <baseValue baseType="identifier">null</baseValue>
         </setOutcomeValue>
         <setOutcomeValue identifier="ASKSOLUTION">
            <baseValue baseType="identifier">null</baseValue>
         </setOutcomeValue>
      </responseElseIf>
      <responseElse> 
         <!-- ***Response Processing goes here*** -->
         <responseCondition>
            <responseIf>
               <!-- If the user has seen the solution, set the score to 0 -->
               <variable identifier="seenSolution"/>
               <setOutcomeValue identifier="FEEDBACK">
                  <multiple>
                     <variable identifier="FEEDBACK"/>
                     <baseValue baseType="identifier">SEEN-SOLUTION</baseValue>
                  </multiple>
               </setOutcomeValue>
               <setOutcomeValue identifier="SCORE">
                  <baseValue baseType="float">0.0</baseValue>
               </setOutcomeValue>
            </responseIf>
            <responseElseIf>
               <!-- If the user has seen the hint, divide the score by 2 -->
               <variable identifier="seenHint"/>
               <setOutcomeValue identifier="FEEDBACK">
                  <multiple>
                     <variable identifier="FEEDBACK"/>
                     <baseValue baseType="identifier">SEEN-HINT</baseValue>
                  </multiple>
               </setOutcomeValue>
               <setOutcomeValue identifier="SCORE">
                  <divide>
                     <variable identifier="SCORE"/>
                     <baseValue baseType="float">2.0</baseValue>
                  </divide>
               </setOutcomeValue>
            </responseElseIf>
         </responseCondition>
      </responseElse>
   </responseCondition>
</responseProcessing>

Maths with QTI – Modifying assessment.xml (for Assessments created in Uniqurate)

To date, I have only created assessments in Uniqurate, so the items in this post just refer to a couple of things I have needed to modify in the assessment.xml (which exists at the top level of the assessment zip file) file to get the assessments working properly.

itemSessionControl

Control whether feedback is shown when reviewing (showFeedback), and whether the user can view the solution (showSolution). The solution is defined by using setCorrectResponse in the templateProcessing. The itemSessionControl tag can be contained within testPart, assessmentSection or assessmentItemRef (individual assessment item) blocks.

<itemSessionControl showFeedback="true" allowReview="true" showSolution="true" />

Test Feedback

For assessments created in Uniqurate, the total (i.e max score) for an assessment seems to be calculated by summing the max scores for each of the individual questions in the assessment, even if it is set up so that questions are repeated. Therefore, as a very simple example, if an assessment has a single section containing a single question, but “Number of questions to choose from section” is set to 2 and “Repeat questions” is switched on, the total/max score for the assessment is set to 1, when it should in fact be 2. This can be fixed by editing the testFeedback section of the xml. Just change the value in the last set of span tags to adjust the maximum score:

<testFeedback identifier="TEST_FB" showHide="show" outcomeIdentifier="TEST_FEEDBACK" access="atEnd">
     <div>You have reached the end of the test. Your total score was <printedVariable format="%.1f" identifier="TEST_total"/> out of <span class="uqfeedbackvar total">2</span>. </div>
</testFeedback>

Note that this example is taken from the default Uniqurate output, you can of course define your own feedback, displaying any of the variables defined in the outcomeProcessing section of the assessment.xml file.

Maths with QTI – Explanation of Help Guide for Maths Entry Questions

Here’s the link to the Help Guide for Maths Entry Questions, if you’ve come here looking for that. This post explains why we’ve created that guide.

We’re starting to deliver Maths questions online using QTIWorks, and are putting together a help guide for users, as it is not always easy to know how to correctly represent mathematical expressions in a maths answer box.

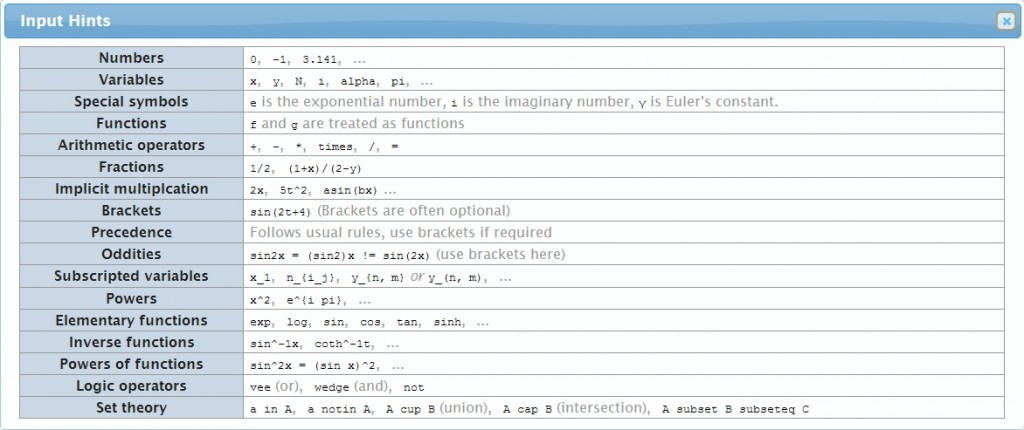
The “Input Hints” provided in QTIWorks are of some help, but are perhaps not the most user friendly and could be improved by the addition of examples, and perhaps some reordering to place the simpler and more commonly used inputs nearer the top of the list.

QTIWorks Input Hints
QTIWorks Input Hints (click to view full size)

To supplement (/replace) this hints box, I’ve started to write a (hopefully) simple guide to using the maths input box, with some examples. This is a work in progress, so will evolve, but hopefully is a reasonable starting point. Any comments are very welcome.

Maths with QTI – Things I wish I’d known before I started

Writing maths questions in QTI has been a bit of a learning curve, and I took my (/everyone’s?) usual approach of diving straight in and trying things out, without spending too much time reading the specification. As a result, there have been some things that I didn’t really understand when I started, but have realised along the way, and really wish that I had  taken the time to find out before I started. As with pretty much all of my QTI-related posts, this is a work in progress and will probably be updated as and when more things that I should have known crop up!

The meaning of adaptive (for an assessmentItem)

I didn’t really look too much at the assessmentItem properties when creating new questions, I just copied an old question, changed the identifier and title, and added extra namespace definitions if I found I hadn’t defined one that I was using (e.g. MathML or MathAssess) when I tested the question. I didn’t really pay attention to the ‘adaptive’ property, and didn’t notice that on some questions it was true and some it was false.

It was not until I put tests together and tried them out that I found out that items for which adaptive was set to false only allowed a single attempt. Since these are formative questions, I wanted students to be able to have multiple attempts, see a hint, see the solution, etc, which means setting adaptive to true. Therefore, had to go back through lots of questions, change adaptive to true and then re-add them to my tests.

What setCorrectResponse does

The name of the setCorrectReponse class gives a pretty good hint as to what it does, but I hadn’t fully understood it. As well as setting the correct response for a response variable (explained below), it is also used for displaying the model answer when a student is reviewing a test. If the test is set up to allow solutions to be shown when reviewing (using <itemSessionControl showSolution="true" /> in the testPart in the assessment.xml file for the test), the user can then choose the show the model solution by clicking the “Show Solution” button. This replaces their answer in the answer box with the model solution. The can switch back to the answer they gave by clicking the “Hide Solution” button.

To summarise the setting/getting of a correct response in an asssessment item, there are two ways to assign a correct response to a response variable:

  1. When declaring the response variable:
    <responseDeclaration identifier="RESPONSE" cardinality="single" baseType="float" >
       <correctResponse>
          <value>5.2</value>
       </correctResponse>
    </responseDeclaration>
  2. Using setCorrectResponse in templateProcessing. This is often more useful as the correct response can be assigned after template variables have been set and/or calculated.
    <setCorrectResponse identifier="RESPONSE">
       <variable identifier="fAns"/>
    </setCorrectResponse>

It is then possible to get the correct response for a response variable, in the responseProcessing, as follows:

<correct identifier="RESPONSE"/>

This can be used for comparing a given response to the correct response:

<equalRounded roundingMode="decimalPlaces" figures="0">
   <correct identifier="RESPONSE"/>
   <variable identifier="RESPONSE"/>
</equalRounded>


Writing Tests in Uniqurate – Tips and Tricks

We are using the QTI specification to create maths questions that can be delivered online. In order to do this we have used Uniqurate, partly as a tool for writing questions (although the vast majority of questions have been ‘hand-coded’ in QTI XML, due to their complexity), but mainly as a tool for bringing questions together into  tests.

I thought I would share a few things that have made my life easier when using Uniqurate, in case they are useful to anyone else:

  • Use ‘Enter’ (carefully!) to confirm actions – Uniqurate often asks for confirmation, e.g. when deleting questions, using a pop up box. This can make deleting lots of questions an annoying process if you use the mouse to click the OK button in the confirm box. However, if you just click the delete button (rubbish bin) and then hit the enter key, this will confirm, so you can delete lots of questions quickly. Needless to say be very careful when doing this!
  • Go back to the main menu if it starts misbehaving – Uniqurate sometimes starts misbehaving, e.g. not adding questions properly. If this happens, just go back to the main menu, then click the “Edit current test” button to return to the edit screen.
  • Click on the Section name to edit it – it’s not immediately obvious, but you can edit section names by clicking on/selecting the current name of a section and then typing in the new name.
  • To move a question, click on white space, not the question name – You can drag and drop questions within a section (but unfortunately not from one section to another). To do this, you need to click on the white space to the right of the question name, not on the question name itself (doing so just selects the text).
  • “Add question to section” link only works when the mouse cursor is an arrow – Depending on your browser (I’m talking about IE10 on Windows), the pointer will be one of an arrow, a pointer (hand with pointed figure) or a text cursor when you hover over the “Add question to section” link, depending on which part of the link you are over. It only seems to actually work as a link when it is the arrow, so move around until you get an arrow before clicking!
  • Check the total score when you have repeated questions – see the post about modifying assessment.xml for more information

I will add any further things as and when they crop up.