Embedding a GitHub gist in Instructure Canvas

I needed to have syntax highlighted code embedded in Canvas. While there are a couple of LTI tools that purport to allow embedding of code, LTI tools receive data about users which mean that using those hosted by third parties comes with issues around vetting of the tool provider for compliance with GDPR, University regulations, etc.

So, I thought, why not just embed GitHub gists directly? Because GitHub is a widely used source code repository, our coders will know how to use it and our students should know how to use it. You can also reuse existing gists/make code from your course available more widely.

The embedding is achieved by Blair Vanderhoof’s gist-embed . This is a JS library which requires JQuery. Kenneth Larson’s post in the Canvas Community on Mobile Javascript Development provided the solutions to both:

  1. Making sure that JQuery was available for gist-embed (both on the Web and in the Student app) and
  2. Giving us a way to upload the gist-embed JS into Canvas.

The JS

The code, as a gist of course :), is below:

You will need access to the Sub-account of the course you wish to use this in – then you simply use the normal Theme editing tools to upload this JS to both the JavaScript file and Mobile app JavaScript file boxes.

The HTML (in a Canvas Page)

Use a <p> tag or similar to embed the gist – the suggested <code> tag from  Blair Vanderhoof’s gist-embed instructions is stripped out by Canvas when you go to Edit it:

One thing to note is that, if you have long lines in your code, it may be easier for those using the Student app if you leave leave the footer in the embedded code so that they can click to see it in GitHub.

The end result

The fine print

Please do heed Canvas’s warning:

  • Custom CSS and Javascript might cause accessibility issues or conflicts with future Canvas updates. Before implementing custom CSS or Javascript, please refer to our documentation

  • CAVEAT: while you can create and embed ‘secret’ gists, they work with a private url which means that, while they should be difficult to discover, they are visible to anyone with the URL. So don’t use this with code which is top secret!

A dashboard view of Modules in Canvas v2

This is a follow-up to my original post about autogenerating a dashboard view of the Modules page in Canvas.

IT IS STILL VERY MUCH A WORK IN PROGRESS SO SEE CAVEATS AT THE BOTTOM AND PLEASE DO CONTRIBUTE YOUR OWN IMPROVEMENTS – there are some TODOs in the .js file on GitHub

Canvas dashboard-like tiles generated for each Module in Modules:

  • Optional images are shown on each tile if there is one or more images in a folder called ’tiles’ (configurable) in Files.
  • Clicking on the body of the tile takes you to the appropriate part of the Modules page
  • Optionally, a drop-down menu (click the black arrow) will list the items in a Module. Clicking the item will take you to that item

There are now two possible use scenarios:

Option 1: Modules page as Home:

  • Tiles with drop-downs inserted at top of Modules page
  • Top buttons inserted in each Module to take you back up to the tiles
  • LH border of each module coloured to match tile colour

Option 2: Pages Page as Home:

  • Tiles replace a table in a Page which is set as Home
  • Whether or not the drop-down menu for items is shown is configurable, based on table id
Tiles only (no drop-down list of items)
Tiles AND drop-down list of items

How to use

  1. You will need to get the .js and .css from: https://github.com/msdlt/canvas-module-tiles (‘Clone or download’ button then ‘Download ZIP’)
  2. In the sub-account where you want the tiles to show (it may be worth creating a sub-account specifically for one course), go to ‘Themes’, add a new theme then roll over your new theme to click the ‘Open in theme editor’ button.
  3. Click the ‘Upload’ tab (top left) then select the .css and .js files in the ‘CSS file’ and ‘JavaScript file’ upload boxes FOR THE ‘Canvas desktop application’ ONLY – this code will not currently work in the student app – more on that later.
  4. Click ‘Preview your changes’ then have a look through to check everything is working OK on your site before clicking ‘Save theme’ then ‘Apply theme’.
  5. If you now set the Modules page as your Home, you should see the tiles appearing in the web.
  6. In the student app, students will see the Modules page as normal.

Using tiles on a Home Page (created in Pages)

  1. Create your Page
  2. Insert a table and then use the HTML Editor to set its id attribute to be either homePageTable or homePageTableTilesOnly as shown here: 
  3. On the web, this table will be replaced with:
    • if id=”homePageTable” – tiles with drop-down item menus
    • if id=”homePageTableTilesOnly” – just tiles for each module (useful if you have a lot of items in each Module).
  4. In the student app, the table you inserted in 2 will not be replaced with tiles as this is not yet possible. To give student app users an equivalent experience, I suggest that you populate your table with links to each of your modules as shown below:

This is very easy to do in the standard Page editor by typing the name of your Module into the table, then selecting that name and clicking on the name of your Module in Links | Modules in the right hand panel:

Adding images to your tiles

  1. Create a folder in Files called ’tiles’ (note that you can change which folder the script looks in for images by changing the string assigned to ’tileImagesFolderName’ in the .js file.
  2. Upload images the images you wish to appear on the tiles:
    • tile images are centred so make sure the images you choose have plenty going on in the middle as the portion of the image shown will change according to screen size.
    • keep the images fairly small so as not to slow down page load too much
    • images are shown on tiles in alphabetical order by their name

Caveats

  • If you are using an images (e.g ’tiles’) folder to show images on each tile, students will have to be given access to the Files tool on their LH menu. If you do not want them to have access to this there is currently no way to show images – sorry!
  • Student app:
    • This won’t currently work on the student app as we still have no way of getting the Course ID from within the app and so there’s no way of knowing which ID to pass the  api.
    • Even if we had the Course ID (we could hard code it into the .js file and have a sub-account/js for every Course), we will not be able to write this dashboard into the Modules page in the app as it appears to be native code (rather than a web page). However, it might work in a Home Page – not tested yet! 
  • Even though this method now relies mostly on the structure of the Canvas apis, which should be fairly stable, it does still rely on current the structure of Canvas’s pages to some extent – much more so in the Modules page option than in the Home Page option – I fully expect this to break at some point as Canvas changes it’s structure so be warned….
  • I haven’t yet added icons in the drop-down list for all the Canvas item-types – do please share your updates
  • I haven’t yet sorted out the column styles for cases where noOfColumnsPerRow is not 4 – again, please do share any updates
  • Note that the tile generation is ONLY fired if the Modules page or your Page containing the table with the special id is your Course’s Home and tiles will not be shown when navigating to the Modules page or your Page directly.

As always, I’d love any suggestions for improvements or to hear about how you have adapted it for your needs.

Angular Reactive Form Custom Validator for ORCID (plus Laravel rule)

Since I struggled a bit with putting this together, thought it might be useful to document it.

ORCID provides a handy guide to the Structure of the ORCID Identifier which includes a little function that calculates the 16th ‘checksum’ character of every ORCID id. This is a great way to check that a user hasn’t mis-typed/mis-copied their ORCID id into a form.

Our Angular validator for reactive forms is shown below:

All this really does is wrap that check digit generator from the ORCID website. To use this in a reactive form, the relevant bits of code are shown below:

If anyone can write me a bit of regex to check that the rest of the URL, after https://orcid.org/ is xxxx-xxxx-xxxx-xxxx, I’d be very grateful!

Finally, in the html (note am using Angular Material here), check for errors on the orcid FormControl (available like this  because of line 20 above) and display the approprioate <mat-error>.

…and if you’re saving your ORCID ID in a Laravel api backend as I am, the same checksum validation as a Laravel Rule:

…and in the update method of my UserController, the validation rules look like:

Note: the ignore clause on the unique rule would not be required in the store method as this user’s id and ORCID id would not be expected to already exist

Any suggestions for improvements gratefully received.


Styling & Layout in Instructure Canvas

Your first stop for any questions re: styling components and layout should be Canvas’s Style Guide

Styling

Table

Give your tables a Bootstrap feel with, striped rows, hover highlight, etc (see CANVA101 course for full description)

Header row, striped rows and, in second picture, showing hover effect on Week 1
<table class="ic-Table ic-Table--hover-row ic-Table--striped" style="border-collapse: collapse; width: 100%;">
    <thead>
        <tr>
            <th style="text-align: center;">Week</th>
            <th style="text-align: center;">Tasks</th>
        </tr>
    </thead>
    <tbody>
        <tr>
            <td style="text-align: center;">1</td>
            <td>Week 1 tasks</td>
        </tr>
        <tr>
            <td style="text-align: center;">2</td>
            <td>Week 2 tasks</td>
        </tr>
    </tbody>
</table>
Icons for links

Canvas icons can be shown on the left of any link (see Pauleds guide for full list of icons)

Add a huge range of Canvas icons to links
<a class="icon-twitter" href="https://twitter.com/allotmentor">Follow me on twitter</a>

Layout

While Canvas appears to provide parts of Bootstrap 3, JQuery UI and Flexbox Grid, not everything is available within an individual page.

Grid

When setting out grids, instead of:

<div class="row">

, use,

<div class="grid-row">

Further details on Canvas’s implementation of Flexbox Grid

Responsive, centred YouTube embed

Sadly, Canvas doesn’t seem to have included the Bootstrap styles for this, so I use the CSS upload to add the standard Bootsrtap responsive embed styles.

HTML

<div class="grid-row center-xs">
    <div class="col-xs-12 col-md-9 col-lg-6">
        <div class="embed-responsive embed-responsive-16by9"><iframe class="embed-responsive-item" src="https://www.youtube.com/embed/DFthTUAAMRI?rel=0&amp;showinfo=0" width="300" height="150"></iframe></div>
    </div>
</div>

(Note that the width and height attributes are inserted automatically by Canvas but are ignored)

CSS

.embed-responsive {
  position: relative;
  display: block;
  height: 0;
  padding: 0;
  overflow: hidden;
}
.embed-responsive .embed-responsive-item,
.embed-responsive iframe,
.embed-responsive embed,
.embed-responsive object,
.embed-responsive video {
  position: absolute;
  top: 0;
  bottom: 0;
  left: 0;
  width: 100%;
  height: 100%;
  border: 0;
}
.embed-responsive-16by9 {
  padding-bottom: 56.25%;
}
.embed-responsive-4by3 {
  padding-bottom: 75%;
}

Towards a Modules navigation menu in Instructure Canvas

It feels as if navigation in Canvas is a bit of an afterthought.

If you navigate to a page via Modules, the breadcrumb shows ‘Pages > Pagename’ rather than ‘Modulename > Pagename’. No one wants to see the list of Pages displayed if you click ‘Pages’ but hiding the link from students will mean they see an error message every time they click on it.

Given that the breadcrumb effectively doesn’t help, that leaves the ‘Next’ and ‘Previous’ buttons – fine if you are working through linear materials in an online course but much less relevant in blended learning – and clicking on ‘Modules’ to go back to the list of modules.

So, I thought to myself, why can’t we have a menu system that shows a manageable view of the ‘Modules’ page on every page?

Right-hand menu in Canvas

The menu allows you to both see where you are within the course (current page highlighted) and to quickly look for and navigate to other parts of the course without having to go back to Modules. The names of the modules are not links, rather clicking them opens and closes the list of module items (pages, quizzes, etc) within.

BIG CAVEAT: I haven’t yet tested this fully and its reliance on the presence of variables in ENV and/or the naming of div classes and ids means that it is liable to break as Instructure pushes updates to Canvas. ie USE AT YOUR OWN RISK

Smaller Caveat: Given the lack on the ENV variable in the Canvas student app, this code will not work in that

Quick explanation

Code is below, with plenty of commenting but some high-level explanation:

  1. The key to this is pulling data from the api about the course you are in – see this previous post on getting a token and calling the API from JS.
  2. In this case we are calling: https://yourinstitution.instructure.com/api/v1/courses/yourCourseId/modules?include=items&student_id=yourStudentId . The student_id (and in fact the whole call to the self api) aren’t strictly necessary as yet but, eventually, should allow me to pull in data about completion of each section which I could also display on the menu)
  3. We don’t want the menu to appear on every page – in some places it doesn’t make sense (e.g Modules) and in others it doesn’t look right. The two arrays dontShowMenuOnTheseElementIds and dontShowMenuOnTheseElementClasses allow you to specify elements to look for in the page which, if present, will prevent the menu from being shown.
  4. In other pages, Canvas inserts a div#right-side-wrapper. I’m not yet sure what should appear here so for the moment, append the menu to that div in pages listed in the array putMenuInRightSideOnTheseElementIds (dealt with in lines 119-146)
  5. On line 150, I add an event listener to divMenuWrapper which handles the showing and hiding (and changing the little arrow) of items within a module when the module name is clicked.
  6. Lines 230-274 are about recognising where we are within a module so that the active item can be highlighted in the menu. If you you are happy to limit the menu to situations in which you are navigating from Modules (see #1 in Other thoughts below) then you could do away with everything except the if statement on line 263.

Other thoughts

  1. If you are happy to only show the menu when you are navigating through a Module (ie have arrived at a page either from the Modules page or by clicking Next and Previous buttons), add ‘&& moduleItemId’ to the if statement on line 41.
  2. If you want to limit the menu to appearing only on a test course, insert the ID of that course into the if statement on line 41 as ‘&& courseId==yourCourseId
  3. Haven’t yet tried indenting the module items to reflect indenting on the Modules page but the data do seem to be there in the return from https://yourinstitution.instructure.com/api/v1/courses/yourCourseId/modules?include=items&student_id=yourStudentId as item.indent.

Do get in touch if it needs any further explanation and share any improvements – the live code is on GitHub.

The JS (note all Plain JS):

The CSS:

Working with the Canvas API in plain JS – Pt 1

With the Canvas app not supporting JQuery (unlike the web application, which does), it make sense to write all custom JS in plain Javascript so it works across both platforms. This makes sending requests to the api harder than it would be in JQuery – apparently, JQuery $ajax request already has the necessary credentials attached.

With some help from various wonderful people on the Canvas Developers forum, the code below will query the Canvas API as the logged in user and log to the console(!).

var csrfToken = getCsrfToken();
console.log('crsfToken', csrfToken);
fetch('/api/v1/conversations/unread_count',{
          method: 'GET',
          credentials: 'include',
          headers: {
               "Accept": "application/json",
               "X-CSRF-Token": csrfToken
          }
     })
     .then(status)
     .then(json)
     .then(function(data) {
          console.log(data);
     })
     .catch(function(error) {
          console.log('Request failed', error);
     }
);

/*
 * Function which returns csrf_token from cookie see: https://community.canvaslms.com/thread/22500-mobile-javascript-development
 */
function getCsrfToken() {
     var csrfRegex = new RegExp('^_csrf_token=(.*)$');
     var csrf;
     var cookies = document.cookie.split(';');
     for (var i = 0; i < cookies.length; i++) { var cookie = cookies[i].trim(); var match = csrfRegex.exec(cookie); if (match) { csrf = decodeURIComponent(match[1]); break; } } return csrf; } /* * Function which returns a promise (and error if rejected) if response status is OK */ function status(response) { if (response.status >= 200 && response.status < 300) {
          return Promise.resolve(response)
     } else {
          return Promise.reject(new Error(response.statusText))
     }
}
/*
 * Function which returns json from response
 */
function json(response) {
     return response.json()
}‍‍‍‍‍‍‍‍‍‍‍‍‍‍‍‍‍‍‍‍‍‍‍‍‍‍‍‍‍‍‍‍‍‍‍‍‍‍‍‍‍‍‍‍‍‍‍‍‍‍‍‍‍‍‍‍‍‍‍‍‍‍‍‍‍‍‍‍‍‍‍‍‍‍‍‍‍‍‍‍‍‍‍‍‍‍‍‍‍‍‍‍‍‍‍‍‍‍‍‍‍‍‍‍‍‍‍‍‍‍‍‍‍‍‍‍‍‍‍‍‍‍‍‍‍‍‍‍‍‍‍‍‍‍‍‍‍‍‍‍‍‍‍‍‍‍‍‍‍‍‍‍‍‍‍‍‍‍‍‍‍‍

Some things to note:

  • I’m using the fetch() method as I like working with promises – fingers crossed that it’ll work in the app!
  • using James Jones csrf extracting function to populate the X-CSRF-Token header;
  • using “Accept”: “application/json” to tell Canvas that we want json and it then doesn’t include the while(1) stuff (try it without to see what I mean)
  • using credentials: ‘include’ to tell fetch() to include the Cookie in the request as this is what Canvas seems to expect

The next step is to do something useful with the api – the first goal is to add next and previous buttons to pages linked to in the mobile app (currently you will only see these if you launch into a page through the app-specific Modules page).

Remote Debugging Samsung Galaxy 7 Edge with Chrome

If you’re confused as to why something which is working well on your Canvas site, isn’t working on the Student App, Google Chrome gives you a great way to find out what’s going wrong with its Remote Debugging Android Devices

Annoyingly, it’s not quite as easy as one would hope on a Galaxy S7 Edge or, by the sounds of it, any Samsung device, on Windows 10 anyway.

Extra steps required above what’s on the page above, for me anyway, were:

  1. Enabling USB Debugging. On A Galaxy S7, to turn developer mode on, you have to go to About phone | Software info then tap Build number 7 times(!?). You can then access the Developer options (at bottom of Settings) to switch on USB Debugging.
  2. On Windows 10, to even get the Device to be recognised, you need to:

If you have a Mac available, you don’t seem to need to bother with Step 2 above – it just works!


Progress bar in Instructure Canvas

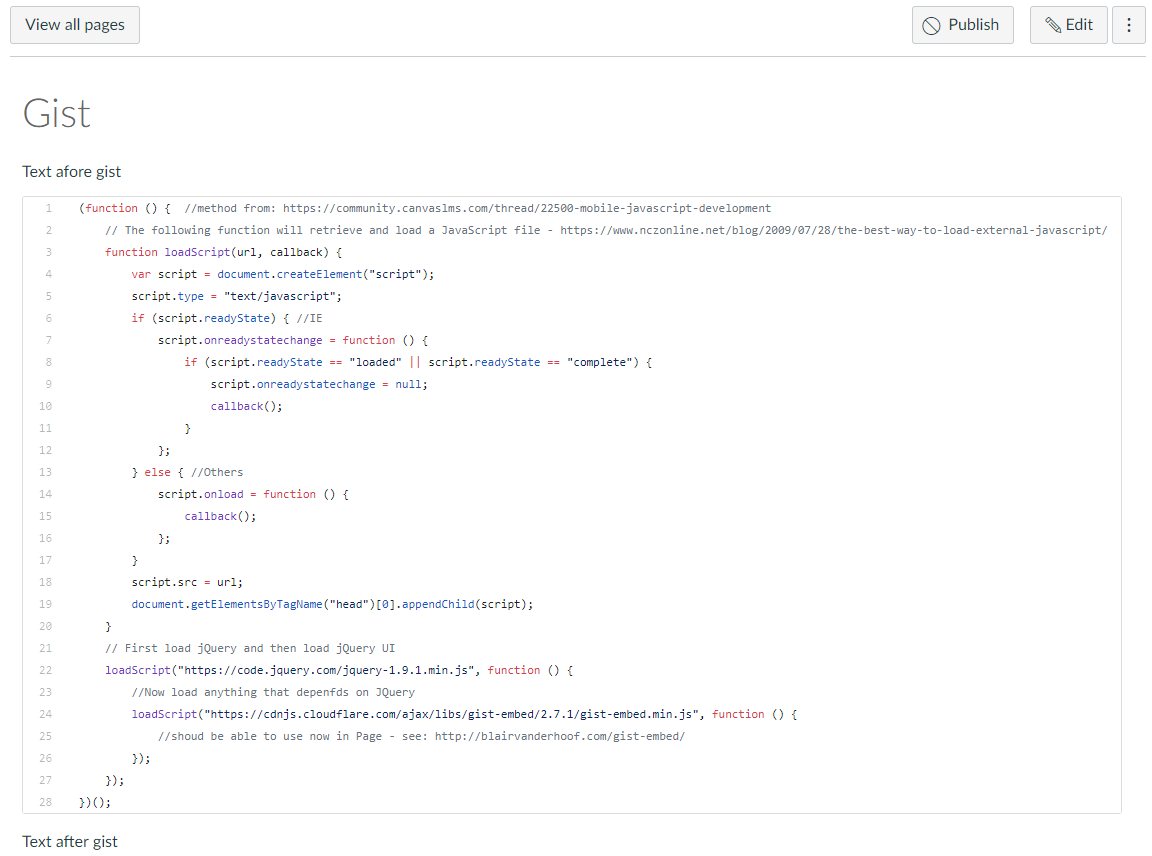
WARNING: Note that themes allow you to upload .css and .js files for both the web and app versions of your Canvas site BUT the app does not provide JQuery so you’ll need a plain JS version of your code for the app…or pull in JQuery.

The Bootstrap progress bar doesn’t appear to be available within pages. Instead, use the JQueryUI progress bar (for the web version of Canvas anyway):

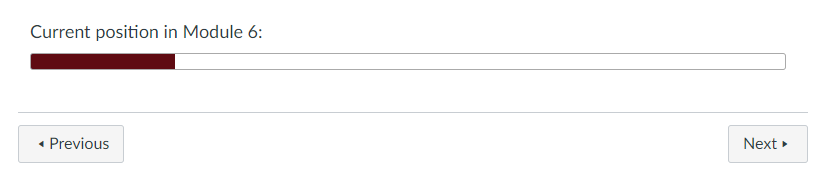
I have styled this in one of our courses as follows.

HTML

<div class="ui-progressbar ui-widget ui-widget-content ou-ProgressBar module_6" style="width: 100%; height: 15px;" role="progressbar" aria-valuemax="100" aria-valuemin="0" aria-valuenow="19">
    <div class="ui-progressbar-value ui-widget-header ui-corner-left ou-ProgressBarBar" style="width: 19%;"></div>
</div>

CSS

.ou-ProgressBar {
 height: 15px;
 margin-bottom: 3em;
}

.ou-ProgressBar.module_6 .ou-ProgressBarBar {
 border: 1px solid #640D14;
 background-image: linear-gradient(to bottom, #640D14, #640D14) !important;
}

TL;DR

In fact, I actually use JS to insert the HTML above based upon a div like this:

HTML

<div id="module_6" class="ou-insert-progress-bar">19</div>

JS

if($('div.ou-insert-progress-bar').length){
    $('div.ou-insert-progress-bar').each( function(index) {
        //get data from insert-progress-bar div
        var value = $(this).text();
        var className = $(this).attr('id');
        //UC first letter
        var viewName = className.toLowerCase().replace(/\b[a-z]/g, function(letter) {
            return letter.toUpperCase();
        });
        viewName = viewName.replace(/_/g, ' ');
        //create progress bar and title
        $(this).after(''+
            '<h4 class="ou-space-before-progress-bar">Current position in ' + viewName + ':</h4>' +
            '<div class="ui-progressbar ui-widget ui-widget-content ui-corner-all ou-ProgressBar ' + className + '" style="width: 100%; height: 15px;" role="progressbar" aria-valuemax="100" aria-valuemin="0" aria-valuenow="'+ value +'">' +
                ' <div class="ui-progressbar-value ui-widget-header ui-corner-left ou-ProgressBarBar" style="width: '+ value +'%;"></div>' +
            '</div>' +
            '');
    });
}
//End by deleting div.insert-progress-bars
$('div.ou-insert-progress-bar').remove();

Far TL;DR

If you also want this to appear in the app (where neither JQuery nor JQuery UI are available), you’ll need to use the plain JS version of the above and update the styles:

JS

//From: https://stackoverflow.com/questions/4793604/how-to-insert-an-element-after-another-element-in-javascript-without-using-a-lib
function insertAfter(newNode, referenceNode) {
    referenceNode.parentNode.insertBefore(newNode, referenceNode.nextSibling);
}

/* Trying plain JS so that it works in the app as well */
function domReady () {
	//get all elements with classname ou-insert-progress-bar
	var progressBarPlaceholders = document.getElementsByClassName('ou-insert-progress-bar');
	Array.prototype.forEach.call(progressBarPlaceholders, function(progressBarPlaceholder) {
		var value = progressBarPlaceholder.innerHTML;
		var className = progressBarPlaceholder.id;
		//UC first letter
		var viewName = className.toLowerCase().replace(/\b[a-z]/g, function(letter) {
			return letter.toUpperCase();
		});
		//replace underscore with space
		viewName = viewName.replace(/_/g, ' ');
		//create our new element
		var progressBarContainer = document.createElement("div");
                progressBarContainer.innerHTML = ''+
                    '<h4 class="ou-space-before-progress-bar">Current position in ' + viewName + ':</h4>' +
                    '<div class="ou-ProgressBar ' + className + '" style="width: 100%; height: 15px;" role="progressbar" aria-valuemax="100" aria-valuemin="0" aria-valuenow="'+ value +'">' +
                    ' <div class="ou-ProgressBarBar" style="width: '+ value +'%;"></div>' +
                    '</div>';
                //insert it after the placeholder using the function insertAfter
                insertAfter(progressBarContainer, progressBarPlaceholder);
                //now delete the placeholder
                progressBarPlaceholder.parentNode.removeChild(progressBarPlaceholder);
       });
}
//Function to work out when the DOM is ready: https://stackoverflow.com/questions/1795089/how-can-i-detect-dom-ready-and-add-a-class-without-jquery/1795167#1795167
// Mozilla, Opera, Webkit 
if ( document.addEventListener ) {
	document.addEventListener( "DOMContentLoaded", function(){
		document.removeEventListener( "DOMContentLoaded", arguments.callee, false);
		domReady();
	}, false );
// If IE event model is used
} else if ( document.attachEvent ) {
	// ensure firing before onload
	document.attachEvent("onreadystatechange", function(){
		if ( document.readyState === "complete" ) {
			document.detachEvent( "onreadystatechange", arguments.callee );
			domReady();
		}
	});
}

CSS

.ou-ProgressBar {
  height: 15px;
  margin-bottom: 3em;
  width: 100%;
  border-radius: 3px;
  border: 1px solid #aaa;
  background: #fff;
  overflow: hidden;
}

.ou-ProgressBarBar {
  height: 100%;
}

.ou-ProgressBar.welcome .ou-ProgressBarBar {
  border: 1px solid #D89E17;
  background-image: linear-gradient(to bottom, #D89E17, #D89E17) !important;
}

A dashboard view of Modules in Canvas

Updated version: A dashboard view of Modules in Canvas v2

Canvas’s Modules page is a great way to show students both what is available to them and their progress through those materials. However, I’m concerned that:

  • it may be overwhelming to see everything in your course on a single page
  • it present a very linear view of a course – this may be appropriate in some circumstances but is certainly not appropriate in many HE courses.

The typical solution to this appears to be to create a course home Page where you can wrap/organise your content as you see fit. Two great guides to this are:

However, this approach has two disadvantages:

  • I’ve already spent time and energy organising, titling and indenting my content – why should I have to create a page of links pointing to that content?
  • The Modules page gives you great feedback on progress through your course – which content you have ‘completed’, what’s next, etc. A links-based home page is going to hide all this from you.

So, what we need is some way of making the Modules page more navigable. There are plenty of requests for this on Canvas’s Community pages and it would indeed be more sensible for Instructure to tackle this themeselves. However, if you’d like something that will work in the shorter term and are happy to add your own js/css, you might find the approach below interesting.

Autogenerating a Modules ‘Dashboard’

With some fairly simple JQuery, a custom stylesheet and a module naming convention it’s relatively simple to autogenerate a ‘dashboard’ of Canvas-style cards which gives students an overview of, and an easy way to navigate to your modules. ‘Top’ buttons on every Module give a quick way back to the dashboard no matter how many modules your site contains.

The JS:

Note that this assumed that Modules are named:

Module x. My module description

The code splits the Module name, based on the characters specified by the ‘delimiter’. So, in this case, my title will be ‘Module x’ and the sub-title will be ‘My module description’. You will need to chnage this caharacter if you want to split on say ‘:’.

and the CSS:

You’ll see that this css is very largely the same as the Canvas Dashboard styles but I have renamed them ‘ou-‘ so that we can make sure they are available on the Modules page and so that we can alter them as necessary.

Hope that’s useful to someone. It’s a work in progress e.g thinking about pulling in Module progress indicator(s), number of items in module, etc. Do get in touch is you spot any problems.

ical/ics feed from Rapla

We’ve been using Rapla resource booking system for years now to manage room (and associated resources such as laptops, furniture, etc) bookings and have been using the Export2iCal plugin to pull data from Rapla and display it in various other ways. I thought it would be useful to just jot down a couple of features of Rapla/iCal that may not be obvious for anyone else thinking of doing this.

  1. The url for the ical feed is:
     http://myraplaserver/rapla?page=ical&user=username[&file=fileName]

    Where:

    • username is the name of the user who has published a view on Rapla
    • fileName [for the optional file parameter] is the name of the view to return. If the file parameter is omitted, it will return the Default view.

    The thing to note here is that the ical feed returned contains the events for those resources that are shown in the Default or other named view for the user, username.

  2. In order to access a view via ical, it must first be published. This is achieved by selecting the desired view (or Default) and then clicking the Publish button, and ticking the ICAL Publish checkbox.
  3. To set which resources are shown in a given view, simply Ctrl-click to highlight them then click the Save button for the view.