This is intended as a simple guide to entering mathematical expressions as answers to questions delivered using QTIWorks. Any comments about its usefulness/helpfulness would be most welcome.
Note that you can also view an input hints box by clicking on the blue question mark symbol  next to the maths input box. You can also watch a brief video showing you how to enter mathematical answers.
This guide contains the following sections:
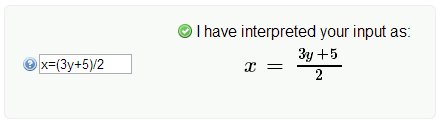
When a mathematical expression is required as an answer to a question, a text box within a larger grey box is shown. When text is typed into the text box, it is interpreted mathematically, and the resulting mathematical expression is shown:
If you click on the blue question mark symbol , an input hints box will pop up.
Basic Operators (+ – * / =) ^ Top
The basic mathematical operators can be represented by words or symbols, as shown in the table below.
| Operation |
Symbol |
Word |
| Addition |
+ |
|
| Subtraction |
– |
|
| Multiplication† |
* |
times |
| Division |
/ |
divide |
| Equals |
= |
|
†note that multiplication is implied between a coefficient and a variable, e.g. 2x = 2*x, and between consecutive variables, i.e. letters, unless the letters make up a special character, e.g. pa = p*a, but pi = π, not p*i.
Other Operators (± > ≥ < ≤ ≠) ^ Top
Other operatores, e.g. comparison operators, can be represented as shown in the table below.
| Operation |
Input |
Interpretation |
| Plus or minus |
+- |
± |
| Greater than |
> |
> |
| Greater than or equal to |
>= |
≥ |
| Less than |
< |
< |
| Less than or equal to |
<= |
≤ |
| Not equal |
!= |
≠ |
Precedence (order of operations) ^ Top
The order of precedence, i.e. the order in which operations are performed/interpreted, follows the usual rules:
- brackets
- roots and exponentials
- multiplication and division
- addition and subtraction
| Input |
Interpretation |
Notes |
| 2+3*4 |
 |
equals 14 |
| 2+(3*4) |
 |
equals 14, brackets are unnecessary |
| (2+3)*4 |
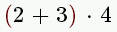 |
equals 20, brackets are required |
Special Symbols and Functions ^ Top
Generally, letters just represent variables, and multiplication between consecutive letters is implied (see Basic Operations above). However, there are certain letters or words that have special meaning, as follows:
| Letter/Word |
Meaning |
| e |
e, the natural exponential, 2.71828… |
| i |
the imaginary number, √-1 |
| alpha…lambda…pi…etc |
Greek letters, α, λ, π etc |
| log |
logarithm function |
| ln |
natural logarithm function |
| sin, cos, tan |
trigonometric functions |
cap, cup, in, not, notin, subset, subseteq, to,
vee, wedge…and probably others |
Logic and Set Theory operators |
Fractions (a/b) ^ Top
Use the divide symbol, ‘/’, between the numerator (top) denominator (bottom) of a fraction. Brackets may be needed to give the correct numerator and denominator.
| Input |
Interpretation |
| 1/2 |
 |
| 2x+1/3x+2 |
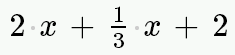 |
| (2x+1)/(3x+2) |
 |
Brackets (a(b+c)) ^ Top
Brackets can be used as they normally would when writing an expression.
| Input |
Interpretation |
Notes |
| sin(2x+30) |
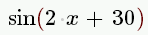 |
brackets not needed for sin of single value, e.g. sinx gives  |
| 5(x+1)(2x-3) |
 |
|
| 3(2x-(2-y)) |
 |
equivalent to 3(2x-2+y) |
Powers (x^a) ^ Top
Use ^ (hat/caret symbol) to represent powers:
| Input |
Interpretation |
Notes |
| x^2 |
 |
|
| x^(1/3) |
 |
fractional powers need brackets |
| x^-1 |
 |
negative powers do not need brackets |
| e^(x(2x+1)) |
 |
|
| e^x(2x+1) |
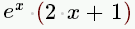 |
|
Roots (sqrt(x) or x^(a/b)) ^ Top
Only a square root can be represented with the root symbol. All other roots must be represented as fractional powers:
| Root |
Input |
Interpretation |
| Square root (√x) |
sqrtx or sqrt(x) |
 |
| Cube root (∛x) |
x^(1/3) |
 |
Subscripts (x_a) ^ Top
Use _ (underscore) to give a subscript (similar to using ^ for powers/superscripts)
| Input |
Interpretation |
| x_1 |
 |
| y_a |
 |
“Sorry, I could not make sense of your input” ^ Top
You will see this message in a number of situations (including, but not limited to):
- When you have an operator (e.g. + – * / ^ _ =), that does not have a value/variable before and/or after it, e.g. ‘1+’, ‘*3’, ‘x/’, ‘y^’
- When you have two consecutive operators, e.g. ‘+*’
- When you have opened a bracket and not (yet) closed it, e.g. ‘2(x+3’
If you see this message when you believe you have entered a complete expression, make sure you check your expression carefully, in particular that you have closed all brackets.