Embedding a GitHub gist in Instructure Canvas

I needed to have syntax highlighted code embedded in Canvas. While there are a couple of LTI tools that purport to allow embedding of code, LTI tools receive data about users which mean that using those hosted by third parties comes with issues around vetting of the tool provider for compliance with GDPR, University regulations, etc.

So, I thought, why not just embed GitHub gists directly? Because GitHub is a widely used source code repository, our coders will know how to use it and our students should know how to use it. You can also reuse existing gists/make code from your course available more widely.

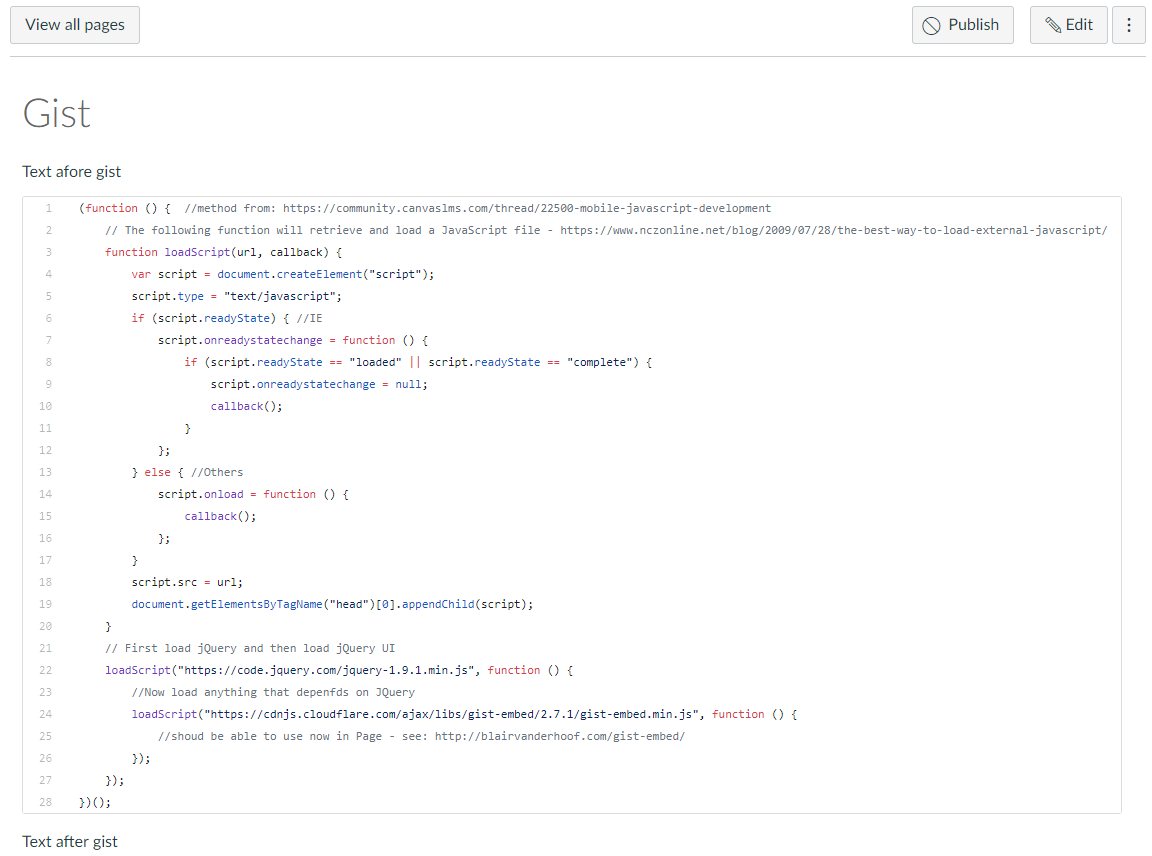
The embedding is achieved by Blair Vanderhoof’s gist-embed . This is a JS library which requires JQuery. Kenneth Larson’s post in the Canvas Community on Mobile Javascript Development provided the solutions to both:

  1. Making sure that JQuery was available for gist-embed (both on the Web and in the Student app) and
  2. Giving us a way to upload the gist-embed JS into Canvas.

The JS

The code, as a gist of course :), is below:

You will need access to the Sub-account of the course you wish to use this in – then you simply use the normal Theme editing tools to upload this JS to both the JavaScript file and Mobile app JavaScript file boxes.

The HTML (in a Canvas Page)

Use a <p> tag or similar to embed the gist – the suggested <code> tag from  Blair Vanderhoof’s gist-embed instructions is stripped out by Canvas when you go to Edit it:

One thing to note is that, if you have long lines in your code, it may be easier for those using the Student app if you leave leave the footer in the embedded code so that they can click to see it in GitHub.

The end result

The fine print

Please do heed Canvas’s warning:

  • Custom CSS and Javascript might cause accessibility issues or conflicts with future Canvas updates. Before implementing custom CSS or Javascript, please refer to our documentation

  • CAVEAT: while you can create and embed ‘secret’ gists, they work with a private url which means that, while they should be difficult to discover, they are visible to anyone with the URL. So don’t use this with code which is top secret!

Towards a Modules navigation menu in Instructure Canvas

It feels as if navigation in Canvas is a bit of an afterthought.

If you navigate to a page via Modules, the breadcrumb shows ‘Pages > Pagename’ rather than ‘Modulename > Pagename’. No one wants to see the list of Pages displayed if you click ‘Pages’ but hiding the link from students will mean they see an error message every time they click on it.

Given that the breadcrumb effectively doesn’t help, that leaves the ‘Next’ and ‘Previous’ buttons – fine if you are working through linear materials in an online course but much less relevant in blended learning – and clicking on ‘Modules’ to go back to the list of modules.

So, I thought to myself, why can’t we have a menu system that shows a manageable view of the ‘Modules’ page on every page?

Right-hand menu in Canvas

The menu allows you to both see where you are within the course (current page highlighted) and to quickly look for and navigate to other parts of the course without having to go back to Modules. The names of the modules are not links, rather clicking them opens and closes the list of module items (pages, quizzes, etc) within.

BIG CAVEAT: I haven’t yet tested this fully and its reliance on the presence of variables in ENV and/or the naming of div classes and ids means that it is liable to break as Instructure pushes updates to Canvas. ie USE AT YOUR OWN RISK

Smaller Caveat: Given the lack on the ENV variable in the Canvas student app, this code will not work in that

Quick explanation

Code is below, with plenty of commenting but some high-level explanation:

  1. The key to this is pulling data from the api about the course you are in – see this previous post on getting a token and calling the API from JS.
  2. In this case we are calling: https://yourinstitution.instructure.com/api/v1/courses/yourCourseId/modules?include=items&student_id=yourStudentId . The student_id (and in fact the whole call to the self api) aren’t strictly necessary as yet but, eventually, should allow me to pull in data about completion of each section which I could also display on the menu)
  3. We don’t want the menu to appear on every page – in some places it doesn’t make sense (e.g Modules) and in others it doesn’t look right. The two arrays dontShowMenuOnTheseElementIds and dontShowMenuOnTheseElementClasses allow you to specify elements to look for in the page which, if present, will prevent the menu from being shown.
  4. In other pages, Canvas inserts a div#right-side-wrapper. I’m not yet sure what should appear here so for the moment, append the menu to that div in pages listed in the array putMenuInRightSideOnTheseElementIds (dealt with in lines 119-146)
  5. On line 150, I add an event listener to divMenuWrapper which handles the showing and hiding (and changing the little arrow) of items within a module when the module name is clicked.
  6. Lines 230-274 are about recognising where we are within a module so that the active item can be highlighted in the menu. If you you are happy to limit the menu to situations in which you are navigating from Modules (see #1 in Other thoughts below) then you could do away with everything except the if statement on line 263.

Other thoughts

  1. If you are happy to only show the menu when you are navigating through a Module (ie have arrived at a page either from the Modules page or by clicking Next and Previous buttons), add ‘&& moduleItemId’ to the if statement on line 41.
  2. If you want to limit the menu to appearing only on a test course, insert the ID of that course into the if statement on line 41 as ‘&& courseId==yourCourseId
  3. Haven’t yet tried indenting the module items to reflect indenting on the Modules page but the data do seem to be there in the return from https://yourinstitution.instructure.com/api/v1/courses/yourCourseId/modules?include=items&student_id=yourStudentId as item.indent.

Do get in touch if it needs any further explanation and share any improvements – the live code is on GitHub.

The JS (note all Plain JS):

The CSS:

Working with the Canvas API in plain JS – Pt 1

With the Canvas app not supporting JQuery (unlike the web application, which does), it make sense to write all custom JS in plain Javascript so it works across both platforms. This makes sending requests to the api harder than it would be in JQuery – apparently, JQuery $ajax request already has the necessary credentials attached.

With some help from various wonderful people on the Canvas Developers forum, the code below will query the Canvas API as the logged in user and log to the console(!).

var csrfToken = getCsrfToken();
console.log('crsfToken', csrfToken);
fetch('/api/v1/conversations/unread_count',{
          method: 'GET',
          credentials: 'include',
          headers: {
               "Accept": "application/json",
               "X-CSRF-Token": csrfToken
          }
     })
     .then(status)
     .then(json)
     .then(function(data) {
          console.log(data);
     })
     .catch(function(error) {
          console.log('Request failed', error);
     }
);

/*
 * Function which returns csrf_token from cookie see: https://community.canvaslms.com/thread/22500-mobile-javascript-development
 */
function getCsrfToken() {
     var csrfRegex = new RegExp('^_csrf_token=(.*)$');
     var csrf;
     var cookies = document.cookie.split(';');
     for (var i = 0; i < cookies.length; i++) { var cookie = cookies[i].trim(); var match = csrfRegex.exec(cookie); if (match) { csrf = decodeURIComponent(match[1]); break; } } return csrf; } /* * Function which returns a promise (and error if rejected) if response status is OK */ function status(response) { if (response.status >= 200 && response.status < 300) {
          return Promise.resolve(response)
     } else {
          return Promise.reject(new Error(response.statusText))
     }
}
/*
 * Function which returns json from response
 */
function json(response) {
     return response.json()
}‍‍‍‍‍‍‍‍‍‍‍‍‍‍‍‍‍‍‍‍‍‍‍‍‍‍‍‍‍‍‍‍‍‍‍‍‍‍‍‍‍‍‍‍‍‍‍‍‍‍‍‍‍‍‍‍‍‍‍‍‍‍‍‍‍‍‍‍‍‍‍‍‍‍‍‍‍‍‍‍‍‍‍‍‍‍‍‍‍‍‍‍‍‍‍‍‍‍‍‍‍‍‍‍‍‍‍‍‍‍‍‍‍‍‍‍‍‍‍‍‍‍‍‍‍‍‍‍‍‍‍‍‍‍‍‍‍‍‍‍‍‍‍‍‍‍‍‍‍‍‍‍‍‍‍‍‍‍‍‍‍‍

Some things to note:

  • I’m using the fetch() method as I like working with promises – fingers crossed that it’ll work in the app!
  • using James Jones csrf extracting function to populate the X-CSRF-Token header;
  • using “Accept”: “application/json” to tell Canvas that we want json and it then doesn’t include the while(1) stuff (try it without to see what I mean)
  • using credentials: ‘include’ to tell fetch() to include the Cookie in the request as this is what Canvas seems to expect

The next step is to do something useful with the api – the first goal is to add next and previous buttons to pages linked to in the mobile app (currently you will only see these if you launch into a page through the app-specific Modules page).