Maths with QTI – Response Processing

From my experience, the responseProcessing section of a QTI XML file is the most complicated. It is the place where you check whether the user has given the correct response, deal with incorrect responses, and display the appropriate feedback. In theory it could be very simple, if you are just checking whether an answer is correct, showing the ‘correct’ feedback if it is and showing ‘incorrect’ feedback if it is not. However, it is possible to give much more tailored feedback than this, pointing users in the right direction if they have made a common mistake.

Another common use of the responseProcessing is to show a hint and/or a solution if the user requests it. For a generic structure for doing this, please see the Solution and Hint post.

responseProcessing Start and End

<responseProcessing>
<!-- Response processing goes here -->
</responseProcessing>

responseConditions

General Structure

This is the general structure for if…else if…else statements for dealing with responses. responseCondition statements can be nested within each other to create complex hierarchies of conditions.

<responseCondition>
   <responseIf>
   </responseIf>
   <responseElseIf>
   </responseElseIf>
   <responseElse>
   </responseElse>
</responseCondition>

Simple Example

In this example, the RESPONSE is tested for being NULL, in which case a score of 0 is given, and no feedback shown, so the user can just have another go. Next, RESPONSE is tested for being equal to ANSWER (i.e. the response is correct), in which case the CORRECT feedback is shown and the score is set to 1. Otherwise, the INCORRECT feedback is shown and the score set to 0.

<responseCondition>
   <!-- Is the response NULL? -->
   <responseIf>
      <isNull>
         <variable identifier="RESPONSE"/>
      </isNull>
      <setOutcomeValue identifier="SCORE">
         <baseValue baseType="float">0.0</baseValue>
      </setOutcomeValue>
   </responseIf>
   <responseElseIf>
      <!-- Is the response Correct? -->
      <equal toleranceMode="exact">
         <variable identifier="iAnswer"/>
         <variable identifier="RESPONSE"/>
      </equal>
      <setOutcomeValue identifier="FEEDBACK">
         <multiple>
            <baseValue baseType="identifier">CORRECT</baseValue>
         </multiple>
      <setOutcomeValue identifier="SCORE">
         <baseValue baseType="float">1.0</baseValue>
      </setOutcomeValue>
   </responseElseIf>
   <responseElse>
      <!-- Otherwise the response must be incorrect -->
      <setOutcomeValue identifier="FEEDBACK">
         <multiple>
            <baseValue baseType="identifier">INCORRECT</baseValue>
         </multiple>
      </setOutcomeValue>
      <setOutcomeValue identifier="SCORE">
         <baseValue baseType="float">0.0</baseValue>
      </setOutcomeValue>
   </responseElse>
</setOutcomeValue>

Feedback

Empty the Feedback Variable

This empties the feedback ‘multiple’ variable, so any previously shown feedback (from previous response) is removed before we process the current response. The EMPTY variable must have been declared in the Variable Declarations.

<setOutcomeValue identifier="FEEDBACK">
   <multiple>
      <variable identifier="EMPTY"/>
   </multiple>
</setOutcomeValue>

Add Feedback to the Feedback Variable

This defines the feedback sections that will be shown to the user. Multiple feedback sections can be shown by adding multiple identifiers.

<setOutcomeValue identifier="FEEDBACK">
   <multiple>
      <baseValue baseType="identifier">INCORRECT</baseValue>
      <baseValue baseType="identifier">NOTSIMP</baseValue>
   </multiple>
</setOutcomeValue>

Append Feedback to the Feedback Variable

If some feedback has already been defined and you want to add further feedback, you can append another feedback identifier as shown.

<setOutcomeValue identifier="FEEDBACK">
   <multiple>
      <variable identifier="FEEDBACK"/>
      <baseValue baseType="identifier">SEEN-HINT</baseValue>
   </multiple>
</setOutcomeValue>

Comparisons

Equal

This simply compares whether two numerical values are equal. If ‘toleranceMode’ is set to exact, the values must be exactly equal. toleranceMode can also be set to absolute or relative, in which case the ‘tolerance’ must be specified. See the specification for more information.

<equal toleranceMode="exact">
   <variable identifier="iAnswer"/>
   <variable identifier="RESPONSE"/>
</equal>

EqualRounded

This compares whether two values are equal, to a specified level of rounding. The roundingMode can either be decimalPlaces or significantFigures.

<equalRounded roundingMode="decimalPlaces" figures="0">
   <variable identifier="RESPONSE"/>
   <variable identifier="iAnswer"/>
</equalRounded>

Substring contains

<substring caseSensitive="false">
   <baseValue baseType="string">+</baseValue>
   <variable identifier="printMath"/>
</substring>

isNull

This tests whether a value is null.

<isNull>
   <variable identifier="RESPONSE"/>
</isNull>

Custom Operator

Custom operators can be used to carry out more complicated tests, e.g. comparing mathematical responses using the MathAssess engine. The ‘action’ can take one of three values:

  • equal: algebraic equivalence (e.g. factorised and expanded forms are equivalent)
  • syntequal: syntactical equality (e.g. factorised and expanded forms are not syntactically equal)
  • code: allows custom comparison code to be provided

As an example of the difference between equal and syntequal, 1/2 and 2/4 are equal, but not syntequal. 2(x+1) and 2x+2 are equal, but not syntequal.

<customOperator class="org.qtitools.mathassess.CasCompare" ma:action="equal" ma:syntax="text/x-maxima">
   <variable identifier="mAnswer"/>
   <variable identifier="RESPONSE"/>
</customOperator>

The following example of a ‘code’ action tests whether the sum of the two response and answer is 0, i.e. the response is correct, but has the wrong sign.

<customOperator class="org.qtitools.mathassess.CasCompare" ma:action="code" ma:code="is(equal($1+$2,0));" ma:syntax="text/x-maxima">
   <variable identifier="RESPONSE"/>
   <variable identifier="mAnswer"/>
</customOperator>

Operators

And Or

As you would expected, placing two comparisons within an ‘and’ operator gives a true result only if both comparisons evaluate to true. Placing two comparisons within an ‘or’ gives a true result if either (or both) of the comparisons evaluate to true. For or, just use the following snippet and change the <and>/</and> tags to <or>/</or>

<and>
   <equal toleranceMode="exact">
      <variable identifier="iAnswer1"/>
      <variable identifier="RESPONSE1"/>
   </equal>
   <equal toleranceMode="exact">
      <variable identifier="iAnswer2"/>
      <variable identifier="RESPONSE2"/>
   </equal>
</and>

Not

The ‘not’ operators gives the ‘logical negative’ (i.e. opposite, e.g. true => false) of the subexpression. The following snippet will return true if the value of RESPONSE is not null.

<not>
   <isNull>
      <variable identifier="RESPONSE"/>
   </isNull>
</not>


Maths with QTI – Solution and Hint

Use the following chunks of code to add “Show Hint” and “Show Solution” buttons to the question, define the hint and solution that are shown and do all the necessary processing

Variable Declarations

Request variables set to true when user asks for Hint or Solution

<responseDeclaration identifier="HINTREQUEST" baseType="boolean" cardinality="single"/>
<responseDeclaration identifier="SOLREQUEST" baseType="boolean" cardinality="single"/>

Outcome variables for tracking whether the user has viewed the Hint or Solution

<outcomeDeclaration identifier="seenHint" baseType="boolean" cardinality="single">
   <defaultValue>
      <value>false</value>
   </defaultValue>
</outcomeDeclaration>
<outcomeDeclaration identifier="seenSolution" baseType="boolean" cardinality="single">
   <defaultValue>
      <value>false</value>
   </defaultValue>
</outcomeDeclaration>

Outcome variables for tracking whether the user has viewed the Hint or Solution

<outcomeDeclaration identifier="ASKHINT" baseType="identifier" cardinality="single">
   <defaultValue>
      <value>askhint</value>
   </defaultValue>
</outcomeDeclaration>
<outcomeDeclaration identifier="ASKSOLUTION" baseType="identifier" cardinality="single">
   <defaultValue>
      <value>asksolution</value>
   </defaultValue>
</outcomeDeclaration>

ItemBody

Hint and Solution feedback blocks

<feedbackBlock identifier="SOLUTION" outcomeIdentifier="FEEDBACK" showHide="show"> Solution goes here </feedbackBlock>
<feedbackBlock identifier="HINT" outcomeIdentifier="FEEDBACK" showHide="show"> Hint goes here </feedbackBlock>

“Show Hint” and “Show Solution” buttons

<div class="">
   <feedbackBlock showHide="show" identifier="askhint" outcomeIdentifier="ASKHINT">
      <p>
         <endAttemptInteraction responseIdentifier="HINTREQUEST" title="Show Hint"/>
      </p>
   </feedbackBlock>
   <feedbackBlock showHide="show" identifier="asksolution" outcomeIdentifier="ASKSOLUTION">
      <p>
         <endAttemptInteraction responseIdentifier="SOLREQUEST" title="Show Solution"/>
      </p>
   </feedbackBlock>
</div>

responseProcessing

The code below can be used as the framework for the responseProcessing section. The responseProcessing expressions that, for example, idenitfy whether the question has been answered correctly should be inserted at the “***Response Processing goes here***” comment.

<responseProcessing>
   <responseCondition>
      <responseIf>
         <!-- If user has asked for the Hint -->
         <variable identifier="HINTREQUEST"/>
         <!-- Show the Hint -->
         <setOutcomeValue identifier="FEEDBACK">
            <multiple>
               <baseValue baseType="identifier">HINT</baseValue>
            </multiple>
         </setOutcomeValue>
         <!-- Set seenHint to true -->
         <setOutcomeValue identifier="seenHint">
            <baseValue baseType="boolean">true</baseValue>
         </setOutcomeValue>
      </responseIf>
      <responseElseIf>
         <!-- If user has asked for the Solution -->
         <variable identifier="SOLREQUEST"/>
         <!-- Show the Solution -->
         <setOutcomeValue identifier="FEEDBACK">
            <multiple>
               <baseValue baseType="identifier">SOLUTION</baseValue>
            </multiple>
         </setOutcomeValue>
         <setOutcomeValue identifier="seenSolution">
            <baseValue baseType="boolean">true</baseValue>
         </setOutcomeValue>
         <setOutcomeValue identifier="completionStatus">
            <baseValue baseType="identifier">completed</baseValue>
         </setOutcomeValue>
         <setOutcomeValue identifier="ASKHINT">
            <baseValue baseType="identifier">null</baseValue>
         </setOutcomeValue>
         <setOutcomeValue identifier="ASKSOLUTION">
            <baseValue baseType="identifier">null</baseValue>
         </setOutcomeValue>
      </responseElseIf>
      <responseElse> 
         <!-- ***Response Processing goes here*** -->
         <responseCondition>
            <responseIf>
               <!-- If the user has seen the solution, set the score to 0 -->
               <variable identifier="seenSolution"/>
               <setOutcomeValue identifier="FEEDBACK">
                  <multiple>
                     <variable identifier="FEEDBACK"/>
                     <baseValue baseType="identifier">SEEN-SOLUTION</baseValue>
                  </multiple>
               </setOutcomeValue>
               <setOutcomeValue identifier="SCORE">
                  <baseValue baseType="float">0.0</baseValue>
               </setOutcomeValue>
            </responseIf>
            <responseElseIf>
               <!-- If the user has seen the hint, divide the score by 2 -->
               <variable identifier="seenHint"/>
               <setOutcomeValue identifier="FEEDBACK">
                  <multiple>
                     <variable identifier="FEEDBACK"/>
                     <baseValue baseType="identifier">SEEN-HINT</baseValue>
                  </multiple>
               </setOutcomeValue>
               <setOutcomeValue identifier="SCORE">
                  <divide>
                     <variable identifier="SCORE"/>
                     <baseValue baseType="float">2.0</baseValue>
                  </divide>
               </setOutcomeValue>
            </responseElseIf>
         </responseCondition>
      </responseElse>
   </responseCondition>
</responseProcessing>

Maths with QTI – Modifying assessment.xml (for Assessments created in Uniqurate)

To date, I have only created assessments in Uniqurate, so the items in this post just refer to a couple of things I have needed to modify in the assessment.xml (which exists at the top level of the assessment zip file) file to get the assessments working properly.

itemSessionControl

Control whether feedback is shown when reviewing (showFeedback), and whether the user can view the solution (showSolution). The solution is defined by using setCorrectResponse in the templateProcessing. The itemSessionControl tag can be contained within testPart, assessmentSection or assessmentItemRef (individual assessment item) blocks.

<itemSessionControl showFeedback="true" allowReview="true" showSolution="true" />

Test Feedback

For assessments created in Uniqurate, the total (i.e max score) for an assessment seems to be calculated by summing the max scores for each of the individual questions in the assessment, even if it is set up so that questions are repeated. Therefore, as a very simple example, if an assessment has a single section containing a single question, but “Number of questions to choose from section” is set to 2 and “Repeat questions” is switched on, the total/max score for the assessment is set to 1, when it should in fact be 2. This can be fixed by editing the testFeedback section of the xml. Just change the value in the last set of span tags to adjust the maximum score:

<testFeedback identifier="TEST_FB" showHide="show" outcomeIdentifier="TEST_FEEDBACK" access="atEnd">
     <div>You have reached the end of the test. Your total score was <printedVariable format="%.1f" identifier="TEST_total"/> out of <span class="uqfeedbackvar total">2</span>. </div>
</testFeedback>

Note that this example is taken from the default Uniqurate output, you can of course define your own feedback, displaying any of the variables defined in the outcomeProcessing section of the assessment.xml file.

Javascript: array.indexOf() fix for IE8 and below

Just a quick note on how to deal with another one of the IE/Javascript deficiencies that make our lives so much easier(!) – IE from versions 8 backwards doesn’t support the indexOf() function for arrays, e.g.

var myArray = ['Apple','Banana','Orange'];
alert(myArray.indexOf('Orange'));  //alerts '2', but not in IE <=8

Thankfully, there are easy ways to fix this:

  1. the JQuery $.inArray() function, e.g.
    alert($.inArray('Orange',myArray);
  2. Defining the indexOf function (before you call it!) if it doesn’t exist – taken from MDN
    if (!Array.prototype.indexOf) {
      Array.prototype.indexOf = function (searchElement /*, fromIndex */ ) {
        'use strict';
        if (this == null) {
          throw new TypeError();
        }
        var n, k, t = Object(this),
            len = t.length >>> 0;
    
        if (len === 0) {
          return -1;
        }
        n = 0;
        if (arguments.length > 1) {
          n = Number(arguments[1]);
          if (n != n) { // shortcut for verifying if it's NaN
            n = 0;
          } else if (n != 0 && n != Infinity && n != -Infinity) {
            n = (n > 0 || -1) * Math.floor(Math.abs(n));
          }
        }
        if (n >= len) {
          return -1;
        }
        for (k = n >= 0 ? n : Math.max(len - Math.abs(n), 0); k < len; k++) {
          if (k in t && t[k] === searchElement) {
            return k;
          }
        }
        return -1;
      };
    }

CakePHP/MySQL: Want a Boolean? Use TINYINT(1), not BIT(1)

I was recently creating some new MySQL tables that stored booleans, so I thought I would do things (what I presumed to be) properly and make them BIT(1) columns, rather than TINYINT(1). However, when I came to try to save values to this field using CakePHP, everything was saved as 1, even if the value in the data array was 0, false, “”, “0” or anything else ‘zero-ey’ or ‘falsey’.

It turns out that BIT fields are not supported by Cake, and so you should just use TINYINT(1) instead!

Furthermore, Cake will assume a TINYINT(1) field is intended as a boolean field, and will only allow you to assign it a value of 0 or 1, even though TINYINT(1) can store values from -128 to 127 (or 0 to 255 unsigned). If you try to save any value other than 0 or 1 to this field, it will be saved as 1 (but note that false, “” and an empty array will cause a save error).

Stringify an Object in Javascript

I just Googled (other search engines are available) variations of “javascript convert object to JSON”, assuming that it would be something that is completely straightforward and easy to do, either with basic Javascript or using JQuery, which we have loaded in most of our applications anyway. It turns out basic Javascript can’t do it, and nor can JQuery (although Jquery does have the parseJSON function for parsing a JSON string – jQuery.parseJSON( json )). Thanfully, there is a simple way to do it, but it’s not quite as simple as I’d hoped, if you want to fully support all browsers.

The Simple Way (won’t work in IE7 or below))

JSON.stringify(yourObject);

All ‘modern’ browsers (see exactly which ones here: http://caniuse.com/json, but basically it’s everything except IE7 and below) natively support the JSON object, which allows you use JSON.stringify(object) to convert and object to a JSON string, and JSON.parse(string) to go back the other way. So if you’re not bothered about supporting old versions of IE, you can do it this way.

The marginally more complicated way (for full cross-browser compatibility)

json2.js (available here: https://github.com/douglascrockford/JSON-js) gives you the same stringify and parse functions as above, and is pretty small when minified. It seems to be the best option out there if you want to support the poor souls forced to (I really hoping no-one is choosing to) use IE7 or below.

Eclipse: Adding File Associations

We regularly write PHP, using the CakePHP framework, in Eclipse (Juno, with PHP Development Tools (PDT)). The view template files in CakePHP have the .ctp extension, which Eclipse does not, by default, recognise as PHP files, so you do not benefit from any of the helpful Eclipse PHP tools. However, you can add an association (i.e. tell Eclipse that .ctp files are PHP files), as follows:

  1. Go to Window > Preferences to open the Preferences box
  2. Go to General > Content Types in the menu
  3. In the Content types box, expand Text and select “PHP Content Type”
  4. Click “Add”
  5. Type “.ctp” in the box that appears and click OK
  6. Click OK to close the Preferences box

Note that you will have to close and then reopen any .ctp files that are already open in order for them to be recognised as PHP files.

Eclipse: Changing Project Type

I’ve just added a new project from an existing location in Eclipse Juno, and for some reason it wouldn’t let me create it as a PHP project. Instead, I had to just create it as a general project. Having done this, it is fairly easy to convert it to a PHP Project, by doing the following:

  1. Open the .project file for the new (non-PHP) project in a text editor
  2. Open a .project file for an existing PHP project (or, if you haven’t got an existing PHP project, create one in your workspace and use the .project file from that)
  3. Copy the <buildSpec> and <natures> sections from the PHP .project file (from 2. above) to the .project file for the project that you want to change to a PHP project (from 1. above)
  4. Save the new modified .project file and refresh the workspace
  5. The general project should now be a PHP project

The .project file for my PHP projects looks like this:

<?xml version="1.0" encoding="UTF-8"?>
<projectDescription>
   <name>project_name</name>
   <comment></comment>
   <projects>
   </projects>
   <buildSpec>
      <buildCommand>
         <name>org.eclipse.wst.validation.validationbuilder</name>
         <arguments>
         </arguments>
      </buildCommand>
      <buildCommand>
         <name>org.eclipse.dltk.core.scriptbuilder</name>
         <arguments>
         </arguments>
      </buildCommand>
   </buildSpec>
   <natures>
      <nature>org.eclipse.php.core.PHPNature</nature>
   </natures>
</projectDescription>

Magnolia CMS: Getting node/page/paragraph IDs and user details using JSP

Just a quick note to remind me, and let anyone else who tries to do this know, how to access the unique id (uuid) of a page or paragraph, and details about the current user in a JSP page in Magnolia CMS. We are watching to save, via AJAX, information about how students use pages and paragraphs (in particular self-test question paragraphs) within our Magnolia installation, and need these details in order to do this.

Displaying the node/page/paragraph ID

If you put this code in a page template, it will show you the unique ID for the page. If you put it in a paragraph template it will show you the unique id for that paragraph. These IDs do not change when you move a page, or a paragraph within a page.

<cms:out nodeDataName="uuid" var="uuid" />
<p>${uuid}</p>

Displaying the name of the current user

<jsp:scriptlet>
   String user = (info.magnolia.context.MgnlContext.getUser().getName()).toString();
   out.println("&lt;p&gt;" + user + "&lt;/p&gt;");
</jsp:scriptlet>

Maths with QTI – Explanation of Help Guide for Maths Entry Questions

Here’s the link to the Help Guide for Maths Entry Questions, if you’ve come here looking for that. This post explains why we’ve created that guide.

We’re starting to deliver Maths questions online using QTIWorks, and are putting together a help guide for users, as it is not always easy to know how to correctly represent mathematical expressions in a maths answer box.

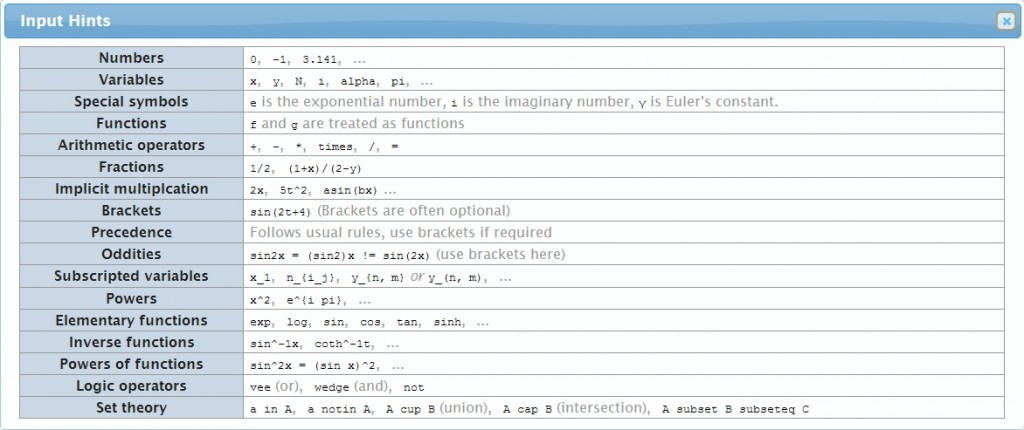
The “Input Hints” provided in QTIWorks are of some help, but are perhaps not the most user friendly and could be improved by the addition of examples, and perhaps some reordering to place the simpler and more commonly used inputs nearer the top of the list.

QTIWorks Input Hints
QTIWorks Input Hints (click to view full size)

To supplement (/replace) this hints box, I’ve started to write a (hopefully) simple guide to using the maths input box, with some examples. This is a work in progress, so will evolve, but hopefully is a reasonable starting point. Any comments are very welcome.