PHPFlickr and SSL/HTTPS – certificate issues on local Windows development server

We use PHPFlickr, which is a very handy PHP wrapper for the Flickr API, in CSlide. Recently, Flickr announced that they are making their API SSL only (on June 27th 2014), and PHPFlickr was updated accordingly. However, I could not get it to work on my local XAMPP development server, running on Windows 8. I initially assumed it was an issue with the changes to the PHPFlickr class (as it had previously worked fine), but, after much debugging, found that the problem was that CURL (which is used to make the requests to the API) could not verify Flickr’s SSL certificate. This is because CURLs default behaviour is to not trust any Certificate Authorities (CAs).

The solution is to give CURL a bundle of trusted CA certificates, which can be download from the CURL site. You can tell CURL about this bundle by setting the path to the CA bundle file in php.ini (and remembering to restart Apache afterwards). Adding this at the end of php.ini did the trick for me, but obviously change the path according to your own setup:

curl.cainfo=c:\xampp\php\cacert.pem

You can also point CURL at the CA bundle when setting up your curl connection, using curl_setopt to set CURLOPT_CAINFO to the full path to your CA bundle file. I didn’t want to do this with PHPFlickr, as it would involve changing the core PHPFlickr code, which would inevitably cause problems when that code gets updated:

curl_setopt($ch, CURLOPT_CAINFO, "c:\xampp\php\cacert.pem");

Note that one bad solution that was commonly suggested was to set CURLOPT_SSL_VERIFYPEER to false, which, as the name suggests, stop CURL from trying to verify the certificate. As rmckay says in the curl_setopt docs, this allows man in the middle attacks, so should be avoided!

Disabling touchscreen in Win 8.1

Having somehow managed to crack the screen on an Asus T100 on my way to work this morning, I was faced with the cracked area being interpreted as near-continuous touches, making the machine almost unusable. Thinking I’d turn off the touch on the screen, I found numerous posts suggesting that Human Interface Devices in Device Manager (in Control Panel) is the way to go and to look for and disable one of the USB Input Device entries. Having accidentally switched of the keyboard and trackpad several times (make sure you only try then one at a time!), I then spotted that my Asus has a device called HID-compliant touch screen. I disabled this and now have a fully working no touch notebook while I organise a repair.

AddThis _atssh div causing issues

I’m using AddThis in the new CSlide site, and it seems to add a div (id=”_atssh”), immediately after the link to the AddThis JavaScript file. This happens even if you have the JS file in the <head> section of the page, resulting in a div in the head, which clearly isn’t right. A quick search on the AddThis site suggests I am not the first to come across this issue, but it would appear the promised fix has not happened yet.

This can be fixed by putting the link to the JS file in the body (ideally at the end, for the sake of performance/progressive rendering*). However, having this div inserted at the end results in the size of the page height being increased by 1 pixel. Since, in my site anyway, it comes after a container with height set to 100%, it results in the page having a scrollbar when it shouldn’t need it.

Again, this can be fixed relatively easily, by adding the CSS below to your stylesheet. The offending div is invisible, so making it absolutely positioned (it used to already have position: absolute, but this seems to have changed (as at 6/01/2015)) and setting “top” to 0 just sticks it at the top of the page where it can’t interfere any more.

#_atssh {
    position: absolute;
    top: 0;
}

*I should mention that my JS was already at the end, and I only found out about the “div in the head” issue when looking into the page height issue.

Using QuickTime to create a movie

A group of students wanted to take some 360 models that we had filmed and put up on the web (see here), and record movies of them, with narration. Using QuickTime on a Mac seemed the simplest way to do this, and so we evolved a series of basic instructions to do this:

It’s a good idea to test how you will make the movie first – and then (unless you have already written a script) make notes of what you want to say.

This is the way to make the test AND the final movie.

1) Open Safari and navigate to https://history.medsci.ox.ac.uk/360objects/. Use the drop down OBJECTS menu to navigate to the models you specifically want to record.
N.B. – this would work for any web page you wanted to record.

2) When you have found the page you need to record, open the QuickTime Player.

QuickTime icon
QuickTime Player icon

QuickTime Player icon in system tray

3) Select File >> New screen recording

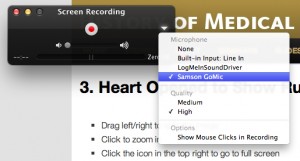
4) Make sure that you have the correct mike selected by checking the dropdown menu.

Selecting the mic
Selecting the mic

5) When you are ready, click the red button to start recording.

6) Enlarge your screen size to full screen (if you try to do this before you start recording on QuickTime Player, you will hide the record button)

7) Wait a couple of seconds before you start to speak and manipulate the model.

8) When you have finished, pause for a couple of seconds, then reduce the screen size so that you can see the Quicktime Player icon.

9) Click the black button to stop recording.

10) When you close the Quicktime screen for your movie (by using the red button top left) you will be prompted to save the file.

Saving the movie
Saving the movie

11) Save it to the folder on the desktop called: Students’ wax model videos

12) Name your file using the format: <<video title>> – <<your name>>

And that’s it!

~~~~~~~~~~

The raw file that is created will be a little rough and ready (for example, it will have the web screen at the front end before the model is expanded to fill the whole screen) so it will need to be smoothed and edited in another program.  We could do it in iMovie, and I’ll address that soon.

CakePHP: Getting the full URL of the current page

In a CakePHP (2.3) project, I needed to echo the full (i.e. including scheme (http, https etc) and hostname) current URL in a view. I assumed this would be easy, and it is, but it wasn’t immediately obvious and took a bit of searching. The following examples assume we are on localhost, the project is called ‘project’ and the current page is /controller/action/1, so we would expect the full URL to be: http://localhost/project/controller/action/1.

The way to do it:

All we need to do is to echo a null url, with the ‘full’ option set to true, which means the scheme, hostname and project path are included. As well as null, any “falsey” value seems to work, e.g. false, 0, “”, and even array().

echo $this->Html->url(null, true);

Produces: http://localhost/project/controller/action/1

The ways not to do it:

echo $this->here;

Produces: /project/controller/action/1. This is missing the scheme and hostname.

echo $this->Html->url();

Produces: /project/controller/action/1. Again, this is missing the scheme and hostname.

echo $this->Html->url( $this->here, true );

Produces: http://localhost/project/project/controller/action/1. Here ‘project’ appears twice, once from $this->here and once as we have set the ‘full’ option to true.

Peer marking systems

With a couple of groups looking at peer marking for:

  • formative essays;
  • formative short answer questions

now seemed like a sensible time to look at what’s out there to make this possible so have created the following Google Spreadsheet – please feel free to add to/modify (apologies for any errors):


Google Maps need resizing after being “shown” with JavaScript/JQuery

If you have a Google Map on a page that, for example, starts off hidden and is shown using JavaScript (inc. JQuery or another library), it seems to only load the top left map tile. In order to fix this, you need to resize the map after showing it, using the following line:

google.maps.event.trigger(map, 'resize');    //map is your google.maps.Map object

This is mentioned in the resize event in the Map class documentation.

XML views in CakePHP 2.x

In a CakePHP project, I needed to extract an XML string from the database and display it as an XML page. The docs suggested this would be easy with the XmlView, but I struggled to get it to work. However,  after a fair amount of fiddling around, I found an easy way to display an XML view.

Here’s what I had to do:

  • Enable parsing of .xml extensions in routes.php:
    Router::parseExtensions('xml');
  • Set the viewClass to Xml in the controller:
    $this->viewClass = 'Xml';
  • Create a simple xml view in Views/YourController/xml/xml.ctp, and echo $xml in this view:
    <?php echo $xml; ?>
  • Back in the controller, set the XML string to the view:
    $this->set('xml', $xmlString);
  • Finally, render using the xml view you have just created (this must be after the ‘set’ line above):
    $this->render('xml');

Unfortunately, this does not take advantage of the _serialize key, which would mean you don’t need to create a view file at all, but I just couldn’t get this to work with an XML string, despite trying various combinations of CakePHP’s Xml Class functions.

Authenticate (SSO) Vanilla users with a CakePHP 2 application using Vanilla’s jsConnect Plugin

Using your existing CakePHP website to authenticate users into a Vanilla forum (so they don’t have to setup another account) is fairly simple…once you know how:

In your Cake site:

  1. Download the PHP jsConnect client library as described here
  2. Create a ‘vanilla’ directory in app/Vendor and copy into it functions.jsconnect.php from the download in 1.
  3. In UsersController.php add:
    App::import(
     'Vendor',
     'FunctionsJsconnect',
     array('file' => 'vanilla' . DS . 'functions.jsconnect.php')
    );
  4. Paste index.php from the download in 1 into View/Users and rename it as vanilla_authenticate.ctp. Edit so that it contains only:
    // 1. Get your client ID and secret here. These must match those in your jsConnect settings.
    $clientID = "your_client_id_from_js_connect_plugin_settings_page";
    $secret = "your_secret_from_js_connect_plugin_settings_page";
    // 3. Fill in the user information in a way that Vanilla can understand.
    // CHANGE THESE FOUR LINES.
    $user['uniqueid'] = $user_data['your_cake_id_field'];
    $user['name'] = $user_data['your_cake_username_field'];
    $user['email'] = $user_data['your_cake_email_field'];
    $user['photourl'] = $user_data['your_cake_avatar_field'];
    // 4. Generate the jsConnect string.
    // This should be true unless you are testing. 
    // You can also use a hash name like md5, sha1 etc which must be the name as the connection settings in Vanilla.
    $secure = true; 
    WriteJsConnect($user, $_GET, $clientID, $secret, $secure);
  5. In UsersController.php, add a vanilla_authenticate action:
    public function vanilla_authenticate(){
        if ($this->Auth->loggedIn()){
             //user is logged in so pass necessary data through to view
             $this->layout = 'ajax';
             $user_data = $this->Auth->user();
             $this->set('user_data', $user_data);
             }
         }
  6. Again in UsersController.php, modify your login action:
    public function login() {
        if ($this->request->is('post')) {
            ...
            //Do your normal login business which includes the line
            $this->redirect($this->Auth->redirectUrl()); //after successful login
            ...
            }
        //add following to handle get request from jsConnect
        else{
            if(isset($this->request->query['source'])&&$this->request->query['source']=="vanilla"){
    	    //we need to redirect to vanilla after login so change redirectURL
    	    $this->Auth->redirectUrl('http://www.yourvanillasite.com/index.php?p=/entry/jsconnect&client_id=your_client_id_from_js_connect_plugin_settings_page&Target=http://www.yourvanillasite.com'); //big thanks to @hgtonight for this snippet
    	    }
    	}
        }

In your Vanilla forum:

  1. Download and enable the jsConnect plugin (at the moment, the advice is to use 1.03 as 1.4.1 is still buggy, reporting a ‘regex’ error);
  2. In the jsConnect plugin settings:
    • autogenerate (using the button at the bottom) a ClientID and Secret;
    • the Site Name: Your Cake Site – this will appear as ‘Sign in with {site name}’ when users go to the Vanilla forum
    • Authenticate URL:  http://www.yourcakesite.com/users/vanilla_authenticate
    • Sign In URL: http://www.yourcakesite.com/users/login?source=vanilla
    • Register URL: http://www.yourcakesite.com/users/register

Well, that’s what worked for me anyway….

Vanilla Community’s x00 tells me that you can avoid the complicated redirect in Cake Step 6 above (and replace with:

$this->Auth->redirectUrl('www.yourvanillasite.com');

if you use the jsConnect AutoSignIn Plugin…but I haven’t tried this yet.

Good luck.