The Basics of writing a Basic LTI Tool Provider

I hope this will be helpful for anyone just getting started with (Basic) LTI and wanting to create their first Tool Provider. Apologies for any abuse/misuse of the terminology – this is just how I understand it. To recap the two halves of an LTI launch:

Tool Consumer (TC) = An LTI-enabled VLE/LMS/other system that can make an LTI launch request. Generally (or at least the way we are using it), the TC manages user accounts/passwords, so that the Tool Provider doesn’t have to.
Tool Provider (TP) = an external tool that receives an LTI request from a TC and uses the launch data to work out what the user is able to see/do within the tool.

Useful links

I found the following useful when getting to grips with LTI and creating my first TP (in PHP):

Thanks of course to Dr Chuck and the rest of the LTI community for developing this specification and the above Classes, Tools and Tutorials.

Basic Implementation

The PHP Basic LTI class makes it very easy to do the LTI/OAuth bit of the TP. Here’s my pseudo-PHP code for the basic process:

//All of the LTI Launch data gets passed through in $_REQUEST
if(isset($_REQUEST['lti_message_type'])) {    //Is this an LTI Request?

    //We store oauth_consumer_key and secret pairs in our database, so we look the secret up here, but it can just be hard-coded (especially for testing)
    $secret = [secret];

    //Get BLTI class to do all the hard work (more explanation of these below)
    // - first parameter is the secret, which is required
    // - second parameter (defaults to true) tells BLTI whether to store the launch data is stored in the session ($_SESSION['_basic_lti_context'])
    // - third parameter (defaults to true) tells BLTI whether to redirect the user after successful validation
    $context = new BLTI($secret, true, false);

    //Deal with results from BLTI class 
    if($context->complete) exit(); //True if redirect was done by BLTI class
    if($context->valid) { //True if LTI request was verified
     //Let the user in
    }
}
else { //Not an LTI request, so either don't let this user in, or provide another way for them to authenticate, or show them only public content
}

Just to further explain the parameters passed when instantiating the BLTI class, the first argument is the secret, which is required and would usually be a string. Alternatively, you can pass through an associative array of database information (e.g. ‘table’ => ‘lti_keys’, ‘key_column’ => ‘oauth_consumer_key’), and the BLTI class will look up the secret from the database.

The second argument (true by default) tells the BLTI class whether to store the launch data in the session (from which it can be retrieved using $_SESSION[‘_basic_lti_context’]) and whether to try to automatically retrieve any stored LTI launch data if someone tries to access a tool without coming in through LTI. This means that if a user has initially come to a tool through LTI, then closes the browser tab containing the tool, and then goes directly back to the tool, without coming through LTI, as long as their session has not expired they will be allowed back into the tool, even though have not come through LTI. I would generally recommend keeping this as true, as I think this would usually be useful behaviour.

The third argument (true by default, but I generally set it to false) tells the BLTI class whether to do the redirect or not after validation of the request. Setting this to false will prevent it from doing the redirect.

I hope this is helpful. My understanding is pretty (cheap pun alert!) basic, so I would welcome any thoughts, queries, suggestions or corrections.

For further information/discussion of LTI, and how we have used it to allow access to our iCases system through WebLearn (our VLE), please see these posts:

Allowing access to iCases through LTI

This post follows on from my Early Thoughts on LTI.

We have now fully implemented LTI for our iCases system. This has many benefits, including:

  • We no longer have to maintain authentication/permissions information within iCases, this can instead be done by WebLearn (Sakai), the Univeristy’s VLE.
  • Previously, it was only possible to log in to iCases if you had an Oxford Single Sign On username, so non-Oxford users had to use a single ‘anonymous’ account. That meant all non-Oxford users could see each other’s attempts and answers, and it was very difficult for them to pause and resume an attempt, due to the difficulty of finding the previous attempt among a long list of anonymous attempts.
  • iCases can be integrated into WebLearn making it very easy to add an iCase to a course.
  • Other institutions with a VLE/LMS that conforms to the LTI standard can easily use our public iCases.

We have already successfully made an iCase available to both Oxford and non-Oxford users through WebLearn/LTI, and are beginning to roll out our remaining iCases using this method. This includes making a number of iCases available publicly – see https://learntech.medsci.ox.ac.uk/wordpress-blog/?p=295.

As it currently works, the following is the process for adding an LTI Tool Provider to a site in WebLearn (the LTI Tool Consumer):

  1. Add a Basic LTI Tool to the site
  2. An individual with “Instructor” privileges (in WebLearn this means someone with a maintain/contribute role) can set up the Basic LTI Tool to point to the Tool Provider. This requires, at the very least, setting the URL and entering a key and secret (held/provided by us) into WebLearn.
  3. The Instructor can also set some launch/display settings. These settings include whether to open the Tool Provider in a new window and whether to pass information about the user, e.g. name/email address, to it, both of which we do.
  4. When the LTI Tool is launched, it sends a signed LTI request to the Tool Provider (i.e. iCases)

Turning iCases into an LTI Tool Provider wasn’t totally easy, but wasn’t as difficult as I had expected, and was made much easier by using the IMS Global Bsaic LTI PHP class – http://ims-dev.googlecode.com/svn/trunk/basiclti/php-simple/ims-blti/. The way I have got the LTI launch to work, at the Tool Provider end is a follows:

  1. Check that we have received an LTI request – iCases is set up so that it can only be accessed through LTI, although it would be possible to allow other access routes.
  2. Get the oauth_consumer_key from the launch data, and use this to look up the corresponding secret in a table to keys/secrets in our database.
  3. Create a new BLTI object (using the IMS Global class) which does all of the “is this a valid LTI launch?”/OAuth stuff for you.
  4. If this is the first time iCases has been launched from this context (i.e. a site in WebLearn), add the context to the database.
  5. If this is the first time that this user (defined by their WebLearn unique ID) has accessed iCases, add the user to the database.
  6. If this is the first time iCases has been launched from this context and the user has an Instructor role, allow them to choose an iCase to associate with this LTI tool instance. If this is the first launch from this context, and the user is not an Instructor, send them to an access denied page.
  7. Any future launches from this context will now send users directly to the associated iCase.
  8. As well as being the only ones who can link a Basic LTI Tool instance to an iCase, Instructors also get extra privileges within iCases, e.g. they can mark student attempts.

And that’s it! We are very excited by the options LTI opens up for us, in particular the fact that it enables us to make WebLearn a single, consistent route to many tools, and that we no longer have to worry about maintaining user accounts/passwords within our tools (which has security benefits for users). It would be possible to make Tool Providers appear as though they are actually part of WebLearn, although we haven’t done this for iCases.

We are anticipating LTI-ing a number of other tools in the near future, including CSlide and a project/module option choosing system – watch this space!

CakePHP Session data being lost on redirect

Having successfully enabled access using LTI to a local version of iCases – see https://learntech.medsci.ox.ac.uk/wordpress-blog/?p=229 – I got it set up on a live server, assuming that it would work without any trouble. However, I was unable to login successfully through WebLearn, which is our Tool Consumer.

It turned out that this was due to the session data being lost when redirecting from the login page within the CakePHP app to the scenario page. Authentication using LTI relies on session data, as the LTI context information is saved to the session. Therefore, when the session data was lost, the app could no longer tell that the user had accessed it through a valid LTI request, and so the user was denied access.

I fixed this by changing Security.level in core.php to ‘low’ (it had previously been medium). From the CakePHP docs, this increases the multiplier for the ‘Session.timeout’ value (from 100 to 300) and disables (or, to be pedantic, does not enable) PHP’s session.referer_check. It seems to be the latter that was the problem. However, in the php.ini file we have ‘session.referer_check = ‘, which should mean that session.referer_check is not enabled anyway. So I am not sure why changing the security level had an effect, unless setting the Security.level to medium enables session.referer_check, even if it was not already enabled.

As far as I can tell from reading around, disabling session.referer_check should not cause any problems, as it is only possible to access the LTI-ed iCases through WebLearn. Checking that the LTI launch is valid includes checking that the launch request has come from a valid location.

Personalising WebLearn (Sakai) – The BMS Portal page

This year (2011-12), a new course, Biomedical Sciences, started within the Medical Sciences Division. This course combines  teaching specific to the course with teaching shared with other courses. In response to this, we wanted to ensure that the students’ experience of the course in WebLearn (Oxford’s Sakai-based VLE) was coherent and personalised, and didn’t require them to search through different parts of WebLearn to find what they needed.

Therefore, we decided to create a portal page that makes it easy for students to access the information – timetables, documents, etc – relevant to them. We wanted the page, and all of the content, to remain in WebLearn, to ensure that managing the content and the users remained straightforward for lecturers and administrators accustomed to using WebLearn.

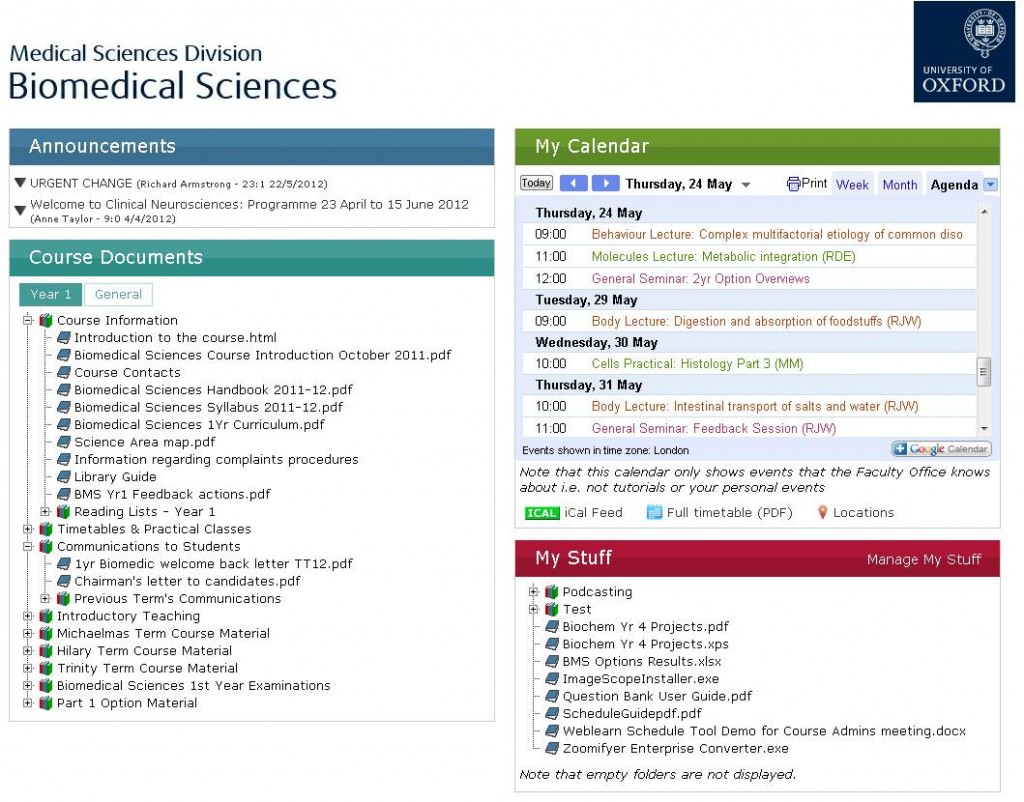
Biomedical Sciences Portal Page
The Biomedical Sciences Portal Page (click to enlarge)

The resulting portal page, shown above, provided students with a slick, modern-looking page, on which they could see any recent announcements, view their timetable and access documents both relating to their course and from their personal site within WebLearn.

In order to achieve this, it was necessary to create a multi-level structure for the site, with the main site containing a subsite for each year of the course, and each year site containing a subsite for each module.

To dip quickly into the technical aspects, the portal page makes significant use of JavaScript, in particular the JQuery library. Where possible, the content, along with the user’s status and year-group, is gathered using Ajax requests to ‘WebLearn direct’ URLs, which return information, such as a user’s recent announcements, in a computer-friendly format, e.g. JSON. A brief summary of how the different sections of the page are created is given below:

Announcements

WebLearn’s direct methods are used to get a user’s announcements, specifying the number and age to show. These are then presented to the user in an ‘accordion’, where clicking on an announcement title expands further details of that announcement.

Calendar

The requirement for the calendar was to bring together multiple module calendars into a single view, with a different colour for each module. This was achieved as follows:

  • The calendars for each module reside in the module sites.
  • A Google account is subscribed to the calendar (ICS) feed provided by WebLearn for each module.
  • A Google-calendar view of all the module calendars, with each one assigned a different colour, is embedded into the page.
  • In order to combine the multiple feeds back into a single ICS feed that students could sign up to, e.g. on a smart phone, we used a tool called MashiCal.  However, requires manual input of the feeds to be ‘mashed’ – this has not been a problem so far as the students all do the same module in Year 1.

Course Docs

Documents and resources are held in the subsites for each year/module, with some general resources in the top level site. At the time of creating the portal page, there were no direct methods for accessing resources, so a somewhat clunkier method was used. The portal page requests the web view (an HTML page) of the appropriate resources and then uses JQuery to dig down through the folder structure to extract the links to all of the resources and present them in a tree view.

My Stuff

This provides a view of everything in a student’s My Workspace resources folder, produced in the same way as the Course Docs. Students can only view their resources from the portal page – they have to actually go to their workspace to upload/edit resources.

Future Developments

  • Access resources for Course Docs and My Stuff using direct methods (now available after a recent upgrade), as the current process of extracting links from HTML pages is slow and error-prone.
  • Extending functionality of My Stuff, in particular enabling drag-and-drop upload of files, so students can quickly upload files from any computer, e.g. results in the lab.
  • Creation of our own  ‘calendar aggregator’, to automatically combine ICS feeds for each student based on the modules they are studying.