CakePHP 3 JSON Views: Setting _jsonOptions special parameter

CakpePHP 3 makes creating JSON and XML views of your data very easy, certainly easier than I remember finding it in Cake 2. However, I found the documentation didn’t make it particularly clear how/where to set the _jsonOptions parameter. All the docs (http://book.cakephp.org/3.0/en/views/json-and-xml-views.html) say is:

“The JsonView class supports the _jsonOptions variable that allows you to customize the bit-mask used to generate JSON. See the json_encode documentation for the valid values of this option.”

It’s actually pretty simple, just put this in your Controller action:

$this->set('_jsonOptions', JSON_HEX_TAG );

I was actually doing this to try to get rid of the JSON_HEX_TAG option, which seems to be set by default. So I actually did this, to unset all the JSON options:

$this->set('_jsonOptions', '');

Documentation for Moodle STACK and Maxima

I found that authoring questions in STACK requires a relatively steep learning curve. The main reason is that STACK exposes the Maxima Computer Algebra System, and its command set which is ‘ALGOL-like‘. This is was very unfamiliar on first look but has elements which I recognised, having programmed in the R statistical language.

The following documentation sources have been invaluable in writing effective STACK questions:

  1. Plug-in overview on Moodle.org
  2. Documentation which installs with the Moodle Plug-in. This will be installed on any system running STACK. It’s easiest to view on GitHub.
  3. Documentation for Maxima on its’ SourceForge home site
  4. Maxima syntax documentation summary. Some of the guide is for interactive mode, but it shows how to craft expressions for your model answer and and potential response tree.
  5. Moodle’s LaTeX summary. Note that the \[ … \] markers are preferred to the $$ … $$ markers in STACK questions.

I also found it useful to install wxMaxima to use on my Ubuntu Linux box.

Moodle STACK installation on Ubuntu LTS

We’re investigating algebraic maths questions in Moodle at the moment. One of the question type plugins is STACK.

I tried to install the STACK question type plug in but it wasn’t working. The error was “CAS failed to return any data”.

The CAS is a Computer Algebraic System. In this case it is Maxima. Our server is Ubuntu. The latest Long Term Support version available is 14.04 Trusty. The default Maxima package for Trusty is Maxima 5.32. The minimum requirement is 5.25.1 but it wasn’t working for me. I decided to upgrade after a test on my local system.

I looked for a Launchpad repository which I could use for a prebuilt package to upgrade with. There are RPM files on the sourceforge homepage (for Red Hat) but no debs for Ubuntu.

The only option was to build the package from source.

Steps:

  1. install Ubuntu package dependencies: automake; clisp; gnuplot; texi2html and texinfo. The latter two are for the help files.
  2. remove currently installed version of maxima
  3. open the installation instructions for building from source
  4. clone using git command in their repository or download from source. Remember that the latest version supported by the Moodle plugin is 5.36.0
  5. go to the healthcheck <moodle_home>question/type/stack/healthcheck.php
  6. purge cache and check that all the tests complete successfully

Our implementation of the STACK question type now accepts the simple test question shown in the authoring guide.

mysqldump all databases from XAMPP on Windows

A quick note to hopefully save others the time I’ve just wasted. If you want to dump out all your databases, perhaps in preparation for an upgrade to XAMPP as I’m about to try:

  1. Open up a command prompt (in Win 8+ type ‘Command’ and press <Enter> from the Start screen);
  2. Type:
    cd\xampp\mysql\bin

    (or wherever your myslq.exe is located)

  3. Type:
    mysqldump --user=root --password=myrootpwd --all-databases > backup.sql

Other options for this command can be found on the MySQL site.

Note that you are doing this from the Windows Command prompt – don’t get distracted, as I was, by running the MySQL command line tool. If you try and run mysqldump from the:

mysql>

prompt, you’ll get various syntax errors such as:

ERROR 1064 (42000): You have an error in your SQL syntax; check the manual that corresponds to your MySQL server version for the right syntax to use near 'mysqldump...' at line 1

However, if running the MySQL command line tool is what has brought you to this post, you launch this by following steps 1 & 2 above and then typing:

mysql --user=root --password=myrootpwd

When executing commands at the:

mysql>

prompt, don’t forget that it allows you to enter multiple lines at once and that clicking <Enter> will just give you a new line unless you finish your line with a semi-colon – this will tell MySQl that you want to execute the command.


AngularJS: Images failing to load (Not Found) with curly brackets in URL

This is one of those schoolboy errors that, in hindsight, is blindingly obvious and I should have been able to work out for myself, but required a bit of searching before I managed to ask Google (other search providers are available) the right question.

Basically, I had a load of image src paths that were defined using AngularJS expressions, e.g.

<img src="content/images/results/{{result.id}}.jpg" />

The images loaded fine, but I kept getting 404 (Not Found) errors on image URLs that contained the curly brackets of my expressions (/content/images/results/%7B%7Bresult.id%7D%7D.jpg). This seemed like it was because the page was trying to load the images before Angular has done it’s work and converted the expressions into sensible URLs. And that’s exactly the problem!

The solution is a simple one: use ng-src instead of src if the URL has an expression in it, e.g.

<img ng-src="content/images/results/{{result.id}}.jpg" />

InfoPath list of countries for drop-down

Want a drop-down list of countries for use in your InfoPath form? The guys at forms on fire have kindly created an XML file which makes this easy.

  1. Save the file (countries or US states – we’ll work with countries from now on) from the link above;
  2. In InfoPath, add a new Drop-Down List Box control, then right-click it and choose Drop Down List Box Properties
  3. On the Data tab, under List box choices, choose Get choices from an external data source and click the Add… button to the right of Data source.
  4. In the Data Connection Wizard, Select Create a new connection to: and Receive data then click Next >.
  5. Choose XML Document then Next >.
  6. Click Resource Files…
  7. In the Resource Files dialogue, click the Add… button and choose the CountryLookup.xml file you downloaded above. Click Open, then OK.
  8. Back in the wizard, click Next >, enter a name for the data connection e.g CountryLookup and click Finish
  9. Back in the Drop Down List Box Properties dialogue we need to specify the name of the repeating entries in the xml file so click the button to the right of Entries and select the repeating group – in this case ‘country’:
    CountryLookup
  10. Click OK, then use the similar buttons to choose which fields you wish to use for the Value (what is saved when users choose this country) and Display Name (what they see in the box) – in this case, ‘name’. Click OK and test.

PHP: Naturally sorting multidimension arrays by string values

This is just one of those things that I have to do often enough for it to be useful to have it close at hand, but not often enough that I actually remember how to do it.

I often run into this problem when using CakePHP, as results are returned from the database in a multidimensional array. Since MySQL doesn’t (as far as I’m aware) have an easy natural sort option, even if the results are sorted by name, strings that have numbers in can end up in the wrong order, e.g. “Item 10” before “Item 2”. Using a combination of usort() and strnatcasecmp(), it’s pretty easy to naturally sort an array by a value that appears in each subarray, like this:

usort($array, function($a, $b) {
    return strnatcasecmp($a['name'], $b['name']);
});

As an example, say I got the following array back from MySQL:

$array = array(
    array(
        'id' => 265,
        'name' => 'Drawer 1'
    ),
    array(
        'id' => 971,
        'name' => 'Drawer 10'
    ),
    array(
        'id' => 806,
        'name' => 'Drawer 2'
    ),
    array(
        'id' => 429,
        'name' => 'Drawer 20'
    )
);

“Drawer 10” comes before “Drawer 2”, which is obviously not what I want. Using strcasecmp() as the sort function on the above array wouldn’t change it, but using strnatcasecmp() gives the required result:

$array = array(
    array(
        'id' => 265,
        'name' => 'Drawer 1'
    ),
    array(
        'id' => 806,
        'name' => 'Drawer 2'
    ),
    array(
        'id' => 971,
        'name' => 'Drawer 10'
    ),
    array(
        'id' => 429,
        'name' => 'Drawer 20'
    )
);

Prevent Win 8/Win 8.1 connecting to an open/public network

You’ll find a lot out there about how you can make one or more networks, that you want to connect to, have higher priority than others. You do this by clicking the Connect automatically tick (check) box when connecting to your preferred networks, and un-ticking (unchecking) it for those that you don’t want to connect to. However, that won’t actually stop your computer from connecting to an unwanted network if it’s an open/public network and your preferred network isn’t available. To make sure it never connects to that unwanted network, you can use the magic of netsh:

netsh wlan add filter permission=block ssid=UnWantedNetwork networktype=infrastructure

You can either run this from a command prompt (don’t forget to replace UnWantedNetwork with your own unwanted network name) opened with administrator permissions: press the Start button, type

cmd

, right-click the Command Prompt item found by Search and choose Run as administrator); or, if you want to add to multiple machines, pop in in a batch file (create a file in Notepad, paste in the netsh command above, and save with a .bat extension), copy that batch file onto a USB stick then pop in the stick, right-click the batch file and choose Run as administrator.

In Win 8.1 it will no longer even appear in the list of available networks – result.

Kiosk Win 8.1 with touchscreen swipe gestures and fast user switching disabled

After a lot of searching and trial and error, here’s a quick guide to setting up a user account to run a webpage in as near-kiosk as it’s possible to be in Win 8.1 if the built in managed access method isn’t suitable for you: either because you’re running 8.1 Standard (managed access isn’t included) or because you need other applications to be able to launch from your webpage (managed access doesn’t permit this).

I’ve implemented it as two .bat files:

KioskAdministrator.bat is run once by an administrator to make some necessary changes (although this could just as easily be typed in at a command prompt running as Administrator):

REM KioskAdministrator.bat
REM Prevent autorestart of explorer
reg add "HKEY_LOCAL_MACHINE\SOFTWARE\Microsoft\Windows NT\CurrentVersion\Winlogon" /v "AutoRestartShell" /t REG_DWORD /d 0 /f
REM Prevent fast user switching
reg add "HKEY_LOCAL_MACHINE\SOFTWARE\Microsoft\Windows\CurrentVersion\Policies\System" /v "HideFastUserSwitching" /t REG_DWORD /d 1 /f

KioskUser.bat is run at whenever the kiosked user logs on:

REM KioskUser.bat
REM Kill explorer
taskkill /f /im explorer.exe
REM Start Chrome
C:\Progra~1\Google\Chrome\Application\chrome.exe --incognito --kiosk http://www.mysebsite.com

To run through what these are doing:

KioskAdministrator.bat

Touchscreen gestures (swiping from left to switch between apps, swipe from right to access start, settings, etc.) are part of explorer.exe and, while you can stop the trackpad equivalents while explorer is still running, the only way to stop the touchscreen gestures, without turning off the touchscreen altogether, appears to be by stopping explorer.exe. AutoRestartShell is a key which determines whether Windows will automatically try to restart explorer.exe if it shuts down unexpectedly – we have to set this to 0 to allow our kiosked user to turn it off in KioskUser.bat. Setting HideFastUserSwitching to 1 means that users can only switch between users by logging off – we only need this because we are running online exams. Note this this changes these settings for all users on the machine.

KioskUser.bat

The first thing this does in kill explorer.exe to prevent access to those touchscreen gestures. It then launches chrome (or any other application you want to launch). –incognito puts Chrome into incognito mode, which prevents it displaying the option to restore a previous session if it closed unexpectedly and –kiosk starts it in full screen mode.

In order to get KioskUser.bat to run at logon, use Scheduled Tasks as described (for Win 7 but it’s very similar) here. Note the gotcha if you want this to happen when on battery as well as when plugged in, that under the Conditions tab in task properties, there is a Start the task only if the computer is on AC power checkbox which is ticked by default.

Note that this is a quick and easy solution – there may well be a way to do this with group or local policies that might suit your situation better.

There doesn’t seem to be any way to disable Ctrl-Alt-Del and access to the Task Manager from where you can re-enabled explorer by choosing Run new task from the File menu – I’d be interested in any ideas…


CSS pseudo element for caret in WordPress Advanced Sidebar Menu

I have been using the fantastic Advanced Sidebar Menu for WordPress – a plugin which gives you configurable widgets which automatically generate a sidebar menu. However, out of the box, the free version lacks (CSS) style – most importantly, some way to indicate whether a menu item is selected and/or has sub-items.

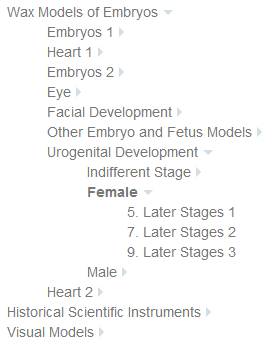
Luckily it provides plentiful classes to attach your styles to – in particular, all you need to tell whether an item is open or not. Combine this with the elegantly simple CSS only technique to generate a caret and you can easily create a simple menu like this (working example on History of Medical Sciences website)

AdvancedSideBarMenu

Basic styling

Three styles give me the simple look I wanted:

ul.child-sidebar-menu{
 padding-left:0; /*stop browser indenting too far*/
 }
ul.child-sidebar-menu li{
 list-style:none; /*get rid of bullets*/
 }
ul.child-sidebar-menu li>a{
 color:#777; /*make text a laid-back grey*/
 }

Active menu item

To indicate the currently active item, the developers have given us the

current_page_item

class which is used like this:

ul.child-sidebar-menu li.current_page_item>a{
 font-weight: 700; /*bold for <a> children of the active list item*/
 }

Has item got children

The developers attach a

has_children

class to items with children. We can pick this up and use the magic of CSS pseudo classes to add a right-pointing caret after every link that has children.

li.has_children>a::after{
	width: 0px; 
	height: 0px; 
	border-top: 5px solid transparent;
	border-bottom: 5px solid transparent;
	border-left: 5px solid #d1dee4;
	content:"";
	position: absolute; /*to prevent it picking up the height of the <a> that is before it*/
	margin-left: 5px; /*now it's absolutely positioned, we need to add suitable margins (not padding which would change its shape)
	margin-top: 5px;
}

However, in big menus, it’s nice to see when an item is open. Again, the developers have given us a class to achieve this:

current_page_ancestor

.

li.current_page_ancestor>a::after{
	border-right: 5px solid transparent;
	border-left: 5px solid transparent;
	border-top: 5px solid #d1dee4;
	margin-top: 8px; /*adjust margin to make caret look as if it has rotated*/
}

But this will only show a down caret on the parent if one of the children is selected. To show it as soon as you can see its children (ie when the parent is selected), we need to add an additional selector as follows:

li.current_page_ancestor>a::after, li.has_children.current_page_item>a::after{
	border-right: 5px solid transparent;
	border-left: 5px solid transparent;
	border-top: 5px solid #d1dee4;
	margin-top: 8px;
}