Virtual microscopy in the classroom

This morning saw the first use of CSlide teaching slides within the laboratory to demonstrate the features that students should be looking for down their own microscopes. Monitors around the laboratory display the demonstrator’s computer screen or a view down the demonstrators microscope. The two main benefits of using CSlide on the computer, rather than projecting images from the demonstrator’s microscope, are:

  1. CSlide starts with a view of the whole slide and the demonstrator zooms in by double-clicking. This helps students get a feel for where they will find the relevant structures on their own slides. With a projected microscope, this overview is generally not possible and the change of lenses required for zooming in can make the experience disjointed.
  2. Each slide can be opened before the class, ready for use, in a separate window. This makes it very much quicker and easier to switch between slides, when teaching or responding to student questions, than with a traditional microscope.

The next stage is to embed the slides in students’ online teaching materials as has been done in the second year Nervous System course (Oxford users only). Annotations and ‘tours’ around the slides will give students a chance to come back to slides of interest outside the time-pressured environment of the laboratory. We also hope to build on these with self-test quizzes and decision maze case-studies.


The Basics of writing a Basic LTI Tool Provider

I hope this will be helpful for anyone just getting started with (Basic) LTI and wanting to create their first Tool Provider. Apologies for any abuse/misuse of the terminology – this is just how I understand it. To recap the two halves of an LTI launch:

Tool Consumer (TC) = An LTI-enabled VLE/LMS/other system that can make an LTI launch request. Generally (or at least the way we are using it), the TC manages user accounts/passwords, so that the Tool Provider doesn’t have to.
Tool Provider (TP) = an external tool that receives an LTI request from a TC and uses the launch data to work out what the user is able to see/do within the tool.

Useful links

I found the following useful when getting to grips with LTI and creating my first TP (in PHP):

Thanks of course to Dr Chuck and the rest of the LTI community for developing this specification and the above Classes, Tools and Tutorials.

Basic Implementation

The PHP Basic LTI class makes it very easy to do the LTI/OAuth bit of the TP. Here’s my pseudo-PHP code for the basic process:

//All of the LTI Launch data gets passed through in $_REQUEST
if(isset($_REQUEST['lti_message_type'])) {    //Is this an LTI Request?

    //We store oauth_consumer_key and secret pairs in our database, so we look the secret up here, but it can just be hard-coded (especially for testing)
    $secret = [secret];

    //Get BLTI class to do all the hard work (more explanation of these below)
    // - first parameter is the secret, which is required
    // - second parameter (defaults to true) tells BLTI whether to store the launch data is stored in the session ($_SESSION['_basic_lti_context'])
    // - third parameter (defaults to true) tells BLTI whether to redirect the user after successful validation
    $context = new BLTI($secret, true, false);

    //Deal with results from BLTI class 
    if($context->complete) exit(); //True if redirect was done by BLTI class
    if($context->valid) { //True if LTI request was verified
     //Let the user in
    }
}
else { //Not an LTI request, so either don't let this user in, or provide another way for them to authenticate, or show them only public content
}

Just to further explain the parameters passed when instantiating the BLTI class, the first argument is the secret, which is required and would usually be a string. Alternatively, you can pass through an associative array of database information (e.g. ‘table’ => ‘lti_keys’, ‘key_column’ => ‘oauth_consumer_key’), and the BLTI class will look up the secret from the database.

The second argument (true by default) tells the BLTI class whether to store the launch data in the session (from which it can be retrieved using $_SESSION[‘_basic_lti_context’]) and whether to try to automatically retrieve any stored LTI launch data if someone tries to access a tool without coming in through LTI. This means that if a user has initially come to a tool through LTI, then closes the browser tab containing the tool, and then goes directly back to the tool, without coming through LTI, as long as their session has not expired they will be allowed back into the tool, even though have not come through LTI. I would generally recommend keeping this as true, as I think this would usually be useful behaviour.

The third argument (true by default, but I generally set it to false) tells the BLTI class whether to do the redirect or not after validation of the request. Setting this to false will prevent it from doing the redirect.

I hope this is helpful. My understanding is pretty (cheap pun alert!) basic, so I would welcome any thoughts, queries, suggestions or corrections.

For further information/discussion of LTI, and how we have used it to allow access to our iCases system through WebLearn (our VLE), please see these posts:

Twitter Widget – filter by @username and #hashtag

If you want to embed tweets in your blog or website from a @username but only show those with a given #hashtag, Twitter’s Widgets makes it easy:

For example, to show only tweets from my @allotmentor account which are tagged with #allotment, I simply enter

from: @allotmentor AND #allotment

in the Search Query box on the Configure a search widget page. Then copy and paste the generated code into your site. See it in action here.

Thanks to this answer on Stack Overflow

Award hat trick

A duo of awards over the summer:

was topped off yesterday by news that we have been awarded FENS Funding for European Neuroscience History Projects in 2013 to capture and make available on our History of Medical Sciences website ‘3-dimensional images of physiological apparatus and models with historic interest’.
See all our summer news in the MSDLT Update


iCases freely and publicly available!

iCases are action mazes on the web which deliver complex and engaging learning. They have been used in the Medical Sciences Division for the last few years, and have been very well received by students.

iCases give students the opportunity to interact with experimental data in a realistic context. For example, with limited time and money, students must decide what tests are needed to resolve a complex situation typical in biomedical sciences. Research is needed before students can begin the case, background information and references are provided. A simple quiz is used to show that they are ready to proceed to the case itself.

Find out more about iCases

Use iCases NOW!

The following iCases are now freely and publicly available, supported by the HEA Bioscience OER project:

Please note that your attempts at these iCases, and any written answers you enter, will be available for anyone else to see.

 Interested in Using iCases in your Institution?

The above iCases are freely available for use under the specified license. If you wish to have individual accounts for your users (so that an individual will only be able to see their own attempts/answers), there are two options available:

  • iCases is a LTI Tool Provider, and so can be integrated into any VLE/LMS that conforms to the LTI standard. User access will then be controlled by the VLE/LMS.
  • We can, on a limited basis depending on demand, provide accounts within WebLearn (the University of Oxford’s VLE) for use by your users.

If you wish to discuss either of these options further, please contact MSD Learning Technologies.

Allowing access to iCases through LTI

This post follows on from my Early Thoughts on LTI.

We have now fully implemented LTI for our iCases system. This has many benefits, including:

  • We no longer have to maintain authentication/permissions information within iCases, this can instead be done by WebLearn (Sakai), the Univeristy’s VLE.
  • Previously, it was only possible to log in to iCases if you had an Oxford Single Sign On username, so non-Oxford users had to use a single ‘anonymous’ account. That meant all non-Oxford users could see each other’s attempts and answers, and it was very difficult for them to pause and resume an attempt, due to the difficulty of finding the previous attempt among a long list of anonymous attempts.
  • iCases can be integrated into WebLearn making it very easy to add an iCase to a course.
  • Other institutions with a VLE/LMS that conforms to the LTI standard can easily use our public iCases.

We have already successfully made an iCase available to both Oxford and non-Oxford users through WebLearn/LTI, and are beginning to roll out our remaining iCases using this method. This includes making a number of iCases available publicly – see https://learntech.medsci.ox.ac.uk/wordpress-blog/?p=295.

As it currently works, the following is the process for adding an LTI Tool Provider to a site in WebLearn (the LTI Tool Consumer):

  1. Add a Basic LTI Tool to the site
  2. An individual with “Instructor” privileges (in WebLearn this means someone with a maintain/contribute role) can set up the Basic LTI Tool to point to the Tool Provider. This requires, at the very least, setting the URL and entering a key and secret (held/provided by us) into WebLearn.
  3. The Instructor can also set some launch/display settings. These settings include whether to open the Tool Provider in a new window and whether to pass information about the user, e.g. name/email address, to it, both of which we do.
  4. When the LTI Tool is launched, it sends a signed LTI request to the Tool Provider (i.e. iCases)

Turning iCases into an LTI Tool Provider wasn’t totally easy, but wasn’t as difficult as I had expected, and was made much easier by using the IMS Global Bsaic LTI PHP class – http://ims-dev.googlecode.com/svn/trunk/basiclti/php-simple/ims-blti/. The way I have got the LTI launch to work, at the Tool Provider end is a follows:

  1. Check that we have received an LTI request – iCases is set up so that it can only be accessed through LTI, although it would be possible to allow other access routes.
  2. Get the oauth_consumer_key from the launch data, and use this to look up the corresponding secret in a table to keys/secrets in our database.
  3. Create a new BLTI object (using the IMS Global class) which does all of the “is this a valid LTI launch?”/OAuth stuff for you.
  4. If this is the first time iCases has been launched from this context (i.e. a site in WebLearn), add the context to the database.
  5. If this is the first time that this user (defined by their WebLearn unique ID) has accessed iCases, add the user to the database.
  6. If this is the first time iCases has been launched from this context and the user has an Instructor role, allow them to choose an iCase to associate with this LTI tool instance. If this is the first launch from this context, and the user is not an Instructor, send them to an access denied page.
  7. Any future launches from this context will now send users directly to the associated iCase.
  8. As well as being the only ones who can link a Basic LTI Tool instance to an iCase, Instructors also get extra privileges within iCases, e.g. they can mark student attempts.

And that’s it! We are very excited by the options LTI opens up for us, in particular the fact that it enables us to make WebLearn a single, consistent route to many tools, and that we no longer have to worry about maintaining user accounts/passwords within our tools (which has security benefits for users). It would be possible to make Tool Providers appear as though they are actually part of WebLearn, although we haven’t done this for iCases.

We are anticipating LTI-ing a number of other tools in the near future, including CSlide and a project/module option choosing system – watch this space!

CakePHP Session data being lost on redirect

Having successfully enabled access using LTI to a local version of iCases – see https://learntech.medsci.ox.ac.uk/wordpress-blog/?p=229 – I got it set up on a live server, assuming that it would work without any trouble. However, I was unable to login successfully through WebLearn, which is our Tool Consumer.

It turned out that this was due to the session data being lost when redirecting from the login page within the CakePHP app to the scenario page. Authentication using LTI relies on session data, as the LTI context information is saved to the session. Therefore, when the session data was lost, the app could no longer tell that the user had accessed it through a valid LTI request, and so the user was denied access.

I fixed this by changing Security.level in core.php to ‘low’ (it had previously been medium). From the CakePHP docs, this increases the multiplier for the ‘Session.timeout’ value (from 100 to 300) and disables (or, to be pedantic, does not enable) PHP’s session.referer_check. It seems to be the latter that was the problem. However, in the php.ini file we have ‘session.referer_check = ‘, which should mean that session.referer_check is not enabled anyway. So I am not sure why changing the security level had an effect, unless setting the Security.level to medium enables session.referer_check, even if it was not already enabled.

As far as I can tell from reading around, disabling session.referer_check should not cause any problems, as it is only possible to access the LTI-ed iCases through WebLearn. Checking that the LTI launch is valid includes checking that the launch request has come from a valid location.

Early Thoughts on LTI

We have been investigating using the Learning Tools Interoperability (LTI) tool available through our VLE, WebLearn (Sakai), in order to authenticate users for various services that we provide (or are considering providing), including Rogo, iCases and OxPro.  We initially thought that this would mean we could take user/authentication control completely out of these systems, but unfortunately (in terms of ease, but fortunately in terms of security) it is not so easy.

The LTI specification has been created by the IMS Global Learning Consortium and uses OAuth to sign requests for accessing a tool. The Tool Provider (TP), e.g. Rogo, iCases or OxPro, stores a secret and an ‘oauth_consumer_key’ for each Tool Consumer (TC), e.g. WebLearn. When a tool is launched from the TC through LTI, a signed request is sent to the TP. The TP uses the oauth_consumer_key sent with the signed request to look up the secret, recreate the signature and check that the signatures match. Matching signatures results in a valid request, and the user is allowed to access the tool. If everything within the tool is available to every user this is as complicated as it gets. It is also possible to differentiate access rights based on a user’s role, which should (i.e. it is recommended by the LTI specification) be passed through in the LTI launch data. Both of these scenarios do not require any user information or privileges to be stored by the TP.

The situation gets more complicated when a user should only be allowed to access certain resources within the TP. This is the situation with Rogo, for example, as a student who is allowed to access Rogo should not necessarily be allowed to access every paper within Rogo. Therefore, the Rogo team at the University of Nottingham have implemented LTI in such a way that it is necessary for Rogo to contain it’s own user information. When a user first accesses Rogo through LTI, they must login separately to Rogo. Rogo then stores a link between the user_id passed through in the LTI launch data (which, in combination with the oauth_consumer_key, uniquely identifies the user) and the user within the Rogo system. Thereafter that user should never again need to login to Rogo when coming in through LTI from the same TC.

An LTI link to Rogo only provides a user with access to a single paper. In order to define which paper is linked, the first time an administrator/module convenor (as defined in Rogo) accesses the LTI link (which should be when the link is set up in the TC), they choose the paper from the list of papers for which they are an editor. Thereafter, students coming in through this LTI link will only be able to access that paper (and then only if they are allowed to access that paper within the Rogo system, i.e. they are a member of the module to which the paper belongs).

The situation with Rogo causes problems for us, as we want our students to be able to login using the University of Oxford single-sign-on system (which is used to login to Weblearn), and not need a separate set of login details for Rogo, even if they only need them for their first login. Therefore, we are looking into logging users into Rogo directly through the single-sign-on system, rather than using LTI.

For iCases, we do not want to have to pre-register all users within the system, as is necessary in Rogo. Unlike in Rogo, we are planning only allow access through LTI. We will then create a user profile when a user first accesses the system and this user profile will be linked to the LTI user_id/oauth_consumer_key. WebLearn passes through sufficient information (email address, name, and hopefully single-sign-on username) that we can know who a student is based on this LTI launch data, so we can monitor students’ activity and performance. This information is not required under the LTI specification, but we will make other institutions who use iCases aware that in order to track students’ activity and performance, their TC will need to provide this information, otherwise they will need to find out who a user is based on the user_id passed through in the launch data.

An LTI link to iCases will only allow a student access to a single iCase. If a user wants to access a different scenario, they will have to come in via a different LTI link, with the appropriate resource_link_id. We would prefer not to maintain a list of user/scenario associations, which would enable users to access multiple scenarios through a single link. However, we are still in the early stages of implementing LTI for iCases, and it may be something we choose to do further down the line.


Zoomify – Flash vs HTML5

We use Zoomify as part of our CSlide project, to enable viewing of microscope slides scanned at up to 40x resolution. It works in a similar way to Google Maps, loading small image tiles to make up a larger image, without the need to load the entire image (up to 20,000 megapixels!) in one go. This makes it much quicker to load the section of the image that the user wants to look at.

Zoomify have just released an HTML5 version of the viewer, in addition to the Flash-based viewer that has been available since Zoomify was first released. The major advantage of this from our point of view is that it enables microscope slides to be viewed on mobile devices, in particular iPads and iPhones, that do not support Flash. The two viewing options provide a similar viewing experience, but there are a few differences, as follows:

  • Mouse scroll wheel zooming – in the Flash viewer it is possible to zoom in and out using the mouse scroll wheel. This does not seem to be possible using the HTML5 viewer, although I am not aware of any reason why this could not be made possible.
  • Full screen view – in the Flash viewer, going to ‘full screen’ view mode results in the viewer taking over the entire screen. In the HTML5 viewer, going to ‘full screen’ view mode results in the viewer taking up the entirety of the browser window. These behaviours are a result of the nature of the viewing options: HTML5 exists entirely within the browser and is therefore constrained by the browser dimensions; Flash on the other hand is, to some extent, ‘outside’ of the browser, and so can occupy the entire screen. My personal opinion is that the HTML5 viewer way of doing this is preferable, as it enables a user to see a large view, but also switch to other programs/browser tabs without needing to close ‘full screen’ view.
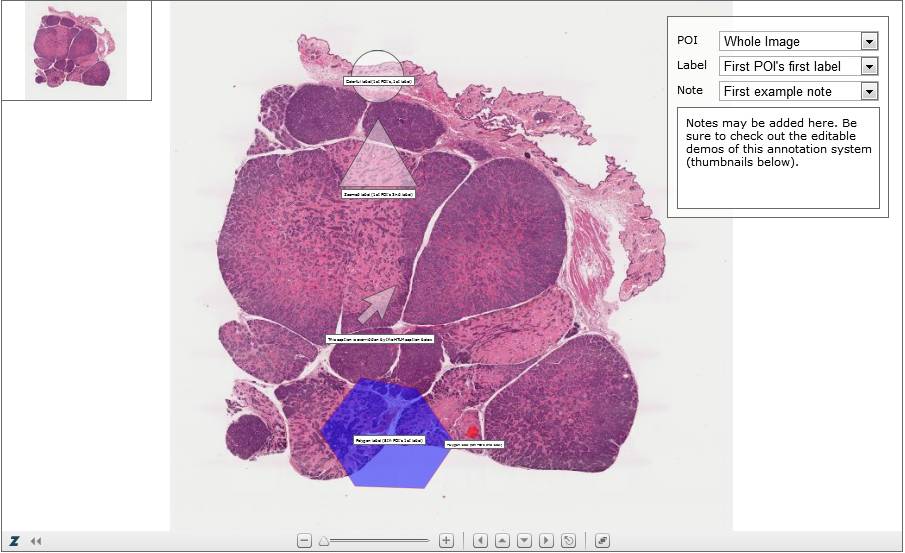
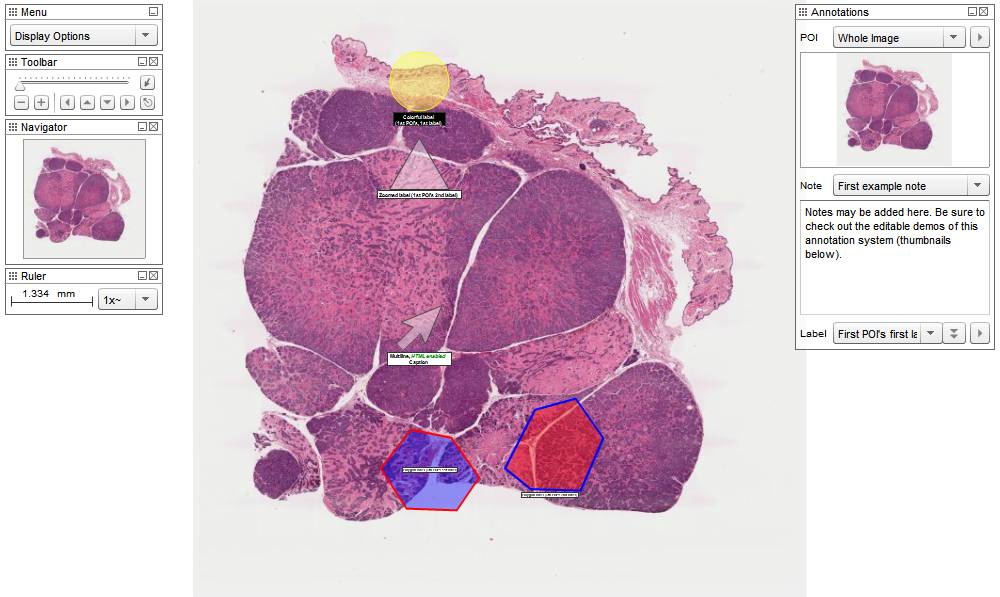
  • Annotation Viewing – currently the Flash annotation viewer has a few more capabilities, as described below. However, I do not feel that any of these represent significant advantages for normal use. Screenshots of the two annotation viewers are shown at the end of the post:
    • Display options menu – Flash annotation viewer has a display options menu, with various options that are not available in the HTML5 annotation viewer, e.g. adding a pointer, or saving the currently shown section of the image to file. However, the most of useful of the display options in the Flash annotation viewer, ‘full screen view’, is available on the toolbar in HTML5 annotation viewer, so full screen mode can be activated in a single click, whereas it requires 2 clicks in the Flash annotation viewer.
    • Ruler – The Flash annotation viewer has a ruler panel, to give an indication of scale at the current zoom level. This is a potentially handy, but not essential, feature.
    • Point of Interest preview – the Flash annotation viewer shows a preview of each Point of Interest, so a user can see what they are going to be taken to before they choose to go to a point of interest. Again this is handy, but not essential.
  • Annotation Editing – currently, the only annotation editing that can be done using the HTML5 viewer is to add polygons, or change the shape of existing polygons. It is not possible to add points of interest, labels or notes. Therefore the HTML5 viewer falls a long way short in this respect, and, at present, we are not going to enable any editing using the HTML5 version. However, Zoomify are presumably (I am awaiting confirmation of this) planning to extend the annotation editing capabilities in HTML5, to bring them in line with the Flash viewer.
One advantage of the HTML5 viewer over the Flash viewer, from our perspective at least, is that we are more familiar with HTML/JavaScript/CSS, on which the HTML5 viewer is based, that we are with Flash. This will make it easier for us to modify the HTML5 viewer, if required. Furthermore, I believe that, with HTML5, CSS and JavaScript being open, and universally supported, standards, HTML5 is the best long term solution.
Zoomify HTML5 Annotation Viewer Screenshot
HTML5 Annotation Viewer Screenshot
Zoomify Flash Annotation Viewer Screenshot
Flash Annotation Viewer Screenshot