Personalising WebLearn (Sakai) – The BMS Portal page

This year (2011-12), a new course, Biomedical Sciences, started within the Medical Sciences Division. This course combines  teaching specific to the course with teaching shared with other courses. In response to this, we wanted to ensure that the students’ experience of the course in WebLearn (Oxford’s Sakai-based VLE) was coherent and personalised, and didn’t require them to search through different parts of WebLearn to find what they needed.

Therefore, we decided to create a portal page that makes it easy for students to access the information – timetables, documents, etc – relevant to them. We wanted the page, and all of the content, to remain in WebLearn, to ensure that managing the content and the users remained straightforward for lecturers and administrators accustomed to using WebLearn.
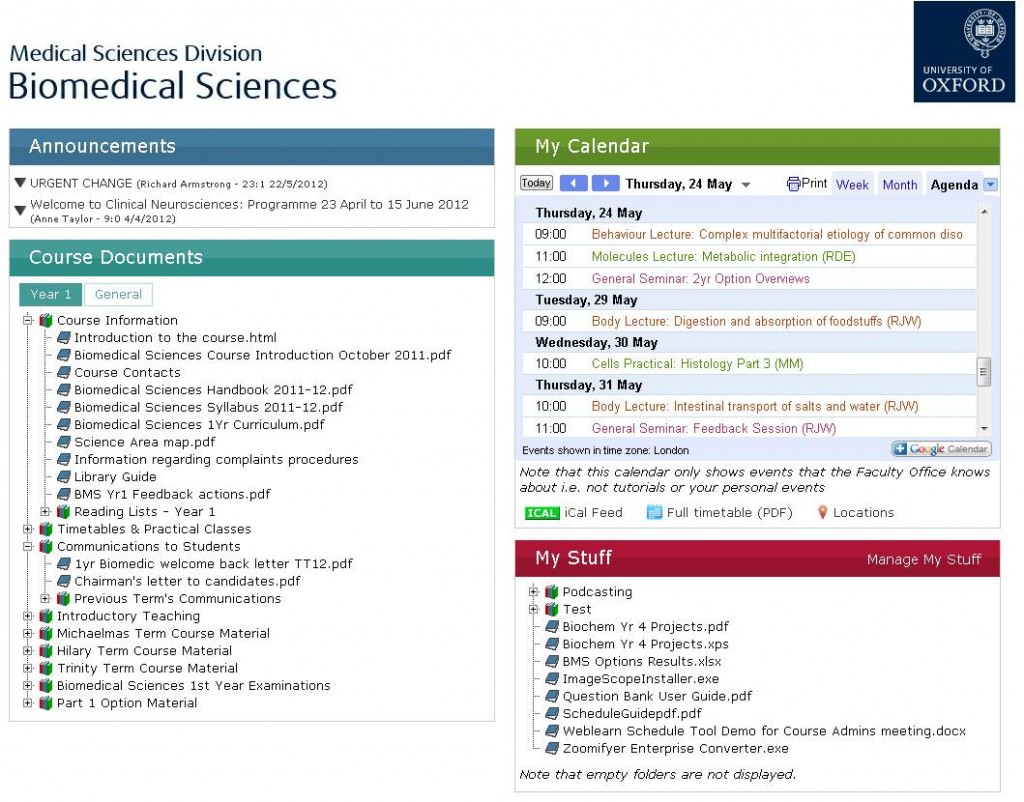
Biomedical Sciences Portal Page
The Biomedical Sciences Portal Page (click to enlarge)

The resulting portal page, shown above, provided students with a slick, modern-looking page, on which they could see any recent announcements, view their timetable and access documents both relating to their course and from their personal site within WebLearn.

In order to achieve this, it was necessary to create a multi-level structure for the site, with the main site containing a subsite for each year of the course, and each year site containing a subsite for each module.

To dip quickly into the technical aspects, the portal page makes significant use of JavaScript, in particular the JQuery library. Where possible, the content, along with the user’s status and year-group, is gathered using Ajax requests to ‘WebLearn direct’ URLs, which return information, such as a user’s recent announcements, in a computer-friendly format, e.g. JSON. A brief summary of how the different sections of the page are created is given below:

Announcements

WebLearn’s direct methods are used to get a user’s announcements, specifying the number and age to show. These are then presented to the user in an ‘accordion’, where clicking on an announcement title expands further details of that announcement.

Calendar

The requirement for the calendar was to bring together multiple module calendars into a single view, with a different colour for each module. This was achieved as follows:

  • The calendars for each module reside in the module sites.
  • A Google account is subscribed to the calendar (ICS) feed provided by WebLearn for each module.
  • A Google-calendar view of all the module calendars, with each one assigned a different colour, is embedded into the page.
  • In order to combine the multiple feeds back into a single ICS feed that students could sign up to, e.g. on a smart phone, we used a tool called MashiCal.  However, requires manual input of the feeds to be ‘mashed’ – this has not been a problem so far as the students all do the same module in Year 1.

Course Docs

Documents and resources are held in the subsites for each year/module, with some general resources in the top level site. At the time of creating the portal page, there were no direct methods for accessing resources, so a somewhat clunkier method was used. The portal page requests the web view (an HTML page) of the appropriate resources and then uses JQuery to dig down through the folder structure to extract the links to all of the resources and present them in a tree view.

My Stuff

This provides a view of everything in a student’s My Workspace resources folder, produced in the same way as the Course Docs. Students can only view their resources from the portal page – they have to actually go to their workspace to upload/edit resources.

Future Developments

  • Access resources for Course Docs and My Stuff using direct methods (now available after a recent upgrade), as the current process of extracting links from HTML pages is slow and error-prone.
  • Extending functionality of My Stuff, in particular enabling drag-and-drop upload of files, so students can quickly upload files from any computer, e.g. results in the lab.
  • Creation of our own  ‘calendar aggregator’, to automatically combine ICS feeds for each student based on the modules they are studying.

The Curious Case of the Disappearing Image

During our first live test of Rogo, we were somewhat alarmed when the students pointed out that one of the questions was missing an image. Although far from ideal, it was thankfully not disastrous, as it was noticed fairly early on and we were able to print out a copy of the image for all the students.

The question is, what happened to this image? The paper was checked thoroughly against the QuestionMark Perception version of the paper immediately after it was imported, so it would have been spotted at that point had it not come through in the import. However, I clearly did not check the paper thoroughly enough immediately before the exam, as the image was not there.

So the image was lost from the question between it being imported into Rogo and the paper being taken. To find out when and why, I reimported just this question. The image is there in the QTI XML export from Perception, and was there in the question immediately after import. However, after saving the question from the edit screen, without having made any changes to the question, the image had disappeared. The table cell that should contain the image was left just containing an  .

We presumed there was something in the imported HTML that was causing this to occur. Initially we thought it might be that there was no closing tag for the <IMG …> (nor a closing slash at the end of the tag), but adding this made no difference, and there were other questions that have the same lack of closing tag and there were no problems with these. On closer inspection of the html for the questions, we noticed that there was a span in the question intro in the faulty question that was not there in any others. This span contained some attributes that came from MS Word:

<SPAN style=”mso-bidi-font-family: Arial; mso-hansi-font-family: Arial” lang=EN-GB><STRONG>diaphragm <BR></STRONG></SPAN>

Removing the span altogether fixed the problem, so we drilled down in order to identify what aspect of the tags was causing it. We looked into the following:

  • The <br> inside span the span? Moving it outside made no difference
  • No quotation marks around EN-GB? Adding them made no difference
  • The lang attribute? Removing it made no difference
  • Non-standard CSS properties in style attribute? Removing the styles fixed the problem

Although it is nice to have found the specific cause, there is no reason for this span to exist at all, so we have removed it completely from the imported version. Hopefully questions containing spans such as this will be few and far between, but since many questions are copied in from Word, care needs to be taken, as it seems that the Rogo text editor, not unusually, does not like them.

For future imports, a quick find/replace through the QTI XML exports when we transfer questions en masse from Perception to Rogo should enable us to remove problematic spans. We will have to do some modification of the XML anyway (e.g. changing the path to images), so it will not be much more work to sort this out as well. I have also blogged about other issues relating to importing questions.

Importing Questions into Rogo

In preparation for our first running our first live test of Rogo, we needed to get an exam paper that had been created in Questionmark Perception into Rogo. This seemed simple enough, simply by exporting the QTI XML from Perception and importing it into Rogo. This generally worked reasonably well, but there were a few issues that had to be dealt with:

  • Not unsurprisingly, images needed special attention. The links to the images in Perception (e.g. “%SERVER.GRAPHICS%topicresources/1065007843”, where the number at the end is the topic id) were replaced (using a blanket find/replace) with “/media(/subdirectorypath)”, and the images copied into the appropriate subdirectory.
  • There were some issues with tables where an image was shown side by side with the answer options, which required a hack in Perception. For some questions there were problems in the HTML in Perception (left over from the dark ages), so fixing the HTML in Perception fixed the import problems relating to this.
  • EMQ feedback – the general question feedback from Perception is given as the feedback for all stems in Rogo, which does not have general feedback for EMQs. This can be fixed by removing the feedback from all except the last question, so that it just appears at the end of the responses. Alternatively, the feedback can be split up to give each stem its own feedback. Either of these options would be laborious for large numbers of questions, so the best long-term alternative may be to alter the import code to deal with this.
  • MCQ feedback – when importing MCQs (including those created in Rogo, exported and imported back in without any modification), in which only general feedback is provided, the general feedback is put in the answer feedback for each answer and general feedback is left empty. This has been added to the Rogo Trac system (#683,  https://suivarro.nottingham.ac.uk/trac/rogo/ticket/683)
  • Correct answers for EMQs – after importing all the correct answers are set to A. This is also the case if a question is created in Rogo, exported from Rogo and imported back in. This issue was added to Trac (#682, https://suivarro.nottingham.ac.uk/trac/rogo/ticket/682) and has now been fixed by the Rogo team, presumably for a future release. For this assessment, fixing this was simply, but annoyingly, a case of going through all the questions and changing the correct answers.
  • Rogo does not have a multiple MCQ question type, i.e. several MCQs that share the same stimulus and so are combined into a single question, so that it looks like an EMQ, but there are different answer options for each stem. Such questions are recognised as Matrix questions by Rogo when they are imported, but this format is not appropriate. There is no way of modifying an EMQ in Rogo so that subsets of the answer options are only available for certain stems. We have a large number of questions of this format, and currently the only option is to separate them out into MCQs, which is not a sustainable solution. Therefore, we may need to create a multiple MCQ question type, which hopefully would not be too difficult using the EMQ question type as the basis.

Having fixed all these problems, it seemed as though we had an exact copy of the assessment, with everything working as it should. The only difference between the questions as far as the students were concerned was that the multiple MCQ question (there was only one of this type in this paper) was split into 5 separate MCQs.

However, while running the assessment, we were to come across the Curious Case of the Disappearing Image, which, it turned out, was caused by a problem related to importing.

Question Analysis – Difficulty/Facility and Discrimination

Difficulty/Facility

This is simply a measure of the proportion of students that answered a question correctly and has a value of between 0 and 1. It is calculated by taking the sum of the actual marks for each candidate and dividing it by (the maximum multiplied by the number of candidates).

It is often referred to as difficulty, but should probably be known as facility, as a value of 0 means that no-one answered the question correctly, and a value of 1 means that everyone answered the question correctly.

General wisdom seems to be that questions with facility values of around the pass mark for the assessment (e.g. pass mark = 70%, facility = 0.7) will give the most most useful information about the candidates.

Discrimination

The purpose of item discrimination is to identify whether good students perform better, worse or the same as poor students on a question. Based on Kelley (1939), good and poor students are defined by taking the top and bottom 27% based on overall assessment mark.

Discrimination for a particular answer option is then calculated by subtracting the fraction of the bottom group who gave the answer from the fraction of the top group who gave the answer. So:

  • A positive item discrimination means a higher proportion of people in the top group chose the answer than in the bottom group. A high positive value for the correct answer generally means the question is a good discriminator, which is what we want (but is very difficult to achieve!). A positive discrimination for an incorrect answer may suggest an issue, but could equally just mean that it is a good distractor.
  • An item discrimination of 0 means the same number of people from each group gave the answer, so the answer doesn’t discriminate at all. Questions where everyone got the correct answer will always have a discrimination of 0.
  • A negative item discrimination means a higher proportion of people in the bottom group chose the answer. This would be expected for an incorrect answer. A negative discrimination on a correct answer may indicate something is wrong, as more able students are choosing an incorrect answer.

To make a question a good discriminator, the correct answer should have a high positive discrimination, and the incorrect answers should have a negative discrimination.

Reporting in Rogo

Currently, reporting in Rogo is only assessment-based. The following reports are available:

  • Class Totals (available as HTML, CSV or Excel) – scores for individuals
  • Frequency & Discrimination (U-L) Analysis (HTML only) – item analysis with frequencies, item difficulty and discrimination value
  • Export responses as CSV file – question by question responses
  • Export marks as CSV file – question by question marks

Class Totals

Example of Class Totals output
Example of Class Totals output (click to view full size)

The class totals output, which is available as HTML, CSV of Excel formats, shows individual results for students who have taken the paper. The table of results has the following headers:

  • Name
  • Student ID
  • Course
  • Mark
  • Percentage
  • Classification (Pass, Fail etc)
  • Start Time
  • Duration
  • IP Address
  • Room
  • Extra

It also produces a histogram for the percentage marks, and a scatter plot of percentage against duration (time taken). Summary statistics, including measures of central tendency, standard deviation and percentiles are also produced.

Frequency & Discrimination (U-L) Analysis

Example of Item Analysis Output
Example of Item Analysis Output (click to view full size)

This analysis is produced on an item by item basis, and is only available in HTML format. It shows the percentage of total respondents who chose each option, as well as the percentage of respondents from the top and bottom groups (the top and bottom 27%, based on overall assessment mark) who chose the correct option.

The p-value, or ‘difficulty’ (actually facility, as 0 = no-one answered the item correctly and 1 = everyone answered the item correctly), is shown, as is the discrimination, d. See the Question Analysis – Difficulty/Facility and Discrimination post for more on this.

At the moment it is not possible to obtain aggregated statistics about a question that has been used in multiple exams. However, the Rogo team have said that this is something that they are looking at for the future.

Export responses/marks as CSV file

The responses export provides a CSV (comma-separated values) file showing the response that each candidate gave,  as a number that corresponds to the option numbers in the question editor (for EMQs/MCQs). It also gives the correct answer for each question/item.

The marks export does the same, but giving the candidate’s mark for each question/item.

Other Reports

It is also possible to output a “Learning Objective Analysis” report, but we have not looked into this yet, as we have not mapped any assessments/questions to learning objectives.

There are also reports available called “Internal Peer Review” and “External Examiners”, but these, I presume, relate to comments/analysis produced during the process of creating the assessment, rather than to student results/question performance.

CSS – Start values in ordered list

When trying to specify the start value for an ordered list, i.e. to make it start from 4 rather 0, I found that the “start” attribute, e.g. <ol start=4>, had been deprecated in HTML 4 and that it should be done using CSS. However, the CSS is more complicated than it seems it should be for what is a relatively straightforward task. It also seems strange that it should be part of CSS, as the start value is not really a style consideration.

Thankfully, in the HTML5 specification – http://www.w3.org/TR/2008/WD-html5-20080122/#the-ol – the start attribute is no longer deprecated. The same is true of the value attribute for li elements, allowing you to specify the value for a specific list item. So to start a list at 4 and miss out 6 & 7, you would use:

<ol start="4">
   <li>Item 4</li>
   <li>Item 5</li>
   <li value="8">Item 8</li>
   <li>Item 9</li>
</ol>

This gives:

  1. Item 4
  2. Item 5
  3. Item 8
  4. Item 9

The final ‘ō’ in Rogō

The final ‘ō’ in Rogō is an ‘o’ with a macron, which has numerical code 333 (&#333; for HTML) and HEX code 014D. This seems to cause some problems, as not all text editors are able to read/save the character, e.g. WinSCP’s internal editor, or are not, by default, set up with the correct encoding to read/save it, e.g. Eclipse. As a result, having edited files, we were finding that the titles of pages, for example, contained the ‘Å’ character instead.

We feel that it is perhaps unnecessary to use this special character, and it might be easier to just use a standard ‘o’ instead. However, in order to ensure the ‘ō’ is retained, it was necessary to take the following steps in the editors we use:

  • Eclipse (which gives a warning when trying to save a file that contains characters in cannot encode) – go to Window > Preferences > General >  Workspace and in the “Text file encoding” section, change the setting from the Default (Cp1252) to UTF-8.
  • WinSCP – rather than changing the encoding settings of the internal editor (which doesn’t seem to be possible), I changed the editor that is used to Notepad++, which has many other advantages over the internal editor.

However, there was still a problem with any ‘ō’ contained within the database, e.g. the contents of the help files. Initially, the database would not let me store the ‘ō’ character. This was fixed by changing the Collation from latin_swedish_ci (which it must have defaulted to) to utf8_unicode_ci. The ‘ō’ character can then be saved in the database, but the browsers I have tested it on (IE9, Firefox, Chrome) display the ‘ō’ as a question mark (only for ‘ō’s read from the database though, not ‘static’ ones in HTML files). The only way to get this to render properly in the pages is to replace the character with the html code &#333; or &#x14D;. Therefore, we could go through the SQL files for the help pages (in the install folder) and do a find/replace on all of the ‘ō’ characters, then replace the contents of the help tables.

However, this all seems a bit unnecessary just to get ‘ō’ rather than ‘o’, so we have suggested the on the Rogo mail list that we could drop the ‘ō’ when using it in text, and just use ‘o’.


A minor change to the assessment delivery page

For EMQs in Perception, we ‘manually’ (using our Question Maker) number the question stems with Roman numerals – (i), (ii) etc – and letter the answer options – A, B, C etc. However, in Rogo, the stems are automatically lettered by default. Therefore, having imported questions from Perception into Rogo, the stems had both letters and Roman numerals, e.g. A. (i) The first stem.

To fix this, the options were to change all of our questions when we imported them, or to remove the automatic stem lettering in Rogo. The former would be a prohibitively large amount of work, so thankfully the latter is merely a case of changing one CSS property in the paper/start.php file, line 370. The “list-style-type:upper-alpha” property of “.extmatch li” was changed to “list-style-type:none” to remove the item-marker. There are many possible values for this property – see http://www.w3.org/TR/CSS21/generate.html#list-style.

Thoughts on Rogo Delivery

The Rogo delivery system seems to be robust and, unlike the admin interface, free from bugs. It also seems fast, and initial load-testing has shown it to be capable of putting up with a reasonable number of students starting or finishing an assessment at the same time, although we have not tested this in a live environment. This is despite us running the system on a single, reasonably-spec’d, but not especially new, server.

One handy feature in the Rogo delivery system, that Perception does not have, is the Fire Alarm button – see https://learntech.medsci.ox.ac.uk/wordpress-blog/?p=15.

However, there are a number of things that are missing, compared with Perception: Auto-save, timed assessments, secure browser.

Auto-save

Rogo is not able to auto-save assessments, e.g. every 5 minutes. It does save when a user moves to another screen (and when the fire alarm button is clicked) but since we prefer to run our exams as a single, scrollable screen containing all of the questions, this is not particularly helpful. However, since the functions are there for saving the current status of an exam while the exam is continuing, it would proably not be a big step to write an AJAX-based auto-save function.

Timed Assessments

Assessments in Rogo are never timed and so do not autosubmit when the time is up. The assessments we have run in Perception have traditionally been timed, so that each user’s time only begins when they enter the assessment page, and the assessment automatically submits when their time runs out. There is also a timer on the page, so the student can see exactly how much time they have left, as this would not be the same for all students. However, we have recently been leaning increasingly towards running untimed assessments, mainly due to the problems of disaster recovery with a timed assessment. For example, if a fire alarm were to go off, it would not be possible to pause the timer and allow students to carry on from where they left off. Therefore, the lack of timed assessments is unlikely to be a major issue, as we were heading in this direction anyway. Nonetheless, it would be good to have the option!

Secure Browser

Unlike Perception, Rogo does not have built in secure browser support. However, there are free secure browsers out there that can be used instead, e.g. Safe Exam Browser – http://safeexambrowser.org. We might cover this more fully at a later date when we’ve done more testing with it. Update: Now covered in this post

Importing Multiple Users in Rogo

Rogo enables the import of multiple users from a CSV file.

The are a number of required fields, although the order of the fields is flexible. The import does not worry about the case of the field headings, and can accept alternatives for each, as shown below:

  • Student ID: student_id, id
  • Forename(s): first names, forenames
  • Surname: surname, family name
  • Title: title
  • Course Code: course code, course
  • Year of Study: year of study, year of course (1, 2, 3 etc, not actual year, which is held in session)
  • Email Address: email, local email

It is also possible to specify a username for each student. If no username is given, the system will take everything before the @ in the email as the student’s username. A Module and Session (e.g. 2011/12) can also be specified – both are needed for this to be added. Module needs to be the module ID, e.g. OrgBod.

The Student ID does not refer to the student’s username or their database ID (an incremental digit), but a student ID held in a separate table in the database, which does not have to be unique.

Importing a user with the same username as a user that is already in the database will result in that user being overwritten.

There is no way of specifying a password for a user. All passwords are generated randomly and then hashed. This means there is also no way of finding out a user’s password. The only way to define a password for a user is to click “Reset” from the User File, which sends the user an email that they can then click on to set their password. This makes sense from a security point of view, but it is important for us to be able to see user’s passwords (something that is possible in Perception), so that we can log them in if they have forgotten their password, and can test multiple users with defined passwords.

In order to enable defining of passwords in user import, the following was added to import_users.inc:

Line 117:

    //JHM 2012-04-13: Enable passwords to be imported by csv
if (isset($header['password']) && $fields[$header['password']] != "") {	//Check that we have a password header, and the password is not blank for this user
    $password = $fields[$header['password']];
} else {
    $password = PasswordUtils::gen_password();	//No password was provided, so generate a random one
}

Line 137, comment out:

//$password = PasswordUtils::gen_password();	//JHM 2012-04-13: Password now obtained from csv or generated above (line 118)

From looking in the database, this was changing the value of the password for a user, but still did not allow the user to login using the given password. It emerged that this was because the passwords were being doubly encrypted, first in import_users.inc and then in UserUtils::createUser (userutils.class.php line 50). Therefore, I changed lines 137-139 of import_users.inc to:

//$password = PasswordUtils::gen_password();	//JHM 2012-04-13: Password now obtained from csv or generated above (line 118)
//$encpw_password = PasswordUtils::encpw($username, $password);	//JHM 2012-04-13: Password encrypted in createUser below
$encpw_password = $password;	//JHM 2012-04-13: Password encrypted in createUser below, so use plain password

This then worked fine for new user imports, but not for importing users over the top of old users. This required changes to lines 153 onwards in import_users.inc:

$encpw_password = PasswordUtils::encpw($username, $password);	//JHM 2012-04-13: Encrypt password for updating

//JHM 2012-04-13: Added password - 'ssssss' refers to var types, so add extra s to get it to work
$result = $mysqli->prepare("UPDATE users SET yearofstudy=?, title=?, first_names=?, surname=?, grade=?, password=? WHERE username=?");
$result->bind_param('sssssss', $year, $title, $forname, $surname, $course, $encpw_password, $username);

This now seems to work. This issue has been submitted to the Trac system – ticket #701, https://suivarro.nottingham.ac.uk/trac/rogo/ticket/701

We have also made a request for the import to flag up potential problems with header names, and/or enabling users to tell Rogo which headers it should expect, so it can report back if it failed to find any of these. Trac ticket #700 – https://suivarro.nottingham.ac.uk/trac/rogo/ticket/700