ical/ics feed from Rapla

We’ve been using Rapla resource booking system for years now to manage room (and associated resources such as laptops, furniture, etc) bookings and have been using the Export2iCal plugin to pull data from Rapla and display it in various other ways. I thought it would be useful to just jot down a couple of features of Rapla/iCal that may not be obvious for anyone else thinking of doing this.

  1. The url for the ical feed is:
     http://myraplaserver/rapla?page=ical&user=username[&file=fileName]

    Where:

    • username is the name of the user who has published a view on Rapla
    • fileName [for the optional file parameter] is the name of the view to return. If the file parameter is omitted, it will return the Default view.

    The thing to note here is that the ical feed returned contains the events for those resources that are shown in the Default or other named view for the user, username.

  2. In order to access a view via ical, it must first be published. This is achieved by selecting the desired view (or Default) and then clicking the Publish button, and ticking the ICAL Publish checkbox.
  3. To set which resources are shown in a given view, simply Ctrl-click to highlight them then click the Save button for the view.


Sakai Entity Broker methods – the missing documentation

An attempt to collect together some understandable documentation on how to use the Sakai (@Oxford Sakai=WebLearn) Entity Broker (EB) methods in the face of continued frustration with Sakai documentation accessed via /direct/describe (@Oxford https://www.weblearn.ox.ac.uk/direct/describe).

I’m only going to cover methods to return JSON  as that’s all we ever use and am not bothering to describe the format of the returned JSON as it’s easier just to look at what’s returned in the browser.

  • Announcement
  • Assignment
  • Content
  • Forums (including Topic, Thread and Message)
  • Group
  • Lesson
  • Lessons
  • Membership
  • Polls
  • Portal-hierarchy
  • User

announcement

Gets the announcements for a site for the logged in user.

/direct/announcement/site/siteId.json

e.g @Oxford

https://weblearn.ox.ac.uk/direct/announcement/site/d1506490-a468-46ca-a915-417d9d11be2f.json

assignment

Gets the assignments for a site for the logged in user.

/direct/assignment/site/siteId.json

e.g @Oxford

https://weblearn.ox.ac.uk/direct/assignment/site/d1506490-a468-46ca-a915-417d9d11be2f.json

content

Gets the contents of the Resources tool.

/direct/content/resources/group/siteId[/subFolderPath].json[?depth=noOfSteps]

where:

  • subFolderPath (optional) is the path a subfolder (path relative to root of Resources)
  • noOfSteps (optional) is the no of ‘layers’ of content to return (seems to have a maximum value of 3?). If not specified defaults to 1.

e.g @Oxford

https://weblearn.ox.ac.uk/direct/content/resources/group/1e969f60-9ebf-48b7-bb0f-54f598de05da/Online%20assessments%20documents.json?depth=2

forums (including topic, thread and message)

Get all fora for a site:

/direct/forums/site/siteId.json

Get all topics for a forum:

/direct/forums/site/siteId/forum/forumId.json

Get all conversations for a topic:

/direct/forums/site/siteId/forum/forumId/topic/topicId.json

Get a fully populated conversation or message. This retrieves the message tree from the specified message downwards. If the messsageId is the top level message in a conversation, the entire conversation is returned:

/direct/forums/site/siteId/forum/forumId/topic/topicId/message/messsageId .json

…and to link directly to individual parts of forums:

For direct forum link url is :

/portal/hierarchytool/siteId/discussionForum/forum/dfForumDirect.jsf?forumId=forumId

Direct forum_topic link is :

/portal/hierarchytool/siteId/discussionForum/message/dfAllMessagesDirect.jsf?topicId=topicId

Direct link to individual message is :

/portal/hierarchytool/siteId/discussionForum/message/dfViewMessageDirect.jsf?messageId=messsageId &topicId=topicId&forumId=forumId

group

Get the membership of a group.

/direct/membership/group/groupId.json

whee groupId can be found by looking at the address of the page when editing a group in Siet Info | Manage Subgroups – may also be possible to find by name with /direct/site methods?

e.g @Oxford

https://weblearn.ox.ac.uk/direct/membership/group/8513fad8-656f-4265-9573-f00b8a781d02.json

lesson

Get the contents of a lesson.

/direct/lessons/lesson/lessonId.json

where lessonId is the id or entityId returned by direct/lessons (above)

e.g @Oxford

https://weblearn.ox.ac.uk/direct/lessons/lesson/35538.json

lessons

Get a list of the lessons in a site.

/direct/lessons/site/siteId.json

e.g @Oxford

https://weblearn.ox.ac.uk/direct/lessons/site/1e969f60-9ebf-48b7-bb0f-54f598de05da.json

Note that, in Sakai 11 at Oxford anyway, the lessons EB method will not currently (03/10/16) return lessons to access users – only those with elevated rights e.g for the same call:

As a maintainer:

{"entityPrefix": "lessons", "lessons_collection": [
    {
    "contentsURL": "https:\/\/weblearn.ox.ac.uk\/direct\/lessons\/lesson\/78676",
    "gradebookPoints": null,
    "id": 78676,
    "lessonTitle": "Module 1",
    "releaseDate": null,
    "hidden": false,
    "entityReference": "\/lessons\/78676",
    "entityURL": "https:\/\/weblearn.ox.ac.uk\/direct\/lessons\/78676",
    "entityId": "78676"
    }
]}

As an access user:

{"entityPrefix": "lessons", "lessons_collection": [

]}

membership

Get information about membership of a given user in a given site

/direct/membership/userId::site:siteId.json

where:

  • userId is the id (Sakai’s internal reference) of user about which you want info (obtainable for logged in user from user/current.json as below)
  • siteId  is the Sakai siteId.

e.g @Oxford

https://weblearn.ox.ac.uk/direct/membership/d00ca345-4e31-485c-00e9-0fc880da2dc0::site:d1506490-a468-46ca-a915-417d9d11be2f.json

polls

Can’t find any way to get a list of polls for a site!

Get poll text and options

/direct/polls/pollId/poll-view.json?includeOptions=true

where:

  • pollId is the id (Sakai’s internal reference) of the poll. This is most easily obtained by hovering over the poll name in the edit view and picking out the number(!)
  • includeOptions (boolean) specifies whether to also return the options for the poll and;
  • includeVotes (boolean) specifies whether to also return the votes cast

e.g @Oxford

https://weblearn.ox.ac.uk/direct/polls/pollId/poll-view.json?includeOptions=true

portal-hierarchy (maybe only @Oxford?)

Provides a list of all the sites (to which the user has access) under a given site – one level down only.

/direct/portal-hierarchy/site.json?portalpath=pathFromRoot

e.g @Oxford

https://weblearn.ox.ac.uk/direct/portal-hierarchy/site.json?portalpath=/medsci

user

Information about the logged-in user – mainly used to get interal Sakai id for use in other methods.

/direct/user/current.json

e.g @Oxford

https://weblearn.ox.ac.uk/direct/user/current.json

more..

I’ll try to remember to add to these as I use them.

Bootstrap image header with title and coloured bar

It’s not rocket-science but, in case anyone else is looking how to do this, based on this post: http://forums.asp.net/t/2067649.aspx?bootstrap+thumbnail+image+with+text+inside+and+green+big+line+on+the+bottom

calendarandforum

Html:

<div class="row">
 <div class="col-md-6">
  <div class="forum-image header-image">
   <div class="h3 heading-text">FORUM</div>
   <div class="heading-border"></div>
  </div>
  <div class="content-container"></div>
 </div>
 <div class="col-md-6">
  <div class="calendar-image header-image">
   <div class="h3 heading-text">CALENDAR</div>
   <div class="heading-border"></div>
  </div>
  <div class="content-container"></div>
 </div>
</div>

Css:

div.header-image{
 position: relative;
 width:100%;
 height: 150px;
 background-position: center;
 background-size: cover;
}
div.heading-text{
 position: absolute;
 bottom: 10px;
 width: 100%;
 padding: 10px;
 margin: 0px !important;
 opacity: 0.8;
 color: #373737;
 background-color: #d8d8d8;
}
div.heading-border{
 position: absolute;
 bottom: 0px;
 width: 100%;
 height: 10px;
}
div.content-container{
 min-height: 200px;
 margin-bottom: 15px;
 border: 1px solid #cccccc;
 padding: 10px;
}
div.calendar-image{
 background-image: url(../img/calendar.jpg);
}
div.calendar-image div.heading-border{
 background-color: #00147a;
}
div.forum-image{
 background-image: url(../img/students_chatting.jpg);
}
div.forum-image div.heading-border{
 background-color: #be0f35;
}

Acknowledgements

Calendar image by Dafne Cholet under Creative Commons Attribution 2.0 Generic

Forum image by Knight Foundation under Creative Commons Attribution-ShareAlike 2.0 Generic

mysqldump all databases from XAMPP on Windows

A quick note to hopefully save others the time I’ve just wasted. If you want to dump out all your databases, perhaps in preparation for an upgrade to XAMPP as I’m about to try:

  1. Open up a command prompt (in Win 8+ type ‘Command’ and press <Enter> from the Start screen);
  2. Type:
    cd\xampp\mysql\bin

    (or wherever your myslq.exe is located)

  3. Type:
    mysqldump --user=root --password=myrootpwd --all-databases > backup.sql

Other options for this command can be found on the MySQL site.

Note that you are doing this from the Windows Command prompt – don’t get distracted, as I was, by running the MySQL command line tool. If you try and run mysqldump from the:

mysql>

prompt, you’ll get various syntax errors such as:

ERROR 1064 (42000): You have an error in your SQL syntax; check the manual that corresponds to your MySQL server version for the right syntax to use near 'mysqldump...' at line 1

However, if running the MySQL command line tool is what has brought you to this post, you launch this by following steps 1 & 2 above and then typing:

mysql --user=root --password=myrootpwd

When executing commands at the:

mysql>

prompt, don’t forget that it allows you to enter multiple lines at once and that clicking <Enter> will just give you a new line unless you finish your line with a semi-colon – this will tell MySQl that you want to execute the command.


InfoPath list of countries for drop-down

Want a drop-down list of countries for use in your InfoPath form? The guys at forms on fire have kindly created an XML file which makes this easy.

  1. Save the file (countries or US states – we’ll work with countries from now on) from the link above;
  2. In InfoPath, add a new Drop-Down List Box control, then right-click it and choose Drop Down List Box Properties
  3. On the Data tab, under List box choices, choose Get choices from an external data source and click the Add… button to the right of Data source.
  4. In the Data Connection Wizard, Select Create a new connection to: and Receive data then click Next >.
  5. Choose XML Document then Next >.
  6. Click Resource Files…
  7. In the Resource Files dialogue, click the Add… button and choose the CountryLookup.xml file you downloaded above. Click Open, then OK.
  8. Back in the wizard, click Next >, enter a name for the data connection e.g CountryLookup and click Finish
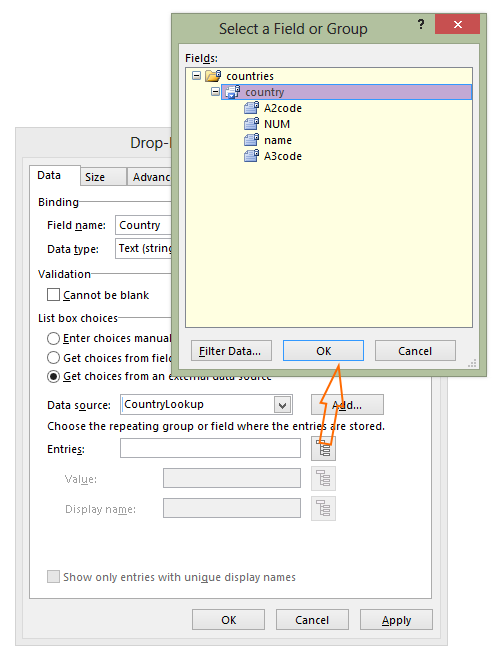
  9. Back in the Drop Down List Box Properties dialogue we need to specify the name of the repeating entries in the xml file so click the button to the right of Entries and select the repeating group – in this case ‘country’:
    CountryLookup
  10. Click OK, then use the similar buttons to choose which fields you wish to use for the Value (what is saved when users choose this country) and Display Name (what they see in the box) – in this case, ‘name’. Click OK and test.

Prevent Win 8/Win 8.1 connecting to an open/public network

You’ll find a lot out there about how you can make one or more networks, that you want to connect to, have higher priority than others. You do this by clicking the Connect automatically tick (check) box when connecting to your preferred networks, and un-ticking (unchecking) it for those that you don’t want to connect to. However, that won’t actually stop your computer from connecting to an unwanted network if it’s an open/public network and your preferred network isn’t available. To make sure it never connects to that unwanted network, you can use the magic of netsh:

netsh wlan add filter permission=block ssid=UnWantedNetwork networktype=infrastructure

You can either run this from a command prompt (don’t forget to replace UnWantedNetwork with your own unwanted network name) opened with administrator permissions: press the Start button, type

cmd

, right-click the Command Prompt item found by Search and choose Run as administrator); or, if you want to add to multiple machines, pop in in a batch file (create a file in Notepad, paste in the netsh command above, and save with a .bat extension), copy that batch file onto a USB stick then pop in the stick, right-click the batch file and choose Run as administrator.

In Win 8.1 it will no longer even appear in the list of available networks – result.

Kiosk Win 8.1 with touchscreen swipe gestures and fast user switching disabled

After a lot of searching and trial and error, here’s a quick guide to setting up a user account to run a webpage in as near-kiosk as it’s possible to be in Win 8.1 if the built in managed access method isn’t suitable for you: either because you’re running 8.1 Standard (managed access isn’t included) or because you need other applications to be able to launch from your webpage (managed access doesn’t permit this).

I’ve implemented it as two .bat files:

KioskAdministrator.bat is run once by an administrator to make some necessary changes (although this could just as easily be typed in at a command prompt running as Administrator):

REM KioskAdministrator.bat
REM Prevent autorestart of explorer
reg add "HKEY_LOCAL_MACHINE\SOFTWARE\Microsoft\Windows NT\CurrentVersion\Winlogon" /v "AutoRestartShell" /t REG_DWORD /d 0 /f
REM Prevent fast user switching
reg add "HKEY_LOCAL_MACHINE\SOFTWARE\Microsoft\Windows\CurrentVersion\Policies\System" /v "HideFastUserSwitching" /t REG_DWORD /d 1 /f

KioskUser.bat is run at whenever the kiosked user logs on:

REM KioskUser.bat
REM Kill explorer
taskkill /f /im explorer.exe
REM Start Chrome
C:\Progra~1\Google\Chrome\Application\chrome.exe --incognito --kiosk http://www.mysebsite.com

To run through what these are doing:

KioskAdministrator.bat

Touchscreen gestures (swiping from left to switch between apps, swipe from right to access start, settings, etc.) are part of explorer.exe and, while you can stop the trackpad equivalents while explorer is still running, the only way to stop the touchscreen gestures, without turning off the touchscreen altogether, appears to be by stopping explorer.exe. AutoRestartShell is a key which determines whether Windows will automatically try to restart explorer.exe if it shuts down unexpectedly – we have to set this to 0 to allow our kiosked user to turn it off in KioskUser.bat. Setting HideFastUserSwitching to 1 means that users can only switch between users by logging off – we only need this because we are running online exams. Note this this changes these settings for all users on the machine.

KioskUser.bat

The first thing this does in kill explorer.exe to prevent access to those touchscreen gestures. It then launches chrome (or any other application you want to launch). –incognito puts Chrome into incognito mode, which prevents it displaying the option to restore a previous session if it closed unexpectedly and –kiosk starts it in full screen mode.

In order to get KioskUser.bat to run at logon, use Scheduled Tasks as described (for Win 7 but it’s very similar) here. Note the gotcha if you want this to happen when on battery as well as when plugged in, that under the Conditions tab in task properties, there is a Start the task only if the computer is on AC power checkbox which is ticked by default.

Note that this is a quick and easy solution – there may well be a way to do this with group or local policies that might suit your situation better.

There doesn’t seem to be any way to disable Ctrl-Alt-Del and access to the Task Manager from where you can re-enabled explorer by choosing Run new task from the File menu – I’d be interested in any ideas…


Sources of reusable images for medical sciences education

[Updated 31/08/21] We are frequently asked where to find medical sciences  images than can be reused in lectures, exams and on web pages and will attempt to maintain a list here of potential sources. Do always check though, before you publish an images that you have met all the criteria (attribution, whether you are allowed to modify, etc.) for publication:

General Web

  1. CC Search (Free) is one of the best places to start as it will take you straight through to some of the main search engines/repositories for images which are reusable under the various Creative Commons licences. Enter your search query and press the button for the Google Images, Flickr, etc. Unfortunately you can search only one at a time and it doesn’t necessarily cover the sites below.
  2. Wellcome Images (Free) – Creative Commons-licensed images related to current and historical medical science.
  3. MedPix (Free) – largely case-based medical imaging with quizzes – thanks @radcliffescilib
  4. Pixabay (Free) and Pexels (Free)– images, vector graphics and illustration
  5. CDC Public Health Image Library (Free) – for photos, illustrations and video related to public health (thank you to Abdulmohsen Alzalabani on Linked In)
  6. Rheumatology Image Library (Free only for live educational use – paid for any other reproduction) Over 1,700 rheumatology diseases and conditions (thank you to Anne Marie Cunningham on LinkedIn)
  7. The Health Education Assets Library (Free) is a collection of over 22,000 freely available digital materials for health sciences education (thank you to Christof Daetwyler on Linked In)

Do check the terms of use – unless clearly stated otherwise, most sites require you to acknowledge the image source – see: Copyright for instruction (ox.ac.uk) for more information.

Journals

For those at Oxford, who are thinking of using images in materials which will only be accessible to Oxford students (through, e.g our VLE WebLearn/Sakai), it is also possible to use images from many of the journals to which the Bodleian Libraries subscribe, as described in the Bodleian’s Quick guide to copyright and licensing for e-journals.

For those both within and outside Oxford:

  1. Proceedings of the National Academy of Sciences of the United States of America (Free) Spans biological, physical, and social sciences – “Anyone may, without requesting permission, use original figures or tables published in PNAS for noncommercial and educational use (i.e., in a review article, in a book that is not for sale) provided that the original source and the applicable copyright notice are cited.”
  2. New England Journal of Medicine (Free)

We’ll add others as we discover/remember them but do let us know if you can recommend any others…

Please note: I have deliberately not included sources that primarily contain images for the arts

Adventures with the the Asus T100T Transformer Book for mobile eLearning – the background

An enabling environment

In response to the explosion in the use of mobile devices in recent years, wireless access to the Oxford University network is now more common than not across departments, colleges and the teaching hospitals. Students expect to be able to access learning materials wherever they are. Academic staff, exploring more interactive ways of teaching, expect students to be able to use mobile technology in ‘flipped’ classrooms.

Across higher education more widely, some courses have embraced mobile technology wholeheartedly – they have begun providing mobile devices for students or requiring students to bring a mobile device which meets certain specifications. While there has undoubtedly been a feeling for some time in our group that ‘we ought to be doing more with mobile technology’, it is only relatively recently that we have identified some specific and pressing needs for mobile devices that allowed us to make a case for the necessary investment of time and money.

The need for mobile devices

1. Objective Structured Clinical Examinations

These are a crucial part of the examination of clinical medical students and involve students moving around ‘stations’ at which they are marked on various aspects of their performance. Currently marks are recorded on paper mark sheets. Barcodes on the sheets enable scores to be read fairly quickly using a barcode scanner but the process is still fairly involved and any text comments have to be transcribed.

Mobile devices, using one of the many OSCE marking systems (such as the Open Source OSCE Manager), could potentially improve the speed and accuracy of this process, although moving from handwritten comments to writing with a keyboard would need to be made as simple as possible. The recording potential of mobile devices might also allow audio feedback or provide an auditable record of the examination in case of disputes.

2. Online assessment

We deliver in excess of 160 online assessments annually, using Questionmark Perception, of which 55 are formal, summative exams.

2.1 Multiple sittings

Of these 160+, 11 summative assessments and 5 formative assessments (which are sat under exam conditions) involve all 150-165 medical students in a given year. In order to accommodate these in the the largest computer-equipped venue in the Medical Sciences Division (MSD), with just under 90 computers, we have to examine the students in two sittings. Quarantining the first sitting until the second sitting has started, holding the second sitting until the first has finished, moving students around the building and resetting computers between sittings needs extra staff as well as rooms. Two sittings also means that many staff (administrators, IT support, invigilators and examiners) are required for at least twice as long as for a single sitting.

We have used another, relatively close, IT suite for several years now, when the larger venue is not available. This provides 50 extra machines but, even when added to those in the larger venue, this is still inadequate for a whole year of medical students. However, 30 mobile devices would enable the whole cohort to sit an assessment at the same time.

2.2 Smaller groups and resits

The bulk of formal online assessment within the Division – 29 formal assessments per annum, plus 16 resit examinations, is actually with groups of 30 students or fewer. There are often clashes with teaching or other uses of computer-equipped rooms and students based at the teaching hospitals often have to travel to different sites, sometimes a mile or two away away.

With 30 mobile devices, we could examine these students anywhere with a wireless connection to the Oxford network and that provides sufficient spacing between students. This would reduce staff and student travel time and the convenience might encourage more courses to take advantage of the benefits of online assessment: objective marking; speed of ‘marking’; ease of access to performance data which can be used to improve questions; and the ability to easily provide formative assessments for students to test themselves.

3. Polling/Audience Response

Although not currently very widely used within MSD, technology-enabled audience response is used regularly by a number of academic staff. Some use ‘clickers’ (voting pads handed out to each student) in lectures but these are a relatively expensive item which can only be used for a single purpose. Others have attempted to use the University’s VLE in IT suites, but, again, availability of devices is an issue and to cope with e.g 75 students in a 45 PC suite, academic staff have asked those with smartphones to connect to the wireless network and answer questions through the VLE’s mobile interface. Despite technical support, the success of the phone users was disappointing. Another academic runs a practical class where students rotate around various practical tasks, answering questions, through the Sakai Poll tool, according to which task they are doing. At the end of the practical, she collates the results from each task, and deals with any problems with the group as a whole. She has also attempted to get students to use their own smartphones with limited success.

By far the biggest hurdle for those students who have their smartphones with them (and surprisingly, many do not) was connection to the wireless network. This requires a remote access password which many students apparently do not have/know and which absorbs valuable contact time to resolve.

Mobile devices which are automatically connected to the wireless network, could be handed out (for the period of the lecture or practical class) to students without smartphones or with connection problems, enabling all of them to take part in the audience response.

4. Virtual microscopy in histology classes

MSDLT has developed a virtual microscopy site, CSlide, which allows microscope slides to be viewed on the web. They are ‘zoomable’ and important features can be labelled. They can also be embedded in other online learning materials.

The pre-clinical histology teaching slide collections have already been scanned in and are included in various online learning materials for various courses. They have also been used by lecturers in histology practical classes to demonstrate to students what to look for down their own laboratory microscopes – screens above each bench show CSlide as it is used on the lecturer’s computer screen.

One or two mobile devices on each bench would allow lecturers/demonstrators to show small groups of students points of interest on virtual microscope slides, rather than having to share a real microscope or involve the whole class. They could also be used by students to access learning materials to relate the structures they are seeing on their microscopes to their wider medical context.

The project begins.

We successfully applied for funding from the MSD Teaching Excellence Project Awards. Read on for how have got on so far…

CSS pseudo element for caret in WordPress Advanced Sidebar Menu

I have been using the fantastic Advanced Sidebar Menu for WordPress – a plugin which gives you configurable widgets which automatically generate a sidebar menu. However, out of the box, the free version lacks (CSS) style – most importantly, some way to indicate whether a menu item is selected and/or has sub-items.

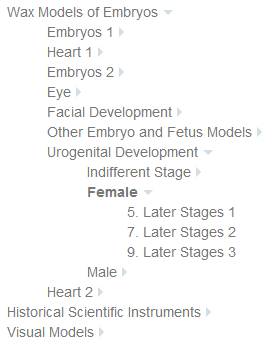
Luckily it provides plentiful classes to attach your styles to – in particular, all you need to tell whether an item is open or not. Combine this with the elegantly simple CSS only technique to generate a caret and you can easily create a simple menu like this (working example on History of Medical Sciences website)

AdvancedSideBarMenu

Basic styling

Three styles give me the simple look I wanted:

ul.child-sidebar-menu{
 padding-left:0; /*stop browser indenting too far*/
 }
ul.child-sidebar-menu li{
 list-style:none; /*get rid of bullets*/
 }
ul.child-sidebar-menu li>a{
 color:#777; /*make text a laid-back grey*/
 }

Active menu item

To indicate the currently active item, the developers have given us the

current_page_item

class which is used like this:

ul.child-sidebar-menu li.current_page_item>a{
 font-weight: 700; /*bold for <a> children of the active list item*/
 }

Has item got children

The developers attach a

has_children

class to items with children. We can pick this up and use the magic of CSS pseudo classes to add a right-pointing caret after every link that has children.

li.has_children>a::after{
	width: 0px; 
	height: 0px; 
	border-top: 5px solid transparent;
	border-bottom: 5px solid transparent;
	border-left: 5px solid #d1dee4;
	content:"";
	position: absolute; /*to prevent it picking up the height of the <a> that is before it*/
	margin-left: 5px; /*now it's absolutely positioned, we need to add suitable margins (not padding which would change its shape)
	margin-top: 5px;
}

However, in big menus, it’s nice to see when an item is open. Again, the developers have given us a class to achieve this:

current_page_ancestor

.

li.current_page_ancestor>a::after{
	border-right: 5px solid transparent;
	border-left: 5px solid transparent;
	border-top: 5px solid #d1dee4;
	margin-top: 8px; /*adjust margin to make caret look as if it has rotated*/
}

But this will only show a down caret on the parent if one of the children is selected. To show it as soon as you can see its children (ie when the parent is selected), we need to add an additional selector as follows:

li.current_page_ancestor>a::after, li.has_children.current_page_item>a::after{
	border-right: 5px solid transparent;
	border-left: 5px solid transparent;
	border-top: 5px solid #d1dee4;
	margin-top: 8px;
}