A dashboard view of Modules in Canvas

Updated version: A dashboard view of Modules in Canvas v2

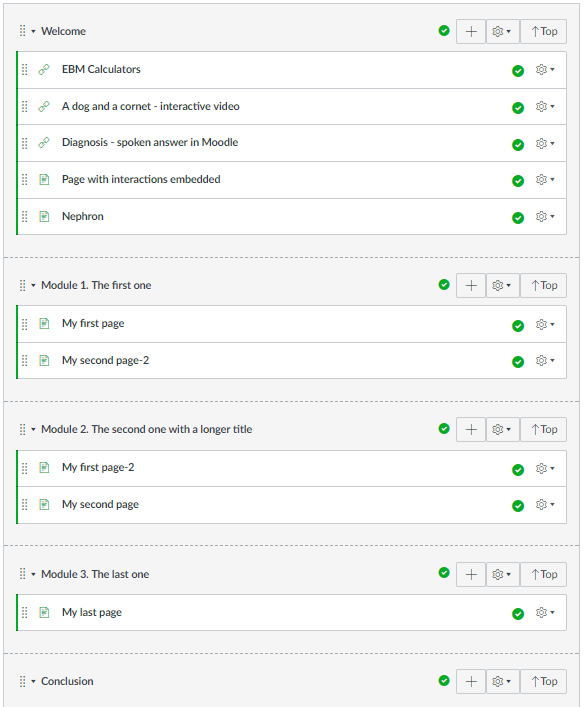
Canvas’s Modules page is a great way to show students both what is available to them and their progress through those materials. However, I’m concerned that:

  • it may be overwhelming to see everything in your course on a single page
  • it present a very linear view of a course – this may be appropriate in some circumstances but is certainly not appropriate in many HE courses.

The typical solution to this appears to be to create a course home Page where you can wrap/organise your content as you see fit. Two great guides to this are:

However, this approach has two disadvantages:

  • I’ve already spent time and energy organising, titling and indenting my content – why should I have to create a page of links pointing to that content?
  • The Modules page gives you great feedback on progress through your course – which content you have ‘completed’, what’s next, etc. A links-based home page is going to hide all this from you.

So, what we need is some way of making the Modules page more navigable. There are plenty of requests for this on Canvas’s Community pages and it would indeed be more sensible for Instructure to tackle this themeselves. However, if you’d like something that will work in the shorter term and are happy to add your own js/css, you might find the approach below interesting.

Autogenerating a Modules ‘Dashboard’

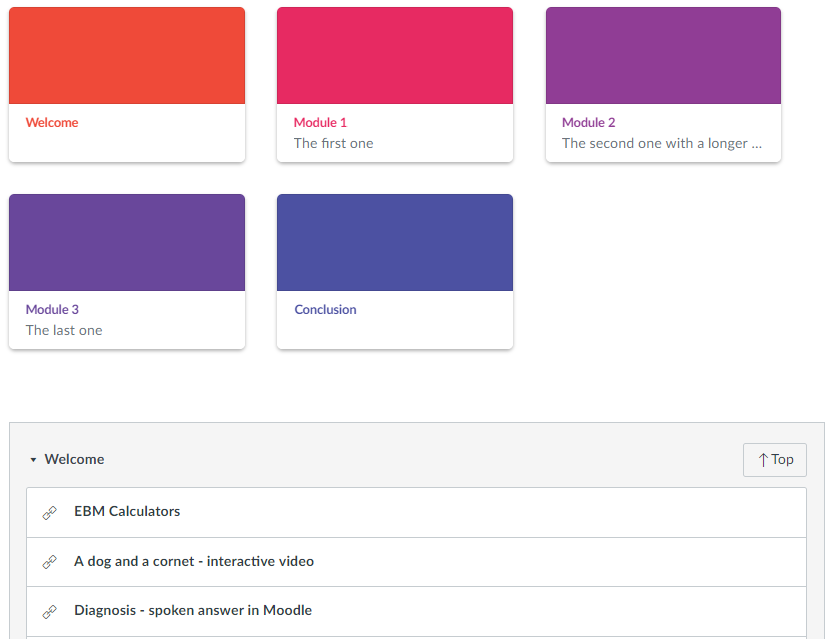
With some fairly simple JQuery, a custom stylesheet and a module naming convention it’s relatively simple to autogenerate a ‘dashboard’ of Canvas-style cards which gives students an overview of, and an easy way to navigate to your modules. ‘Top’ buttons on every Module give a quick way back to the dashboard no matter how many modules your site contains.

The JS:

Note that this assumed that Modules are named:

Module x. My module description

The code splits the Module name, based on the characters specified by the ‘delimiter’. So, in this case, my title will be ‘Module x’ and the sub-title will be ‘My module description’. You will need to chnage this caharacter if you want to split on say ‘:’.

and the CSS:

You’ll see that this css is very largely the same as the Canvas Dashboard styles but I have renamed them ‘ou-‘ so that we can make sure they are available on the Modules page and so that we can alter them as necessary.

Hope that’s useful to someone. It’s a work in progress e.g thinking about pulling in Module progress indicator(s), number of items in module, etc. Do get in touch is you spot any problems.

Javascript: array.indexOf() fix for IE8 and below

Just a quick note on how to deal with another one of the IE/Javascript deficiencies that make our lives so much easier(!) – IE from versions 8 backwards doesn’t support the indexOf() function for arrays, e.g.

var myArray = ['Apple','Banana','Orange'];
alert(myArray.indexOf('Orange'));  //alerts '2', but not in IE <=8

Thankfully, there are easy ways to fix this:

  1. the JQuery $.inArray() function, e.g.
    alert($.inArray('Orange',myArray);
  2. Defining the indexOf function (before you call it!) if it doesn’t exist – taken from MDN
    if (!Array.prototype.indexOf) {
      Array.prototype.indexOf = function (searchElement /*, fromIndex */ ) {
        'use strict';
        if (this == null) {
          throw new TypeError();
        }
        var n, k, t = Object(this),
            len = t.length >>> 0;
    
        if (len === 0) {
          return -1;
        }
        n = 0;
        if (arguments.length > 1) {
          n = Number(arguments[1]);
          if (n != n) { // shortcut for verifying if it's NaN
            n = 0;
          } else if (n != 0 && n != Infinity && n != -Infinity) {
            n = (n > 0 || -1) * Math.floor(Math.abs(n));
          }
        }
        if (n >= len) {
          return -1;
        }
        for (k = n >= 0 ? n : Math.max(len - Math.abs(n), 0); k < len; k++) {
          if (k in t && t[k] === searchElement) {
            return k;
          }
        }
        return -1;
      };
    }

How to stop JQuery accordion scrolling to bottom of page

I struggled with this for a while until I found this great StackOverflow thread: http://stackoverflow.com/questions/3621161/jquery-accordion-will-it-scroll-to-the-top-of-the-open-item

What worked for me:

$("#accordion").accordion({autoHeight: false,active: 0});
$(".ui-accordion").bind("accordionchange", function(event, ui) {
     if ($(ui.newHeader).offset() != null) {
          ui.newHeader, // $ object, activated header
          $("html, body").animate({scrollTop: ($(ui.newHeader).offset().top)-100}, 500);
     }
});

There’s a lot of animation going on but it does exactly what is says on the tin.

jsTree: different contextmenu actions for different nodes

jsTree is a great jQuery plugin for easily creating expandable trees, e.g. from a list of items. We use it in our personalised portal page for Weblearn – see Personalising WebLearn (Sakai) – to display document trees.

We have been working on increasingly the functionality of this portal page to allow students to easily upload files. To do this, we are making use of the ‘contextmenu’ functionality of jsTree, which allows you to specify a menu of actions that can be accessed by right clicking on a tree node.

One thing that wasn’t immediately obvious from the jsTree docs was how to show different actions depending on the type of node, e.g. file or folder, on which the user clicked. However, it turns out that this can be done quite easily, by passing the ‘items’ parameter of the contextmenu configuration a function (that returns an object), rather than an object, as follows:

$('#tree_container').jstree({ 
    "plugins" : [ "contextmenu" ],
    "contextmenu" : {
        "items" : customMenu
    }
});

You then need to set up the customMenu function to return an items object, for example:

function customMenu(node) {
   //Show a different label for renaming files and folders
   if ($(node).hasClass("jstree-closed") || $(node).hasClass("jstree-open")) { //If node is a folder
      var renameLabel = "Rename Folder";
   }
   else {
      var renameLabel = "Rename File";
   }
   var items = {
      "upload" : {
          "label" : "Upload File",
          "action" : function () { ... }
      },
      "rename" : {
         "label" : renameLabel,   //Different label (defined above) will be shown depending on node type
         "action" : function () { ... }
      },
      "delete" : {
         "label" : "Delete File",
         "action" : function () { ... }
      }
   };

   //If node is a folder do not show the "delete" menu item
   if ($(node).hasClass("jstree-closed") || $(node).hasClass("jstree-open")) {
      delete items.remove;
   }

   return items;
}

Copying Arrays (and Objects) in Javascript

This is a bit of an amateur mistake, but I definitely wasn’t the first person to make it and I suspect I won’t be the last. I had a JavaScript array that I wanted to copy, then make some change to the copy, so that I could access the original and the modified copy. Therefore, being used to PHP, I did the following, assuming it would make a ‘proper’ copy of the original:

var original = [1,2,3];  //Define original array
var copy = original;     //Attempt to copy original
copy[2] = 4;             //Modify the copy
alert(original[2]);      //Hoped for 3, got 4

I’d created a reference to the original array, rather than a copy of it. As a result, updating the copy also updated the original.

So, how do I create a copy of an array, rather than a reference. Thankfully, the slice method makes this very easy:

var original = [1,2,3];        //Define original array
var copy = original.slice(0);  //Copy original using slice
copy[2] = 4;                   //Modify the copy
alert(original[2]);            //Got 3 this time

This works fine for simple, one-dimensional arrays, where the array contains only booleans, numbers or strings. If the array is multi-dimensional, i.e. it contains other arrays or objects, then only the top level array will be copied, the arrays/objects it contains will be referenced. Therefore, it is necessary to create a function to do this – this seems to be a good way to do: http://my.opera.com/GreyWyvern/blog/show.dml/1725165

Alternatively, use jQuery, and take advantage of the extend method:

var original = {team:"Arsenal"};               //Define original object
var copy = jQuery.extend(true, {}, original);  //Copy original using extend
copy.team = "Man Utd" ;                        //Modify the copy
alert(original.team);                          //Alerts Arsenal

Preventing IE from caching Ajax requests

We are increasingly using AJAX (Asynchronous JavaScript and XML) to deliver content on our pages, but often have problems due to Internet Explorer, every web developers favourite browser, caching AJAX requests. This means that the results presented are not updated when a new request is made to the same URL, even if the data has changed.

This is annoying, but does not go against the HTTP specification, which states that GET requests are cacheable, whereas POST results are not. AJAX requests seem to generally default to GET (JQuery certainly does), so IE caches them.

Therefore, the solution is to make sure that AJAX requests use POST rather than GET. In jQuery, you can do this by setting:

type: 'POST'

For Prototype, you can set:

method: 'get'

In the jQuery.ajax() method, there is also a ‘cache’ setting, which is true by default, but can be set to false, which prevents caching. It does this by appending a TIMESTAMP to the URL, so that each request is made to a different URL, so a cached result cannot be returned. If not using jQuery, an alternative to ensuring that your request is a POST request rather a GET request is to add a ‘cache-busting’ parameter, e.g. a timestamp, to the end of the request URL, e.g.:

var cacheBuster = new Date().getTime();  //Get timestamp
var url  = 'http://www.example.com/getdata?cb=' + cacheBuster;  //Add timestamp to URL